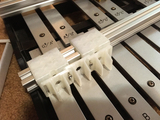
Adding the Solenoid Mounts
The 20x20 aluminum extrusions will sit towards the back of each set of notes so that the solenoids will strike towards the middle of the keys for the best possible tone. Slide the assembled solenoid mounts onto the rails.
The two 3D printed feet allow for the extrusions to sit at the correct angle across the keys and at the right height as well.
To assemble, take two slim T-Nuts and two M4 screws. Screw them loosely together through the top holes on both legs.
After the solenoid mounts are on the aluminum extrusions, you can slide the legs on either side of the extrusions and tighten the M4 screws so that they're secured using the T-Nuts.
In the center of the 2nd, 3rd, 4th and 5th triple solenoid mounts, place the slim T-Nuts from proto board mounts. Turn them so that they're locked in.


