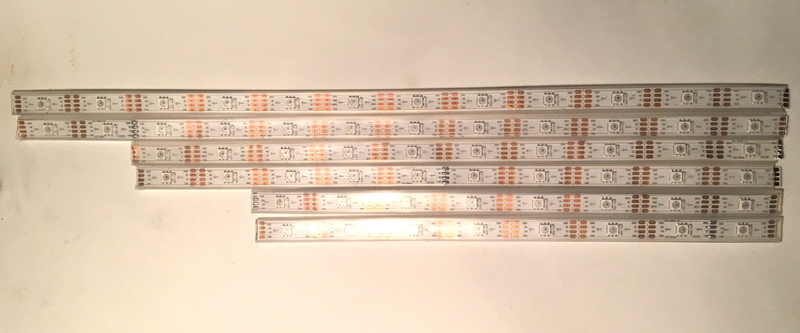
Prepare LED Strips
Cut 6 strands of dotstars -- 3 for each side. My strips have 8, 10, and 12 pixels respectively since I like a "layered" look on the finished wig. Cut carefully between the copper pads and leave the silicone sleeve intact.

Clock & Data Out
Start by finding the "out" ends of all the strands and line them up so they're all correctly faced. Solder a long (15-20") clock and data wire onto the pins at this end of 5 of the strips (you don't need clock-out or data-out on the last strip).

Slide the strips out of their silicone housing, then slide them back in, with the wires trailing along the back of the strip. The idea here is to get the wires to feed neatly back through the silicone strip so they won't ever get tugged or bumped.

Clock & Data In
Once you've got the sleeves back on, expose the "in" end of the strip.
On strip #1, solder a long clock wire and data wire to the "in" pads. These will later connect to the Feather.
Turn this strip over and find the wires poking out the back of its silicone sleeve. Trim to a good length and then solder these "out" wires from strip #1 to the "in" pads on strip #2.
Find strip #2's "out" wires and solder those to the "in" pads on strip #3. You now have a daisy chain of 3 LED strips all connected to each other.
Repeat this sequence with the other 3 strips. Note: Do not daisy-chain all 6 strips together at this point! That will make it impossible to thread the wires into the wig for attachment. We'll connect the clock and data lines from strip #3 to strip #4 together later.
For now, take a sharpie and mark the "out" clock and data wires on strip #3 and the "in" wires on strip #4, so you'll know which is which later on.
Power & Ground Wires
Cut 6 short (3") red and black wires and solder onto the + and - pads of each strip.

Cut a 6" power wire and twist it together with the power wire from strip #1. Then, twist together the power wires from strips #2 and #3. Splice all these wires together and cover with heat shrink. You should end up with one red wire that splits 3 ways and connects to each strip.
Repeat with the ground wires, and do the same for strips #4, 5 and 6.
At this point you'll want to test all your connections and make sure everything is solid and all the strips work. Hook each set of 3 strips up to a gemma or flora running the Dotstar Strandtest code and be really sure everything works perfectly. In the next step we'll be coating these connections in glue and heat shrink and they'll be very hard to fix! So be sure everything works before proceeding.


![Debug Header for the Feather [M0]](https://cdn-learn.adafruit.com/guides/cropped_images/000/001/563/medium640/m0-debug-1.JPG?1520544696)


