Wondering how to create a custom API from any website to display your most wanted data?

Dashblock is a new application that allows you to create an API from just about any website easily.

In this guide we walk through a demo on extracting the total Adafruit Learning System guide count with Dashblock then show how to display it on the Adafruit PyPortal.

What's an API anyway?

Also known as "application programming interfaces" APIs allow us to access all kinds of data from the internet. For this guide we want to access the number of Adafruit guides on learn.adafruit.com. Some websites have readily available APIs for giving people easy access to data they may need, but this is not always the case. Using Dashblock however changes things. Read on to see how you can use Dashblock to access all kinds of data on the web!

Parts:

You can pick up an Adafruit PyPortal and a USB cable (if needed). If you like, you can mount the PyPortal in the Adafruit laser-cut acrylic stand. All these parts are bundled in AdaBox 011 if you'd like to buy them together. 

Instead of AdaBox 011, you can buy parts separately:

USB cable - USB A to Micro-B - 3 foot long
This here is your standard A to micro-B USB cable, for USB 1.1 or 2.0. Perfect for connecting a PC to your Metro, Feather, Raspberry Pi or other dev-board or...
Out of Stock
Front view of a Adafruit PyPortal - CircuitPython Powered Internet Display with a pyportal logo image on the display.
PyPortal, our easy-to-use IoT device that allows you to create all the things for the “Internet of Things” in minutes. Make custom touch screen interface...
$54.95
In Stock

Optional

Assembled PyPortal in acrylic enclosure
PyPortal is our easy-to-use IoT device that allows you to create all the things for the “Internet of Things” in minutes. Create little pocket...
$9.95
In Stock

What info and where?

First things first, head over to the front page of the Adafruit Learning System at learn.adafruit.com

Scroll to the bottom to find the total guide count.

This is the information that we will extract using Dashblock, make an API for and eventually display on the PyPortal.

Download Dashblock

Next let's download the Dashblock application.

Head over to Dashblock.com and download the software either for Windows or Mac (sorry, there appears to be no Linux version yet).

Once you have the software downloaded, open it up and make an account.

Creating the API

  • Now copy and paste the url: learn.adafruit.com in the search bar of the app.
  • Next you will be taken to the learning system site within the app. Scroll down to the bottom to find the learn guide count, once again.
  • Once there, right click on the text that says "xxxx tutorials and counting"
  • You will be prompted to make a label name for the data. Create a name for the data and hit return to save the name.
  • Next hit the save button in the top right corner of the app.
  • You will see the app loading then it will display the data we just requested in JSON format. Hurrah, the API has been created!

Double check

Lastly to confirm this API is functioning properly, click the button in the top right that says "show code sample".

You will see a line of text that starts with "curl" and then a link.

The link after the curl is what we want so copy the entire link and paste it in a browser of your choice.

  • After some loading, you should see that same JSON data but in your browser, yay!

Now that we have the API set up, it's time to prepare and code the PyPortal to display it.

CircuitPython is a derivative of MicroPython designed to simplify experimentation and education on low-cost microcontrollers. It makes it easier than ever to get prototyping by requiring no upfront desktop software downloads. Simply copy and edit files on the CIRCUITPY "flash" drive to iterate.

The following instructions will show you how to install CircuitPython. If you've already installed CircuitPython but are looking to update it or reinstall it, the same steps work for that as well!

Set up CircuitPython Quick Start!

Follow this quick step-by-step for super-fast Python power :)

Click the link above to download the latest version of CircuitPython for the PyPortal.

Download and save it to your desktop (or wherever is handy).

Plug your PyPortal into your computer using a known-good USB cable.

A lot of people end up using charge-only USB cables and it is very frustrating! So make sure you have a USB cable you know is good for data sync.

Double-click the Reset button on the top in the middle (magenta arrow) on your board, and you will see the NeoPixel RGB LED (green arrow) turn green. If it turns red, check the USB cable, try another USB port, etc. Note: The little red LED next to the USB connector will pulse red. That's ok!

If double-clicking doesn't work the first time, try again. Sometimes it can take a few tries to get the rhythm right!

You will see a new disk drive appear called PORTALBOOT.

Drag the adafruit-circuitpython-pyportal-<whatever>.uf2 file to PORTALBOOT.

The LED will flash. Then, the PORTALBOOT drive will disappear and a new disk drive called CIRCUITPY will appear.

If you haven't added any code to your board, the only file that will be present is boot_out.txt. This is absolutely normal! It's time for you to add your code.py and get started!

That's it, you're done! :)

PyPortal Default Files

Click below to download a zip of the files that shipped on the PyPortal or PyPortal Pynt.

To use all the amazing features of your PyPortal with CircuitPython, you must first install a number of libraries. This page covers that process.

Adafruit CircuitPython Bundle

Download the Adafruit CircuitPython Library Bundle. You can find the latest release here:

Download the adafruit-circuitpython-bundle-*.x-mpy-*.zip bundle zip file where *.x MATCHES THE VERSION OF CIRCUITPYTHON YOU INSTALLED, and unzip a folder of the same name. Inside you'll find a lib folder. You have two options:

  • You can add the lib folder to your CIRCUITPY drive. This will ensure you have all the drivers. But it will take a bunch of space on the 8 MB disk
  • Add each library as you need it, this will reduce the space usage but you'll need to put in a little more effort.

At a minimum we recommend the following libraries, in fact we more than recommend. They're basically required. So grab them and install them into CIRCUITPY/lib now!

  • adafruit_esp32spi - This is the library that gives you internet access via the ESP32 using (you guessed it!) SPI transport. You need this for anything Internet
  • adafruit_requests - This library allows us to perform HTTP requests and get responses back from servers. GET/POST/PUT/PATCH - they're all in here!
  • adafruit_connection_manager - used by adafruit_requests.
  • adafruit_pyportal - This is our friendly wrapper library that does a lot of our projects, displays graphics and text, fetches data from the internet. Nearly all of our projects depend on it!
  • adafruit_portalbase - This library is the base library that adafruit_pyportal library is built on top of.
  • adafruit_touchscreen - a library for reading touches from the resistive touchscreen. Handles all the analog noodling, rotation and calibration for you.
  • adafruit_io - this library helps connect the PyPortal to our free datalogging and viewing service
  • adafruit_imageload - an image display helper, required for any graphics!
  • adafruit_display_text - not surprisingly, it displays text on the screen
  • adafruit_bitmap_font - we have fancy font support, and its easy to make new fonts. This library reads and parses font files.
  • adafruit_slideshow - for making image slideshows - handy for quick display of graphics and sound
  • neopixel - for controlling the onboard neopixel
  • adafruit_adt7410 - library to read the temperature from the on-board Analog Devices ADT7410 precision temperature sensor (not necessary for Titano or Pynt)
  • adafruit_bus_device - low level support for I2C/SPI
  • adafruit_fakerequests - This library allows you to create fake HTTP requests by using local files.

CircuitPython works with WiFi-capable boards to enable you to make projects that have network connectivity. This means working with various passwords and API keys. As of CircuitPython 8, there is support for a settings.toml file. This is a file that is stored on your CIRCUITPY drive, that contains all of your secret network information, such as your SSID, SSID password and any API keys for IoT services. It is designed to separate your sensitive information from your code.py file so you are able to share your code without sharing your credentials.

CircuitPython previously used a secrets.py file for this purpose. The settings.toml file is quite similar.

Your settings.toml file should be stored in the main directory of your CIRCUITPY drive. It should not be in a folder.

CircuitPython settings.toml File

This section will provide a couple of examples of what your settings.toml file should look like, specifically for CircuitPython WiFi projects in general.

The most minimal settings.toml file must contain your WiFi SSID and password, as that is the minimum required to connect to WiFi. Copy this example, paste it into your settings.toml, and update:

  • your_wifi_ssid
  • your_wifi_password
CIRCUITPY_WIFI_SSID = "your_wifi_ssid"
CIRCUITPY_WIFI_PASSWORD = "your_wifi_password"

Many CircuitPython network-connected projects on the Adafruit Learn System involve using Adafruit IO. For these projects, you must also include your Adafruit IO username and key. Copy the following example, paste it into your settings.toml file, and update:

  • your_wifi_ssid
  • your_wifi_password
  • your_aio_username
  • your_aio_key
CIRCUITPY_WIFI_SSID = "your_wifi_ssid"
CIRCUITPY_WIFI_PASSWORD = "your_wifi_password"
ADAFRUIT_AIO_USERNAME = "your_aio_username"
ADAFRUIT_AIO_KEY = "your_aio_key"

Some projects use different variable names for the entries in the settings.toml file. For example, a project might use ADAFRUIT_AIO_ID in the place of ADAFRUIT_AIO_USERNAME. If you run into connectivity issues, one of the first things to check is that the names in the settings.toml file match the names in the code.

Not every project uses the same variable name for each entry in the settings.toml file! Always verify it matches the code.

settings.toml File Tips

Here is an example settings.toml file.

# Comments are supported
CIRCUITPY_WIFI_SSID = "guest wifi"
CIRCUITPY_WIFI_PASSWORD = "guessable"
CIRCUITPY_WEB_API_PORT = 80
CIRCUITPY_WEB_API_PASSWORD = "passw0rd"
test_variable = "this is a test"
thumbs_up = "\U0001f44d"

In a settings.toml file, it's important to keep these factors in mind:

  • Strings are wrapped in double quotes; ex: "your-string-here"
  • Integers are not quoted and may be written in decimal with optional sign (+1, -1, 1000) or hexadecimal (0xabcd).
    • Floats, octal (0o567) and binary (0b11011) are not supported.
  • Use \u escapes for weird characters, \x and \ooo escapes are not available in .toml files
    • Example: \U0001f44d for 👍 (thumbs up emoji) and \u20ac for € (EUR sign)
  • Unicode emoji, and non-ASCII characters, stand for themselves as long as you're careful to save in "UTF-8 without BOM" format


When your settings.toml file is ready, you can save it in your text editor with the .toml extension.

Accessing Your settings.toml Information in code.py

In your code.py file, you'll need to import the os library to access the settings.toml file. Your settings are accessed with the os.getenv() function. You'll pass your settings entry to the function to import it into the code.py file.

import os

print(os.getenv("test_variable"))

In the upcoming CircuitPython WiFi examples, you'll see how the settings.toml file is used for connecting to your SSID and accessing your API keys.

Connect to WiFi

OK, now that you have your settings.toml file set up - you can connect to the Internet.

To do this, you need to first install a few libraries, into the lib folder on your CIRCUITPY drive. Then you need to update code.py with the example script.

Thankfully, we can do this in one go. In the example below, click the Download Project Bundle button below to download the necessary libraries and the code.py file in a zip file. Extract the contents of the zip file, open the directory examples/ and then click on the directory that matches the version of CircuitPython you're using and copy the contents of that directory to your CIRCUITPY drive.

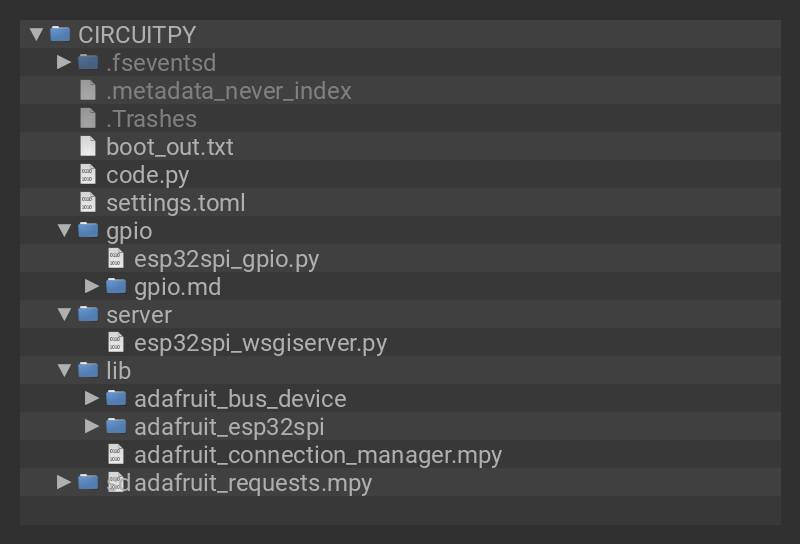
Your CIRCUITPY drive should now look similar to the following image:

CIRCUITPY
# SPDX-FileCopyrightText: 2019 ladyada for Adafruit Industries
# SPDX-License-Identifier: MIT

from os import getenv
import board
import busio
from digitalio import DigitalInOut
import adafruit_connection_manager
import adafruit_requests
from adafruit_esp32spi import adafruit_esp32spi

# Get wifi details and more from a settings.toml file
# tokens used by this Demo: CIRCUITPY_WIFI_SSID, CIRCUITPY_WIFI_PASSWORD
secrets = {
    "ssid": getenv("CIRCUITPY_WIFI_SSID"),
    "password": getenv("CIRCUITPY_WIFI_PASSWORD"),
}
if secrets == {"ssid": None, "password": None}:
    try:
        # Fallback on secrets.py until depreciation is over and option is removed
        from secrets import secrets
    except ImportError:
        print("WiFi secrets are kept in settings.toml, please add them there!")
        raise

print("ESP32 SPI webclient test")

TEXT_URL = "http://wifitest.adafruit.com/testwifi/index.html"
JSON_URL = "http://api.coindesk.com/v1/bpi/currentprice/USD.json"


# If you are using a board with pre-defined ESP32 Pins:
esp32_cs = DigitalInOut(board.ESP_CS)
esp32_ready = DigitalInOut(board.ESP_BUSY)
esp32_reset = DigitalInOut(board.ESP_RESET)

# If you have an AirLift Shield:
# esp32_cs = DigitalInOut(board.D10)
# esp32_ready = DigitalInOut(board.D7)
# esp32_reset = DigitalInOut(board.D5)

# If you have an AirLift Featherwing or ItsyBitsy Airlift:
# esp32_cs = DigitalInOut(board.D13)
# esp32_ready = DigitalInOut(board.D11)
# esp32_reset = DigitalInOut(board.D12)

# If you have an externally connected ESP32:
# NOTE: You may need to change the pins to reflect your wiring
# esp32_cs = DigitalInOut(board.D9)
# esp32_ready = DigitalInOut(board.D10)
# esp32_reset = DigitalInOut(board.D5)

# Secondary (SCK1) SPI used to connect to WiFi board on Arduino Nano Connect RP2040
if "SCK1" in dir(board):
    spi = busio.SPI(board.SCK1, board.MOSI1, board.MISO1)
else:
    spi = busio.SPI(board.SCK, board.MOSI, board.MISO)
esp = adafruit_esp32spi.ESP_SPIcontrol(spi, esp32_cs, esp32_ready, esp32_reset)

pool = adafruit_connection_manager.get_radio_socketpool(esp)
ssl_context = adafruit_connection_manager.get_radio_ssl_context(esp)
requests = adafruit_requests.Session(pool, ssl_context)

if esp.status == adafruit_esp32spi.WL_IDLE_STATUS:
    print("ESP32 found and in idle mode")
print("Firmware vers.", esp.firmware_version.decode("utf-8"))
print("MAC addr:", ":".join("%02X" % byte for byte in esp.MAC_address))

for ap in esp.scan_networks():
    print("\t%-23s RSSI: %d" % (str(ap["ssid"], "utf-8"), ap["rssi"]))

print("Connecting to AP...")
while not esp.is_connected:
    try:
        esp.connect_AP(secrets["ssid"], secrets["password"])
    except OSError as e:
        print("could not connect to AP, retrying: ", e)
        continue
print("Connected to", str(esp.ssid, "utf-8"), "\tRSSI:", esp.rssi)
print("My IP address is", esp.pretty_ip(esp.ip_address))
print(
    "IP lookup adafruit.com: %s" % esp.pretty_ip(esp.get_host_by_name("adafruit.com"))
)
print("Ping google.com: %d ms" % esp.ping("google.com"))

# esp._debug = True
print("Fetching text from", TEXT_URL)
r = requests.get(TEXT_URL)
print("-" * 40)
print(r.text)
print("-" * 40)
r.close()

print()
print("Fetching json from", JSON_URL)
r = requests.get(JSON_URL)
print("-" * 40)
print(r.json())
print("-" * 40)
r.close()

print("Done!")

And save it to your board, with the name code.py.

Don't forget you'll also need to create the settings.toml file as seen above, with your WiFi ssid and password.

In a serial console, you should see something like the following. For more information about connecting with a serial console, view the guide Connecting to the Serial Console.

In order, the example code...

Initializes the ESP32 over SPI using the SPI port and 3 control pins:

esp32_cs = DigitalInOut(board.ESP_CS)
esp32_ready = DigitalInOut(board.ESP_BUSY)
esp32_reset = DigitalInOut(board.ESP_RESET)

spi = busio.SPI(board.SCK, board.MOSI, board.MISO)
esp = adafruit_esp32spi.ESP_SPIcontrol(spi, esp32_cs, esp32_ready, esp32_reset)

Tells our requests library the type of socket we're using (socket type varies by connectivity type - we'll be using the adafruit_esp32spi_socket for this example). We'll also set the interface to an esp object. This is a little bit of a hack, but it lets us use requests like CPython does.

requests.set_socket(socket, esp)

Verifies an ESP32 is found, checks the firmware and MAC address

if esp.status == adafruit_esp32spi.WL_IDLE_STATUS:
    print("ESP32 found and in idle mode")
print("Firmware vers.", esp.firmware_version)
print("MAC addr:", [hex(i) for i in esp.MAC_address])

Performs a scan of all access points it can see and prints out the name and signal strength:

for ap in esp.scan_networks():
    print("\t%s\t\tRSSI: %d" % (str(ap['ssid'], 'utf-8'), ap['rssi']))

Connects to the AP we've defined here, then prints out the local IP address, attempts to do a domain name lookup and ping google.com to check network connectivity (note sometimes the ping fails or takes a while, this isn't a big deal)

print("Connecting to AP...")
while not esp.is_connected:
    try:
        esp.connect_AP(secrets["ssid"], secrets["password"])
    except RuntimeError as e:
        print("could not connect to AP, retrying: ", e)
        continue
print("Connected to", str(esp.ssid, "utf-8"), "\tRSSI:", esp.rssi)
print("My IP address is", esp.pretty_ip(esp.ip_address))
print(
    "IP lookup adafruit.com: %s" % esp.pretty_ip(esp.get_host_by_name("adafruit.com"))

OK now we're getting to the really interesting part. With a SAMD51 or other large-RAM (well, over 32 KB) device, we can do a lot of neat tricks. Like for example we can implement an interface a lot like requests - which makes getting data really really easy

To read in all the text from a web URL call requests.get - you can pass in https URLs for SSL connectivity

TEXT_URL = "http://wifitest.adafruit.com/testwifi/index.html"
print("Fetching text from", TEXT_URL)
r = requests.get(TEXT_URL)
print('-'*40)
print(r.text)
print('-'*40)
r.close()

Or, if the data is in structured JSON, you can get the json pre-parsed into a Python dictionary that can be easily queried or traversed. (Again, only for nRF52840, M4 and other high-RAM boards)

JSON_URL = "http://api.coindesk.com/v1/bpi/currentprice/USD.json"
print("Fetching json from", JSON_URL)
r = requests.get(JSON_URL)
print('-'*40)
print(r.json())
print('-'*40)
r.close()

Requests

We've written a requests-like library for web interfacing named Adafruit_CircuitPython_Requests. This library allows you to send HTTP/1.1 requests without "crafting" them and provides helpful methods for parsing the response from the server.

To use with CircuitPython, you need to first install a few libraries, into the lib folder on your CIRCUITPY drive. Then you need to update code.py with the example script.

Thankfully, we can do this in one go. In the example below, click the Download Project Bundle button below to download the necessary libraries and the code.py file in a zip file. Extract the contents of the zip file, open the directory examples/ and then click on the directory that matches the version of CircuitPython you're using and copy the contents of that directory to your CIRCUITPY drive.

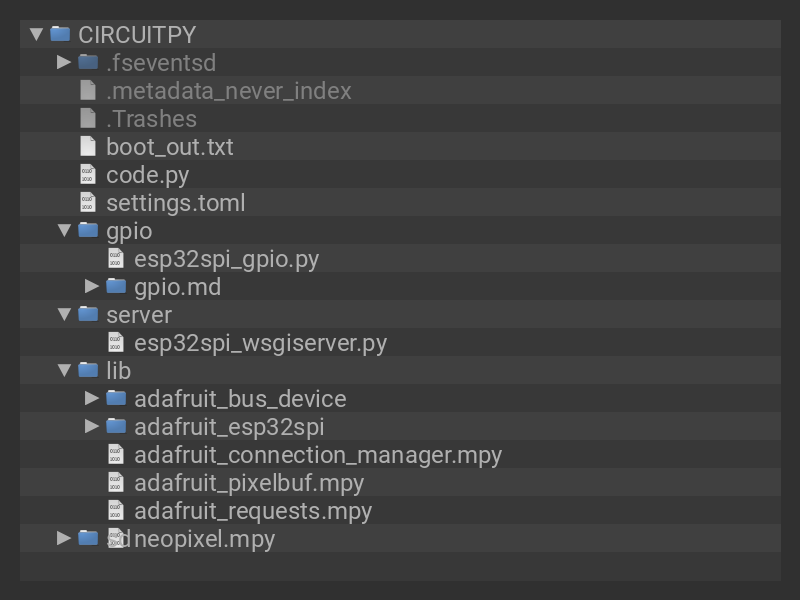
Your CIRCUITPY drive should now look similar to the following image:

CIRCUITPY
Temporarily unable to load content:

The code first sets up the ESP32SPI interface. Then, it initializes a request object using an ESP32 socket and the esp object.

import board
import busio
from digitalio import DigitalInOut
import adafruit_esp32spi.adafruit_esp32spi_socket as socket
from adafruit_esp32spi import adafruit_esp32spi
import adafruit_requests as requests

# If you are using a board with pre-defined ESP32 Pins:
esp32_cs = DigitalInOut(board.ESP_CS)
esp32_ready = DigitalInOut(board.ESP_BUSY)
esp32_reset = DigitalInOut(board.ESP_RESET)

# If you have an externally connected ESP32:
# esp32_cs = DigitalInOut(board.D9)
# esp32_ready = DigitalInOut(board.D10)
# esp32_reset = DigitalInOut(board.D5)

spi = busio.SPI(board.SCK, board.MOSI, board.MISO)
esp = adafruit_esp32spi.ESP_SPIcontrol(spi, esp32_cs, esp32_ready, esp32_reset)

print("Connecting to AP...")
while not esp.is_connected:
    try:
        esp.connect_AP(b'MY_SSID_NAME', b'MY_SSID_PASSWORD')
    except RuntimeError as e:
        print("could not connect to AP, retrying: ",e)
        continue
print("Connected to", str(esp.ssid, 'utf-8'), "\tRSSI:", esp.rssi)

# Initialize a requests object with a socket and esp32spi interface
requests.set_socket(socket, esp)

HTTP GET with Requests

The code makes a HTTP GET request to Adafruit's WiFi testing website - http://wifitest.adafruit.com/testwifi/index.html.

To do this, we'll pass the URL into requests.get(). We're also going to save the response from the server into a variable named response.

Having requested data from the server, we'd now like to see what the server responded with. Since we already saved the server's response, we can read it back. Luckily for us, requests automatically decodes the server's response into human-readable text, you can read it back by calling response.text.

Lastly, we'll perform a bit of cleanup by calling response.close(). This closes, deletes, and collect's the response's data. 

print("Fetching text from %s"%TEXT_URL)
response = requests.get(TEXT_URL)
print('-'*40)

print("Text Response: ", response.text)
print('-'*40)
response.close()

While some servers respond with text, some respond with json-formatted data consisting of attribute–value pairs.

CircuitPython_Requests can convert a JSON-formatted response from a server into a CPython dict. object.

We can also fetch and parse json data. We'll send a HTTP get to a url we know returns a json-formatted response (instead of text data). 

Then, the code calls response.json() to convert the response to a CPython dict

print("Fetching JSON data from %s"%JSON_GET_URL)
response = requests.get(JSON_GET_URL)
print('-'*40)

print("JSON Response: ", response.json())
print('-'*40)
response.close()

HTTP POST with Requests

Requests can also POST data to a server by calling the requests.post method, passing it a data value.

data = '31F'
print("POSTing data to {0}: {1}".format(JSON_POST_URL, data))
response = requests.post(JSON_POST_URL, data=data)
print('-'*40)

json_resp = response.json()
# Parse out the 'data' key from json_resp dict.
print("Data received from server:", json_resp['data'])
print('-'*40)
response.close()

You can also post json-formatted data to a server by passing json_data into the requests.post method.

    json_data = {"Date" : "July 25, 2019"}
print("POSTing data to {0}: {1}".format(JSON_POST_URL, json_data))
response = requests.post(JSON_POST_URL, json=json_data)
print('-'*40)

json_resp = response.json()
# Parse out the 'json' key from json_resp dict.
print("JSON Data received from server:", json_resp['json'])
print('-'*40)
response.close()
  

Advanced Requests Usage

Want to send custom HTTP headers, parse the response as raw bytes, or handle a response's http status code in your CircuitPython code?

We've written an example to show advanced usage of the requests module below.

To use with CircuitPython, you need to first install a few libraries, into the lib folder on your CIRCUITPY drive. Then you need to update code.py with the example script.

Thankfully, we can do this in one go. In the example below, click the Download Project Bundle button below to download the necessary libraries and the code.py file in a zip file. Extract the contents of the zip file, open the directory examples/ and then click on the directory that matches the version of CircuitPython you're using and copy the contents of that directory to your CIRCUITPY drive.

Your CIRCUITPY drive should now look similar to the following image:

CIRCUITPY
Temporarily unable to load content:

WiFi Manager

That simpletest example works but it's a little finicky - you need to constantly check WiFi status and have many loops to manage connections and disconnections. For more advanced uses, we recommend using the WiFiManager object. It will wrap the connection/status/requests loop for you - reconnecting if WiFi drops, resetting the ESP32 if it gets into a bad state, etc.

Here's a more advanced example that shows the WiFi manager and also how to POST data with some extra headers:

To use with CircuitPython, you need to first install a few libraries, into the lib folder on your CIRCUITPY drive. Then you need to update code.py with the example script.

Thankfully, we can do this in one go. In the example below, click the Download Project Bundle button below to download the necessary libraries and the code.py file in a zip file. Extract the contents of the zip file, open the directory examples/ and then click on the directory that matches the version of CircuitPython you're using and copy the contents of that directory to your CIRCUITPY drive.

Your CIRCUITPY drive should now look similar to the following image:

CIRCUITPY
# SPDX-FileCopyrightText: 2019 ladyada for Adafruit Industries
# SPDX-License-Identifier: MIT

import time
from os import getenv
import board
import busio
from digitalio import DigitalInOut
import neopixel
from adafruit_esp32spi import adafruit_esp32spi
from adafruit_esp32spi import adafruit_esp32spi_wifimanager

print("ESP32 SPI webclient test")

# Get wifi details and more from a settings.toml file
# tokens used by this Demo: CIRCUITPY_WIFI_SSID, CIRCUITPY_WIFI_PASSWORD
#                           CIRCUITPY_AIO_USERNAME, CIRCUITPY_AIO_KEY
secrets = {}
for token in ["ssid", "password"]:
    if getenv("CIRCUITPY_WIFI_" + token.upper()):
        secrets[token] = getenv("CIRCUITPY_WIFI_" + token.upper())
for token in ["aio_username", "aio_key"]:
    if getenv("CIRCUITPY_" + token.upper()):
        secrets[token] = getenv("CIRCUITPY_" + token.upper())

if not secrets:
    try:
        # Fallback on secrets.py until depreciation is over and option is removed
        from secrets import secrets
    except ImportError:
        print("WiFi secrets are kept in settings.toml, please add them there!")
        raise

# If you are using a board with pre-defined ESP32 Pins:
esp32_cs = DigitalInOut(board.ESP_CS)
esp32_ready = DigitalInOut(board.ESP_BUSY)
esp32_reset = DigitalInOut(board.ESP_RESET)

# If you have an externally connected ESP32:
# esp32_cs = DigitalInOut(board.D9)
# esp32_ready = DigitalInOut(board.D10)
# esp32_reset = DigitalInOut(board.D5)

# Secondary (SCK1) SPI used to connect to WiFi board on Arduino Nano Connect RP2040
if "SCK1" in dir(board):
    spi = busio.SPI(board.SCK1, board.MOSI1, board.MISO1)
else:
    spi = busio.SPI(board.SCK, board.MOSI, board.MISO)
esp = adafruit_esp32spi.ESP_SPIcontrol(spi, esp32_cs, esp32_ready, esp32_reset)
"""Use below for Most Boards"""
status_light = neopixel.NeoPixel(board.NEOPIXEL, 1, brightness=0.2)
"""Uncomment below for ItsyBitsy M4"""
# status_light = dotstar.DotStar(board.APA102_SCK, board.APA102_MOSI, 1, brightness=0.2)
"""Uncomment below for an externally defined RGB LED (including Arduino Nano Connect)"""
# import adafruit_rgbled
# from adafruit_esp32spi import PWMOut
# RED_LED = PWMOut.PWMOut(esp, 26)
# GREEN_LED = PWMOut.PWMOut(esp, 27)
# BLUE_LED = PWMOut.PWMOut(esp, 25)
# status_light = adafruit_rgbled.RGBLED(RED_LED, BLUE_LED, GREEN_LED)

wifi = adafruit_esp32spi_wifimanager.ESPSPI_WiFiManager(esp, secrets, status_light)

counter = 0

while True:
    try:
        print("Posting data...", end="")
        data = counter
        feed = "test"
        payload = {"value": data}
        response = wifi.post(
            "https://io.adafruit.com/api/v2/"
            + secrets["aio_username"]
            + "/feeds/"
            + feed
            + "/data",
            json=payload,
            headers={"X-AIO-KEY": secrets["aio_key"]},
        )
        print(response.json())
        response.close()
        counter = counter + 1
        print("OK")
    except OSError as e:
        print("Failed to get data, retrying\n", e)
        wifi.reset()
        continue
    response = None
    time.sleep(15)

You'll note here we use a secrets.py file to manage our SSID info. The wifimanager is given the ESP32 object, secrets and a neopixel for status indication.

Note, you'll need to add a some additional information to your secrets file so that the code can query the Adafruit IO API:

  • aio_username
  • aio_key

You can go to your adafruit.io View AIO Key link to get those two values and add them to the secrets file, which will now look something like this:

# This file is where you keep secret settings, passwords, and tokens!
# If you put them in the code you risk committing that info or sharing it

secrets = {
    'ssid' : '_your_ssid_',
    'password' : '_your_wifi_password_',
    'timezone' : "America/Los_Angeles", # http://worldtimeapi.org/timezones
    'aio_username' : '_your_aio_username_',
    'aio_key' : '_your_aio_key_',
    }

Next, set up an Adafruit IO feed named test

We can then have a simple loop for posting data to Adafruit IO without having to deal with connecting or initializing the hardware!

Take a look at your test feed on Adafruit.io and you'll see the value increase each time the CircuitPython board posts data to it!

In the code block below, click on the Download Project Bundle button, and save the .zip archive file to your computer.

Then, uncompress the .zip file, it will unpack to a folder named Dashblock_API.

Copy the contents of the Dashblock_API directory to your PyPortal CIRCUITPY drive.

# SPDX-FileCopyrightText: 2019 Isaac Wellish for Adafruit Industries
#
# SPDX-License-Identifier: MIT

"""
Dashblock API Adafruit Learn Guide Count demo
Use Dashblock to create a custom API for learn.adafruit.com,
then display the number of learn guides on the site
"""

import os
import time
import board
from adafruit_pyportal import PyPortal

# Set up where we'll be fetching data from
DATA_SOURCE = "https://api.dashblock.io/model/v1?api_key=" + os.getenv("DASHBLOCK_KEY")
GUIDE_COUNT = ['entities', 0, 'guide count']
CAPTION = 'total tutorials:'

# determine the current working directory
# needed so we know where to find files
cwd = ("/"+__file__).rsplit('/', 1)[0]

# Initialize the pyportal object and let us know what data to fetch and where
# to display it
pyportal = PyPortal(url=DATA_SOURCE,
                    json_path = (GUIDE_COUNT),
                    status_neopixel=board.NEOPIXEL,
                    default_bg=cwd+"/adabot_cover.bmp",
                    text_font=cwd+"/fonts/Collegiate-50.bdf",
                    text_position=((40, 100)),
                    text_color=(0x8080FF),
                    text_maxlen=(4), # max text length, only want first 4 chars for number of guides
                    caption_text=CAPTION,
                    caption_font=cwd+"/fonts/Collegiate-24.bdf",
                    caption_position=(40, 60),
                    caption_color=0xFFFFFF)

# track the last value so we can play a sound when it updates
last_value = 0

while True:
    try:
        value = pyportal.fetch()
        print("Response is", value)
        int_value = int(value[:4]) # save only first 4 chars and cast to int
        if last_value < int_value:  # ooh it went up!
            print("New guide!")
            pyportal.play_file(cwd+"/coin.wav")  # make a noise!
        last_value = int_value
    except RuntimeError as e:
        print("Some error occured, retrying! -", e)
    except ValueError as e:
        print("Value error occured, retrying! -", e)
        continue

    time.sleep(600) #update every 10 mins

Downloading the libraries

Make sure to add the necessary libraries to the lib folder, info on how to do this can be found in the "PyPortal CircuitPython Setup" section

This project uses the following CircuitPython libraries:

  • adafruit_bitmap_font (directory)
  • adafruit_bus_device (directory)
  • adafruit_display_shapes (directory)
  • adafruit_display_text (directory)
  • adafruit_esp32spi (directory)
  • adafruit_imageload (directory)
  • adafruit_io (directory)
  • adafruit_pyportal.mpy (file)
  • adafruit_requests (file)
  • adafruit_sdcard.mpy (file)
  • adafruit_touchscreen.mpy (file)
  • neopixel.mpy (file)

Add Dashblock Credentials to settings.toml

The secrets file needs some edits before the project will work.

Your Dashblock account is tied to your API requests, thus you have a limited number of credits or requests for data. Each user has their own API key associated with their account. You can find your key by looking at the URL we extracted earlier from Dashblock.

It looks like this:

https://api.dashblock.io/model/v1?api_key=yourSuperLongDashblockKeyHere

Go into your settings.toml file, and add the following line:

Make sure to change 'yourSuperLongDashblockKeyHere' with your key

Save the file and you are good to go!

CIRCUITPY_WIFI_SSID = "your_wifi_ssid"
CIRCUITPY_WIFI_PASSWORD = "your_wifi_password"
DASHBLOCK_KEY = "yourSuperLongDashblockKeyHere"

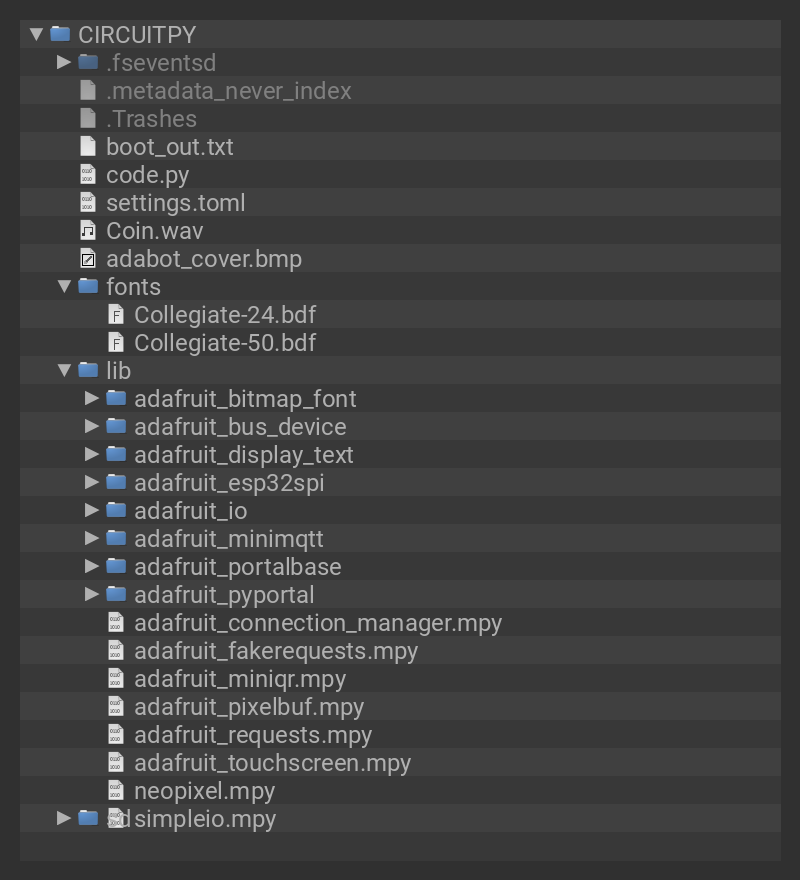
This is what the final contents of the CIRCUITPY drive will look like:

CIRCUITPY

How It Works

The CircuitPython code is doing a few neat tricks to display the guide count data.

Background

First, it displays a bitmap graphic as the screen's background. This is a 320 x 240 pixel RGB 16-bit raster graphic in .bmp format.

Font

Then, it displays the words "total tutorials:" as a caption, created with bitmapped fonts to overlay on top of the background. The fonts used here is are bitmap fonts made from the Collegiate typeface. You can learn more about converting type in this guide.

Next, the PyPortal will display the current number of guides on learn.adafruit.com

JSON

If you visit the URL we extracted from Dashblock earlier (looks like https://api.dashblock.io/model/v1?api_key=yourLongKeyHere) and copy the address and paste it into the Load Url button of the online code "beautifier" https://codebeautify.org/jsonviewer you'll see the raw JSON file next to a nicely formatted version of it (choose "View" from the dropdown menu in the right hand box to change the display format).

Here it is in a raw-er form, but still using indentation and carriage returns to make it readable:

{
  "entities": [
    {
      "guide count": "1972 tutorials total and counting"
    }
  ]
}

Keys

If we look through the JSON page, we'll see a key called guide count that has a value of 1972 tutorials and counting. The raw JSON for this key : value pair looks like this: "guide count": 1972 tutorials and counting

Our CircuitPython code is able to grab and parse this data using the variable:

GUIDE_COUNT = ['entities', 0, 'guide count']

Traversing JSON

GUIDE_COUNT contains a value that we use to traverse the JSON file. In the image above, note how there is a tree hierarchy indicated by the indentation level. The guide count key is one set of brackets indented from the 2nd level of the file's hierarchy, so we can call it the child of the 2nd index of the array, which is 0. The top level of the file's hierarchy is called "entities", which is the first level we reference. You can see this more clearly by switching to the "Form" view of the code beautifier as seen below:

Our GUIDE_COUNT is therefore ['entities', 0, 'guide count']

PyPortal Constructor

When we set up the pyportal constructor, we are providing it with these things:

  • url to query
  • json_path to traverse and find the key:value pair we need
  • default_bg path and name to display the background bitmap
  • text_font path and name to the font used for displaying the follower count value
  • text_position on the screen's x/y coordinate system
  • text_color
  • text_maxlen max text length, only want first 4 chars for number of guides
  • caption_text to display statically
  • caption_font
  • caption_position
  • caption_color

Text Max Length

You may notice the data we get from guide count is 1972 tutorials and counting however we only want the 1972 part. How do we choose only this part? Using the text_maxlen parameter in the pyportal constructor we can choose to select and display only the first 4 characters of that text by setting text_maxlen = 4.

Fetch

With the pyportal set up, we can then use pyportal.fetch() to do the query and parsing of the learn data and then display it on screen along with the caption text on top of the background image.

Ba-Ding!

Additionally, we use the last_value variable's state to compare against the latest value. If they differ, we play the coin.wav file for a satisfying ding over the PyPortal's built in speaker!

To make your own .wav files, check out this guide.

Text Position

Depending on the design of your background bitmap and the length of the text you're displaying, you may want to reposition the text and caption. You can do this with the text_position and caption_position options.

The PyPortal's display is 320 pixels wide and 240 pixels high. In order to refer to those positions on the screen, we use an x/y coordinate system, where x is horizontal and y is vertical.

The origin of this coordinate system is the upper left corner. This means that a pixel placed at the upper left corner would be (0,0) and the lower right corner would be (320, 240).

So, if you wanted to move the subscriber count text to the right and up closer to the top, your code may look like this for that part of the pyportal constructor: text_position=(250, 10)

Text Color

Another way to customize your stats trophy is to adjust the color of the text. The line text_color=0xFFFFFF in the constructor shows how. You will need to use the hexidecimal value for any color you want to display.

You can use something like https://htmlcolorcodes.com/ to pick your color and then copy the hex value, in this example it would be 0x0ED9EE

Background Image

If you would like to create your own background, awesome! You'll want to save the file with these specifications:

  • 320 x 240 pixels
  • 16-bit RGB color
  • Save file as .bmp format

You can then copy the .bmp file to the root level of the CIRCUITPY drive. Make sure you refer to this new filename in the pyportal constructor line:

default_bg=cwd+"/twitter_background.bmp"

Change that line to use the new filename name, such as:

default_bg=cwd+"/my_new_background.bmp"

Going further

You can use the following code example as a template for future API projects.

The data from most websites is now at your fingertips! This could include:

  • Weather
  • News
  • Social media followers
  • so much more!
import time
import board
from adafruit_pyportal import PyPortal

# Set up where we'll be fetching data from
DATA_SOURCE = "URL.OF.JSON.DATA"
JSON_DATA = ['Outside first element', 0, 'inside first element']
CAPTION = 'caption'

# determine the current working directory
# needed so we know where to find files
cwd = ("/"+__file__).rsplit('/', 1)[0]

# Initialize the pyportal object and let us know what data to fetch and where
# to display it
pyportal = PyPortal(url=DATA_SOURCE,
                    json_path = (JSON_DATA),
                    status_neopixel=board.NEOPIXEL,
                    default_bg=cwd+"/<pathToBackgroundImage>",
                    text_font=cwd+"/<pathToFont>",
                    text_position=((40, 100)), # definition location
                    text_color=(0x8080FF),
                    text_wrap=(20), #how many chars you want until it wraps
                    text_maxlen=(4), # max text size for word, part of speech and def
                    caption_text=CAPTION,
                    caption_font=cwd+"/fonts/<pathToFont>",
                    caption_position=(40, 60),
                    caption_color=0xFFFFFF)

while True:
    try:
        value = pyportal.fetch()
        print("Response is", value)
    except RuntimeError as e:
        print("Some error occured, retrying! -", e)

    time.sleep(600) #update every 10 mins

This guide was first published on Sep 09, 2019. It was last updated on Apr 17, 2024.