This code is discontinued - Check out our newer tutorial at - https://learn.adafruit.com/adafruit-2-dot-8-color-tft-touchscreen-breakout-v2/python-wiring-and-setup
Dependencies
Before installing the character LCD library you'll need to make sure a few dependencies are installed by following the steps below. Make sure your development board has access to the internet so the software can be downloaded.sudo apt-get update sudo apt-get install build-essential python-dev python-smbus python-pip python-imaging python-numpy git sudo pip install RPi.GPIO
You can ignore any warnings about dependencies already being installed.
sudo apt-get update
sudo apt-get install build-essential python-dev python-smbus python-pip python-imaging python-numpy git
sudo pip install Adafruit_BBIO
Installation
Once the dependencies above have been installed you can install the TFT module by executing the following commands on the device:cd ~ git clone https://github.com/adafruit/Adafruit_Python_ILI9341.git cd Adafruit_Python_ILI9341 sudo python setup.py install
These commands will clone the GitHub repository with the library source and then execute the setup.py script to install the library.
Usage
Once the library is installed you can find a few examples of its usage in the examples subdirectory.If you're using a Raspberry Pi and have wired it according to this guide, you can immediately run the example. However if you're using a BeagleBone Black or changed the wiring, first open image.py in a text editor (like nano) and uncomment/comment the lines towards the top that set the TFT pins.
To run the image.py example execute:
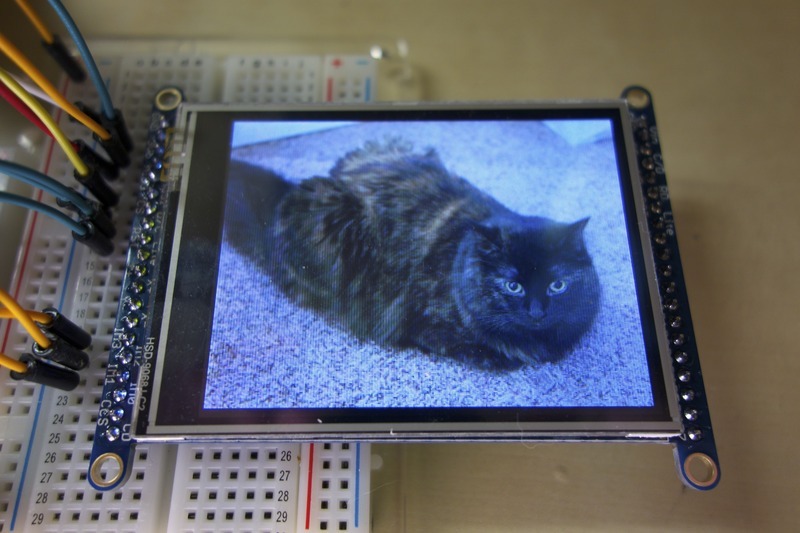
cd examples
sudo python image.py
You should see the TFT display a cat picture:
To help understand the usage of the library, I'll walk through the code of the image.py example below.
import Image

import Adafruit_ILI9341 as TFT
import Adafruit_GPIO as GPIO
import Adafruit_GPIO.SPI as SPI
These import commands will pull in modules which the example depends on, in particular the Python Imaging Library and TFT library.
# Raspberry Pi configuration.
DC = 18
RST = 23
SPI_PORT = 0
SPI_DEVICE = 0

# BeagleBone Black configuration.
# DC = 'P9_15'
# RST = 'P9_12'
# SPI_PORT = 1
# SPI_DEVICE = 0
The next lines configure the pins which are connected to the TFT breakout. You can see how the pins and SPI device are configured separately for the Raspberry Pi and BeagleBone Black.
# Create TFT LCD display class.
disp = TFT.ILI9341(DC, rst=RST, spi=SPI.SpiDev(SPI_PORT, SPI_DEVICE, max_speed_hz=64000000))

# Initialize display.
disp.begin()
The first line create an instance of the ILI9341 class and pass in the appropriate pins and SPI configuration. Notice the SPI connection is created with a maximum speed of 64mhz (although in reality the Pi and BeagleBone Black are limited to lower speeds like 24-32mhz).
The second line initializes the TFT display. Make sure to call this function once before you make other calls to the display object!
The second line initializes the TFT display. Make sure to call this function once before you make other calls to the display object!
# Load an image.
# Make sure the image is 320x240 pixels!
print 'Loading image...'
image = Image.open('cat.jpg')

# Resize the image and rotate it so it's 240x320 pixels.
image = image.rotate(90).resize((240, 320))
These lines will open an image file using the Python Imaging Library Image.open function. You can pass in almost any common image to this function like JPEG, PNG, etc.
Next the image is rotated and resized to fit in the 240x320 dimensions of the display using the rotate and resize functions. You can find more image functions in the PIL documentation.
Next the image is rotated and resized to fit in the 240x320 dimensions of the display using the rotate and resize functions. You can find more image functions in the PIL documentation.
# Draw the image on the display hardware.
print 'Drawing image'
disp.display(image)
Finally the image is drawn on the display by passing it to the display function. After this command executes the image should be shown on the TFT display. That's all there is to loading an image and displaying it on the hardware!
The next example is the shapes.py script which draws some shapes and text on the display. To run this example, first edit it in a text editor to comment and uncomment the appropriate pin configuration, then execute:
sudo python shapes.py
You should see the display render a few shapes and some text:

If you open the shapes.py file in a text editor, I'll run through the code below:
import Image
import ImageDraw
import ImageFont

import Adafruit_ILI9341 as TFT
import Adafruit_GPIO as GPIO
import Adafruit_GPIO.SPI as SPI


# Raspberry Pi configuration.
DC = 18
RST = 23
SPI_PORT = 0
SPI_DEVICE = 0

# BeagleBone Black configuration.
# DC = 'P9_15'
# RST = 'P9_12'
# SPI_PORT = 1
# SPI_DEVICE = 0

# Create TFT LCD display class.
disp = TFT.ILI9341(DC, rst=RST, spi=SPI.SpiDev(SPI_PORT, SPI_DEVICE, max_speed_hz=64000000))

# Initialize display.
disp.begin()
The module imports, pin configuration, and display configuration are almost exactly the same as the image.py example. The only difference is that a few more Python Imaging Library modules are imported, for drawing shapes and fonts.
# Clear the display to a red background.
# Can pass any tuple of red, green, blue values (from 0 to 255 each).
disp.clear((255, 0, 0))

# Alternatively can clear to a black screen by calling:
# disp.clear()
Next the display buffer is cleared to a red color. You can see the color is represented by a tuple of 3 values, the red, green, and blue components of the color. These component values can range from 0 to 255. For example the color read is (255, 0, 0), or the color yellow (combination of red and green) is (255, 255, 0).
# Get a PIL Draw object to start drawing on the display buffer.
draw = disp.draw()
In this line a PIL ImageDraw object is created for the display buffer by calling the draw() function on the display object. You must get an ImageDraw object in order to draw shapes, text, etc.
# Draw some shapes.
# Draw a blue ellipse with a green outline.
draw.ellipse((10, 10, 110, 80), outline=(0,255,0), fill=(0,0,255))

# Draw a purple rectangle with yellow outline.
draw.rectangle((10, 90, 110, 160), outline=(255,255,0), fill=(255,0,255))

# Draw a white X.
draw.line((10, 170, 110, 230), fill=(255,255,255))
draw.line((10, 230, 110, 170), fill=(255,255,255))

# Draw a cyan triangle with a black outline.
draw.polygon([(10, 275), (110, 240), (110, 310)], outline=(0,0,0), fill=(0,255,255))
The next lines draw shapes in different colors on the display. Notice that the drawing functions take dimensions as a 4-tuple of x min, y min, x max, and y max bounds. The x axis of the image is the shorter side of the display and is 240 pixels long (positions range from 0 to 239). The y axis is the longer side of the display and is 320 pixels long (position range from 0 to 319).
# Load default font.
font = ImageFont.load_default()

# Alternatively load a TTF font.
# Some other nice fonts to try: http://www.dafont.com/bitmap.php
#font = ImageFont.truetype('Minecraftia.ttf', 16)
A default font is loaded by calling the ImageFont.load_default() function. This font will be used for text rendering.
Note that the default font is quite small (only about 8 pixels tall), so you might want to grab a TrueType font and copy it to the directory of the script so it can be used instead of the default font. See the commented line for how to load a TTF font.
Note that the default font is quite small (only about 8 pixels tall), so you might want to grab a TrueType font and copy it to the directory of the script so it can be used instead of the default font. See the commented line for how to load a TTF font.
# Define a function to create rotated text.  Unfortunately PIL doesn't have good
# native support for rotated fonts, but this function can be used to make a
# text image and rotate it so it's easy to paste in the buffer.
def draw_rotated_text(image, text, position, angle, font, fill=(255,255,255)):
	# Get rendered font width and height.
	draw = ImageDraw.Draw(image)
	width, height = draw.textsize(text, font=font)
	# Create a new image with transparent background to store the text.
	textimage = Image.new('RGBA', (width, height), (0,0,0,0))
	# Render the text.
	textdraw = ImageDraw.Draw(textimage)
	textdraw.text((0,0), text, font=font, fill=fill)
	# Rotate the text image.
	rotated = textimage.rotate(angle, expand=1)
	# Paste the text into the image, using it as a mask for transparency.
	image.paste(rotated, position, rotated)
Next a function is defined to help with rendering rotated text. Unfortunately PIL doesn't have great support for rotating fonts, so this function can be used to render text that's rotated. Don't worry, you don't need to really understand the implementation of the function!
# Write two lines of white text on the buffer, rotated 90 degrees counter clockwise.
draw_rotated_text(disp.buffer, 'Hello World!', (150, 120), 90, font, fill=(255,255,255))
draw_rotated_text(disp.buffer, 'This is a line of text.', (170, 90), 90, font, fill=(255,255,255))
A couple lines of text are drawn on the display buffer in these lines. You can see the draw_rotated_text function that was defined above is called here. Notice that this function takes in the display buffer, the text to render, the location to render the text on the buffer, the angle of rotation (in degrees), the font, and the fill color as parameters.
# Write buffer to display hardware, must be called to make things visible on the
# display!
disp.display()
Finally the display buffer is drawn on the hardware by calling the display() function. Make sure to call this function after drawing shapes, text, etc. so they'll be visible on the display.
That's all there is to drawing on a TFT display with the ILI9341 Python library!
That's all there is to drawing on a TFT display with the ILI9341 Python library!


