Random numbers have a lot of uses in computer programming. These can be for fun things like picking a random song, drawing to a random location, etc. On the more serious side, they are useful in the realm of cryptography. For the later, security is a primary concern, so the actual randomness of the random number becomes increasingly important. This is where using a True Random Number Generator (TRNG) is very beneficial.

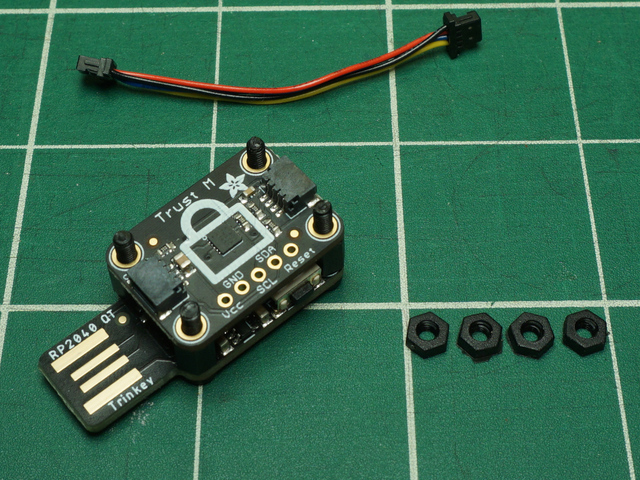
Don't have a TRNG? No worries. In this guide we'll show how to easily create a TRNG by coupling an Adafruit Trinkey QT2040 with an Infineon Trust M breakout. The two boards can be mounted together using M2.5 screws (kit here) or similar. Further, by connecting the boards using the STEMMA QT connector and cable - no soldering is required. Simply connect everything, load the provided code, plug into your PC's USB port, and connect to the serial port to receive all the true random goodness you may need.

Parts

Here is a list of the hardware items used in this project:

Video of Trinkey RP2040 plugged into a laptop. An OLED display is connected and shows a graphic keyboard cat animation.
It's half USB Key, half Adafruit QT Py, and a lotta RP2040...it's Trinkey QT2040, the circuit board with an RP2040 heart and Stemma QT legs....
$7.95
In Stock
Adafruit Infineon Trust M Breakout Board
This is a STEMMA I2C breakout for the
$4.95
In Stock
Angled shot of a USB key-shaped PCB with a sensor board stacked on top via black nylon screws.
 Here is the perfect hardware kit to make a RP2040 QT Trinkey into any kind of USB-connected smart sensor with a...
$1.50
In Stock
Angled of of JST SH 4-Pin Cable.
This 4-wire cable is 50mm / 1.9" long and fitted with JST SH female 4-pin connectors on both ends. Compared with the chunkier JST PH these are 1mm pitch instead of 2mm, but...
$0.95
In Stock

Using the Stacking M2.5 Hardware Kit and a STEMMA QT cable, assembling everything together can be done by hand. No soldering required.

Gather all the parts.

Use the screws to attach the hex standoffs to the Trinkey QT2040.

Flip over and mount the Trust M breakout on the hex standoffs.

Screw the hex nuts on to the hex standoffs to hold the Trust M breakout in place.

Use the STEMMA QT cable to connect the Trust M breakout to the Trinkey QT2040.

The idea for the TRNG sending code is very simple:

  1. Get TRNG data from Trust M
  2. Send TRNG data over USB CDC serial
  3. Repeat

There is currently only an Arduino library available for talking to the Trust M, so we'll do everything using Arduino.

The complete Arduino sketch code is provided later in this guide to allow customizing. Here we provide some pre-compiled examples in UF2 format. With these UF2 files, you can just drag-and-drop to the Trinkey QT2040 RPI-RP2 bootloader folder. The Arduino IDE does not even need to be installed.

Installing UF2 Examples

To install the UF2 files:

  1. Put the Trinkey QT2040 in bootloader mode by holding the BOOT button while pressing the RST (reset) button.
  2. A folder named RPI-RP2 should appear.
  3. Drag the UF2 file to the RPI-RP2 folder.
  4. Once copied, board should reset and code is now running.

Send Raw Bytes

This example sends a continuous stream of raw bytes. This behaves much like dumping /dev/random on a linux machine. Here's the UF2:

With that running on the Trinkey QT2040, the serial output will look like this (screen was used to connect):

It's raw bytes, so will look like gibberish.

Want something more human readable? OK, let's try some formatted string output next.

Send CSV Formatted Text

This example provides comma separated (CSV) formatted text. Here's the UF2:

With that running on the Trinkey QT2040, the serial output will look like this:

Send JSON Formatted Text

This example provides JavaScript Object Notation (JSON) formatted text. Here's the UF2:

With that running on the Trinkey QT2040, the serial output will look like this:

The TRNG data can be received by anything that can interact with the USB CDC serial port that gets created. In the previous section, we used screen to simply open and view the output, without doing any parsing or processing. Here we go a little further and show some simple examples of how to do this using Python.

Install pySerial

The pySerial module is used to open and read from the serial port in Python. If this module is not already installed on your setup, go here:

Read Raw Bytes

This is the simplest thing to read. The out is just a continuous stream of random bytes. You can read in as many of these as you wish.

Here is how to read in 4 bytes.

# SPDX-FileCopyrightText: 2021 Carter Nelson for Adafruit Industries
#
# SPDX-License-Identifier: MIT

import serial

# how many bytes to read?
TRNG_SIZE = 4

# open serial port
ss = serial.Serial("/dev/ttyACM0")

# read raw bytes
raw_bytes = ss.read(TRNG_SIZE)

# print them
print(raw_bytes)

Read CSV String

Reading and parsing a comma separated (CSV) formatted string is also easy, thanks to Python's excellent string handling capabilities. Once parsed, the data can be further processed for whatever end application.

Here we just turn it into a list (array) of integers.

# SPDX-FileCopyrightText: 2021 Carter Nelson for Adafruit Industries
#
# SPDX-License-Identifier: MIT

import serial

# open serial port
ss = serial.Serial("/dev/ttyACM0")

# read string
_ = ss.readline() # first read may be incomplete, just toss it
raw_string = ss.readline().strip().decode()

# create list of integers
rnd_ints = [int(x) for x in raw_string.split(',')]

# print them
print(rnd_ints)

Read JSON String

JavaScript Object Notation, aka JSON, is another common text based data format. It allows for more complexity than CSV and thanks to Python's JSON module, it is also easy to process. Once loaded in, that data can be accessed via the trng entry.

Here is a simple example.

# SPDX-FileCopyrightText: 2021 Carter Nelson for Adafruit Industries
#
# SPDX-License-Identifier: MIT

import json
import serial

# open serial port
ss = serial.Serial("/dev/ttyACM0")

# read string
_ = ss.readline() # first read may be incomplete, just toss it
raw_string = ss.readline().strip().decode()

# load JSON
json_data = json.loads(raw_string)

# print data
print(json_data['trng'])

An Arduino sketch is used to create the TRNG sending code that runs on the Trinkey QT2040. Scroll to the bottom of this page for the complete code listing.

You can customize the TRNG sending behavior by modifying these lines found at the top of the sketch:

//--| User Config |-----------------------------------------------
#define TRNG_FORMAT   2         // 0=raw, 1=CSV, 2=JSON
#define TRNG_LENGTH   8         // random number length in bytes, 8 to 256
#define TRNG_RATE     100       // generate new number ever X ms
#define BEAT_RATE     1000      // neopixel heart beat rate in ms, 0=none
#define BEAT_COLOR    0xADAF00  // neopixel heart beat color
//----------------------------------------------------------------

Here is a summary of the options:

  • TRNG_FORMAT - sets the desired output format on the serial port
  • TRNG_LENGTH - sets the desired length in bytes
  • TRNG_RATE - sets how often new values are sent over serial
  • BEAT_RATE - sets NeoPixel heart beat rate
  • BEAT_COLOR - sets NeoPixel heart beat color

The UF2 files provided earlier in this guide are simply pre-compiled versions of this sketch with different settings.

Infineon Trust M Arduino Library

The Arduino library used is provided by Infineon and can be found here:

It can be installed via the Library Manager. Just search for "optiga trust m" and it should show up:

Manually Installing Trust M Arduino Libary

At the time of this guide writing, there is a needed update to the Infineon Trust M library. While this change has been added (PR merged) into the library code, it has not been released.  With the current release version (v1.1.0), a compile time error will occur:

error: no return statement in function returning non-void [-Werror=return-type]

Therefore, manually installing the library is required.

To download a zip of the library:

  1. Go to the libary repo
  2. Click the Code button
  3. Click Download ZIP
  4. In the Arduino IDE, install via Sketch > Include Library > Add .ZIP Library...

Arduino Sketch

Here is the code listing for the Arduino sketch used.

// SPDX-FileCopyrightText: 2021 Carter Nelson for Adafruit Industries
//
// SPDX-License-Identifier: MIT

#include <Adafruit_NeoPixel.h>
#include "OPTIGATrustM.h"

//--| User Config |-----------------------------------------------
#define TRNG_FORMAT   2         // 0=raw, 1=CSV, 2=JSON
#define TRNG_LENGTH   8         // random number length in bytes, 8 to 256
#define TRNG_RATE     100       // generate new number ever X ms
#define BEAT_RATE     1000      // neopixel heart beat rate in ms, 0=none
#define BEAT_COLOR    0xADAF00  // neopixel heart beat color
//----------------------------------------------------------------

uint8_t trng[TRNG_LENGTH];
int current_time, last_trng, last_beat;

Adafruit_NeoPixel neopixel(1, PIN_NEOPIXEL, NEO_GRB + NEO_KHZ800);

void setup() 
{
  Serial.begin(115200); // USB CDC doesn't really care about baud rate
  
  if (trustM.begin()) {
    Serial.println("Failed to initialize Trust M.");
    neoPanic();
  }

  neopixel.begin();
  neopixel.fill(0);
  neopixel.show();

  last_trng = last_beat = millis();
}

void loop()
{
  current_time = millis();

  if (current_time - last_trng > TRNG_RATE) {
    trustM.getRandom(TRNG_LENGTH, trng);
    sendTRNG();
    last_trng = current_time;   
  }

  if ((BEAT_RATE) && (current_time - last_beat > BEAT_RATE)) {
    if (neopixel.getPixelColor(0)) {
      neopixel.fill(0);
    } else {
      neopixel.fill(BEAT_COLOR);
    }
    neopixel.show();
    last_beat = current_time;
  }
}

void sendTRNG() {
  if (TRNG_FORMAT) {
    // formatted string output (CSV, JSON)
    if (TRNG_FORMAT==2) Serial.print("{\"trng\": \"");
    for (uint16_t i=0; i<TRNG_LENGTH; i++) {
      Serial.print(trng[i]);
      if (i != TRNG_LENGTH - 1) Serial.print(", "); 
    }
    if (TRNG_FORMAT==2) Serial.print("\"}");
    Serial.println();
  } else {
    // raw output (bytes)
    Serial.write(trng, TRNG_LENGTH);
  }
}


void neoPanic() {
  while (1) {
    neopixel.fill(0xFF0000); neopixel.show(); delay(100);
    neopixel.fill(0x000000); neopixel.show(); delay(100);
  }
}

This guide was first published on Dec 09, 2021. It was last updated on Apr 18, 2024.