Measure & Cut Wires for LED
The Adafruit LED Sequins are great for this project because they're tiny, really bright and already have a resistor on the PCB. They come in a pack of 5. Break off one piece from the set. Then, measure two extra wires to about 75mm in length. Go ahead and remove the tips from each wire using wire strippers and tin the tips with solder, just like we need for the LED display.


Solder Wires to LED Sequin
Let's add a small amount of solder to the positive and negative pads of the LED sequin. Then, solder one wire to each of the pads. I used a red colored wire for positive and blue for negative. They're marked with a + and – label on the PCB.

Secure LED Sequin to Holder
OK, now that our LED sequin is wired up, we can secure it to the ab-LED-holder.stl part. I used super glue to keep the LED held in place. Follow the orientation like in the photo. Place the LED sequin in the center of the holder part. Give the adhesives a few minutes to dry before moving onto the next steps.


Install Holder to Actuator Cover
After the glue has set, let's install the LED holder piece to the printed cover. Reference the photo for correct positioning.
Then, grab the arcade button housing and the two wires from LED. Thread the wires through the openings on the side of the housing. Follow the photo for reference.


Reinstall Actuator to Button
Slowly insert the cover back into the housing of the arcade button. Make sure the wires aren't being kinked. Try to keep the LED holder piece to the printed emjoi cover. Press the pieces together until the clips snap into place. If everyone is correctly in place, you should be able to press the button with ease.
If not, the LED holder may have come loose - remove the cover and try again. This requires a bit of finesse to get it right. If the LED holder keeps coming loose, you could glue it to the bottom of the emjoi cover.

Test LED
Now is a good time to test the LED. I did this by grabbing a coin cell battery by pressing and holding the wires to the positive and negative spots on the battery. The LED Sequin should light up! ~Thumbs Up~

Arcade Button Wires
Next, we need to make "yet another" set of wires – these are going to be for the two leads on arcade button. They can be about 75mm in length and do the same "song and dace" for stripping and tinning the tips.

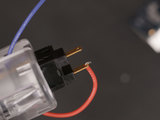

Arcade Button Wiring
Let's start connecting wires from the arcade button. First up, let's focus on the positive connection from the LED sequin. I found the easiest way to do this is to share "power". Cut the wire short from the LED positive connection, then strip the tip of it (remove about 7mm of insulation) and thread it through the hole of the closest lead on the arcade button. Bend the exposed wire so it's held in place. Now we can solder one of our extra wires to this lead without the other coming loose. This extra wire is going to be connected to the 5V/3V pin of the Trinket. It will effectively "share" power from it. Reference the photo to get a better image of how this works.

Arcade Button WIring [Continued]
Now we can solder the second "extra" wire to the opposite lead of the arcade button. You can either thread the wire through the hole or just solder it in place. This second wire will be connected to one of the digital pins on the Trinket later.
Hopefully the coloring here isn't confusing. In retrospect, I should have soldered this red colored "extra" wire to the positive connection of the LED sequin, but I digress.


Bend Leads of Arcade Button
To accomodate for the limited space in the enclosure, you have to bend the leads of the arcade button so they're slightly angled. Reference the photo to get a better idea of how much they should be bend. If they aren't bend... the button won't fit inside the case. I recommend using a pair of pliers to do this.
Alrighty, now we have our two "extra" wired hooked up and our positive connection from the LED sequin wired to one of the leads on the arcade button. The negative connection from the LED sequin will be wired into the ground/GND pin on the Trinket later.