It’s that time of year again: PUMPKIN SPICE SEASON!

Kidding. It’s HALLOWEEN! Time for candy and spooky monster dress-up! Maybe you’re looking for ideas for your MONSTER M4SK board. Here’s something I quickly scared up to rattle some ideas loose…

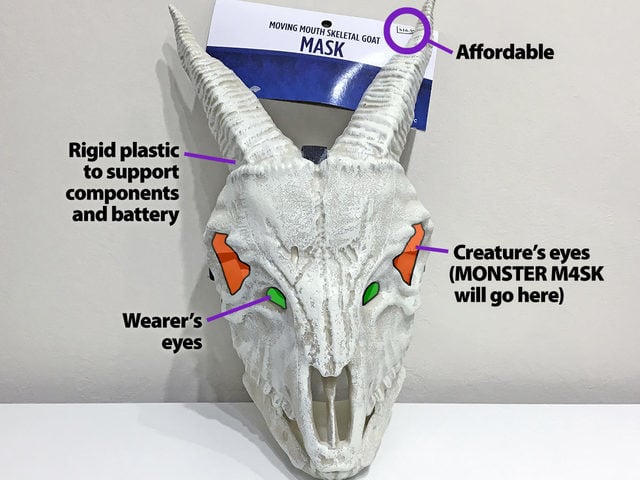
This isn’t meant as an A-to-Z build guide…I wouldn’t expect everyone would want to make this exact thing. But the process of incorporating MONSTER M4SK may be insightful…

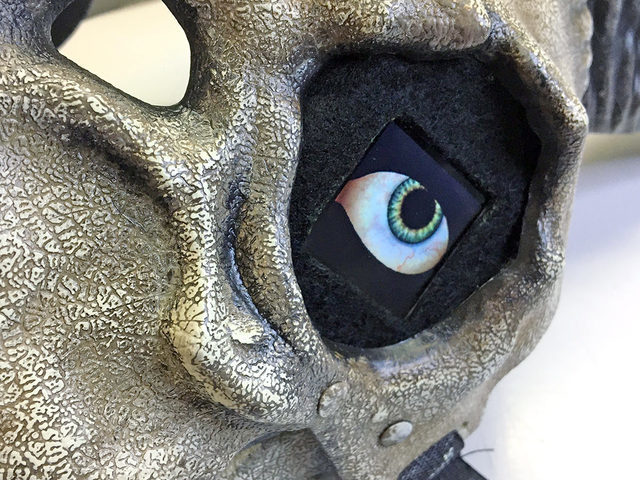
I wanted to go a little beyond the basic “stick the MONSTER M4SK on something” idea and show a couple of its more unusual features in action:

  • Splitting the MONSTER M4SK board and extending with the 9-pin JST cable.
  • Using the voice changer, including an amplified speaker.

I also had some helpful tips to pass along on selecting a mask, dealing with electronics in costumes, and so forth. So even if you’re not making this exact thing, you may want to skim through the guide before starting your own MONSTER M4SK project, whatever it may be.

START EARLY

The Truest Truth of Halloween, cosplay and Burning Man projects: start sooner rather than later…

  • Last-minute building leads to stress, disappointment and dropped projects. Halloween should be FUN. There’s CANDY and MONSTERS!
  • Give yourself time to think through difficult parts of a build, coming up with a plan B, C or even D when things aren’t going as planned.
  • More time to source the right parts or materials, or work out bugs in the finished piece.
  • Rushing when using tools runs the risk of injury, or ruining the thing you’re working on.
  • Give chemical glues and paint lots of time to dry. Though some set up quickly, many continue curing (and releasing fumes) for days. This is going right on your face, and if you’re smelling it, you’re breathing it. Finish the project well before the due date.

This wasn’t all done in one sitting. Just spending 15 minutes to an hour here and there, it still got finished in just a few days.

Other MONSTER M4SK Project Ideas

If the costume in this guide isn’t your style, check out these related guides for a font of ideas:

More will likely be coming…search the Adafruit Learning System to find the latest additions!

One of the more challenging parts of this project was just finding a mask that works with the particular needs of the MONSTER M4SK board…

The main issue is that most masks are (sensibly) designed with openings for the wearer’s eyes to show through…but the MONSTER M4SK would block your vision if placed there. We need it a little out of the way.

Sorry, werewolf. You won’t work for this project.

I had to hit up a couple different Halloween stores before finding something really suitable. This is best done in person…you don’t really know what you’re getting online. You might want to bring the MONSTER M4SK board with you to check for a good fit.

Aha! This goat skull mask was perfect!

  • Some distance between the creature’s and wearer’s eyes, so our electronics won’t block the view.
  • Plastic rather than rubber, making it easier to attach things.
  • Inexpensive. This was a goof-off project and not something I’m attached to. Tip: whatever store you’re at, check online for coupons, many stores have a 20%-off-one-item deal.
  • This one’s not a full over-the-head mask, so it’ll stay cooler and dryer.
  • Skulls are creepy. Goats doubly so.

This crow skull mask was a runner-up. I guess animal skulls just work well with this idea, having the eye sockets in a different location. But there’s no law that says you have to make a monster…maybe you’ll find something cute instead!

Since this crow is a latex rubber mask, you’d need to get more creative with attaching electronics. The Fish Head MONSTER M4SK Eyes guide floats some ideas.

Of course, if you’re not planning on wearing the mask…but making an animated display piece instead…anything’s fair game, regardless where the eyes sit.

TOTALLY OPTIONAL: the mask’s minimal paint job seemed awful plain. A few thin washes of cheap craft store acrylic paint were all it took to make it “pop.”

While I was customizing things…I ripped out a couple of the interior foam pads to better fit my big head.

Modifications like these are best done before adding any electronics.

If the mask idea isn’t your style, maybe there’s some prop you could fancy up. Peering eyes from a monster in a box. A ventriloquist dummy. Or Skeletor had that staff with a ram skull on it. Check out the seasonal merchandise at big-box stores, there are usually a few winners there.

One of the stranger things about the MONSTER M4SK is that it’s designed to be broken. The board can be split in two, and the halves joined with a 9-pin JST cable, allowing the eyes to be spaced differently. This is illustrated in the Fish Head guide!

Right off the bat…trouble!

The eye sockets on this mask are set too far apart even for the 100mm JST cable to reach.

Fix is simple in principle, but requires soldering finesse…

Each of the wires in the 9-pin JST cable needed to be extended. This requires:

  • Soldering iron and related paraphernalia
  • 26 or 28 gauge wire
  • Heat-shrink tubing
  • Checking your progress repeatedly

It’s not a lot of soldering, but it’s very fussy soldering. You ever solder wires and then realize you forgot to slip on the heat-shrink tubing first? There’s 18 chances to mess that up…so just work slowly and methodically.

Also, the order of the 9 wires must be maintained…if any are crossed, the second eye won’t work. It could even damage the board. Cutting and extending the wires one at a time is an option. If you decide to cut the whole cable at once, triple-check that each wire goes to the same position at both ends…and also that one of the connectors isn’t flipped 180 degrees.

I not-quite-doubled the length of the wires. This was more than I needed…but gives options in the future if I decide to pull this out and stick it in other projects.

Before anything goes in the mask, power up the board and make sure that both eyes still work.

Then disconnect the cable from both sides. There’s some cutting and gluing to be done, and we don’t want the cable getting messed up!

Another unexpected turn: originally I’d planned to use lenses with the eyes, but encountered a couple of problems…

  • The acrylic lens holders were just a tiny bit too big for the mask’s eye sockets. I could have ground down the mask or the holders, but…
  • The lenses limit the viewing angle of the screens…and with the eyes pointed somewhat outward, the effect isn’t visible from the front, where most people would be interacting.

So I decided to leave the lenses off and just use the bare screens. I’d need a way to hold them in place in the eye sockets, and also wanted to limit the amount of light that bleeds around the perimeter.

One more constraint: I’d prefer if none of this was permanent. After Halloween, I might like to take the components out and use them in the next project.

Solution to the latter was to use hot glue in key places. Hot glue can be removed using a Q-Tip dipped in rubbing alcohol. This doesn’t dissolve the glue…it cleanly breaks the bond, allowing it to be peeled away. When the time comes, this can all be dismantled and the electronics will be pristine!

Raiding my craft supply stash, I found some black craft foam (aka “fun foam”). Fashioned some frames that fit around the screens, which served multiple purposes…

  • Blocks the light bleeding out the sides of the display
  • The back side of the foam can be hot glued to the MONSTER M4SK PCB. As described above, this can be cleanly removed later. Then I can use whatever glue I want on the front side of the frames.
  • Provides a front surface that’s flush with the face of the screens…helpful for the next part…

I’m not suggesting anyone should go out and buy all these same materials. See what you have around and are comfortable working with, and improvise from that first. That goes for both materials and tools. I’m just oddly reluctant to throw anything away and have decades of accumulated craft detritus around the house. Maybe that crow mask would’ve been more fitting.

Also found in the craft hoard: black felt.

I cut two squares large enough to cover the mask’s eye sockets and then some. In the middle of each, I cut a 30mm-ish square through which the screen will be visible. Felt has some give to it, so the squares need not be perfect…you can adjust it while gluing it down to the frames.

Then I had something called Fabri-Tac glue on-hand and used that. E-6000 adhesive would also work. Once the glue dried, I glopped on some extra hot glue on the back in places around the perimeter, careful not to get any into the connector sockets.

Check that everything still works. Connect the board halves together with the cable and attach a battery or USB power.

Decide how the eyes will be positioned in the mask, make whatever marks you need to line this up again later.

After testing, disconnect all the cables again. More cutting and gluing, don’t want those getting nicked.

The felt eye squares are hot-glued back-to-front on the inside of the mask. Work slowly, one edge at a time and allowing the glue to set, so the fabric can be pulled taut as you go.

Once the glue’s all cooled down, the felt edges can be trimmed with small scissors and/or a hobby knife. Notice the wearer’s eye holes are not blocked now!

Link up the two boards with the cable again, and apply a few dabs of hot glue to keep it in place (depending on the mask or prop, zip ties can also work).

For powering the M4SK (audio will be powered separately, shown on the next page) a 500 mAh LiPo battery is slim enough to tuck behind a horn. It’s held in place with double-stick tape, wires secured with a couple dabs of hot glue. Do not hot glue the battery itself, and keep it out of spots where it could get flexed or punctured.

The 500 mAh battery gives about 3 hours run time, and takes a similar time to fully charge. If you’re planning marathon costume sessions, this cylindrical lithium-ion cell should run for closer to 12 hours. Or…if there’s space for a USB cable…even the most basic USB power banks have a ton of capacity!

Unexpected benefit of using a skull mask: if the battery runs out, when the screens go black it’s still a perfectly usable monster! The eyes and voice really step things up but aren’t a necessity for the character to work.

Bodies can be gross sometimes. We perspire continuously…salt water, basically, which is both mildly conductive and corrosive.

To keep some space between skin and electronics, I cut some pads from craft foam, held in place over the boards with double-stick foam tape.

And this is with an open-back mask! A full over-the-head mask is sweatier and has humid breath to contend with…more drastic measures might be called for: possibly even sealing the electronics with conformal coating spray, or adding a little DC fan in the snoot to bring in fresh air.

For some reason, even the simplest of costumes are always the temperature of Venus inside.

When planning how the electronics will fit, give some thought to clearances for both the USB port and audio jack. If space is tight, you can track down slim right-angle connectors for one or both.

If it’s difficult to plug and unplug the USB cable: consider just leaving it connected, and coiling up the cable in an out-of-the-way spot!

One more dry run to confirm everything still works. Try it on your head, make sure you can see OK. Doing monster “rar hands” poses is totally optional but recommended.

With the addition of a PDM microphone, 4-pin cable and amplified speaker, the MONSTER M4SK can alter your voice. The first two items are included in the ADABOX 013 bundle, or can be acquired separately.

Frankly, the voice distortion isn’t super great, but good enough for Halloween fun. Some words are hard to understand, especially with the pitch lowered. It’s fantastic for grunts and roars and monster sounds though!

Ideally the microphone should be right in front of the wearer’s mouth.

The wide-set eyes of this skull mask meant extending the PDM microphone cable, similar to the split-eyes cable on the prior page. Fortunately there’s only four wires and they’re color-coded. Your own project might not need this.

The mic seemed to work best centered about 1cm in front of one’s mouth.

Scrounging in the craft supplies again, ended up with a popsicle stick, trimmed to size. This part made me grateful for having chosen a rigid plastic mask.

Experiment and adjust, using tape to hold things temporarily until the sizes and positions are just right. Then one can commit to more permanent methods.

Hot glue holds the stick in place, and I gave it a coat of paint to hopefully seal the wood a little (so it won’t absorb moisture and bacteria).

Once the paint was dry, some hot glue held the mic in place, as well as a few dots to keep the wires under control.

Remember, the point to all this hot glue is that it’s removable later.

Exhaled breath contains a ton of moisture! A couple layers of plastic wrap, taped down around the mic, keeps out condensed breath and spittle. Or cut out a small piece of a sandwich bag. Or improvise. Maybe there’s a 3D-printed doodad that could encapsulate this and still let enough sound through?

A really humid over-the-head mask might require more drastic measures. Heat-shrink might work, or might block too much sound, haven’t tried. An old audio engineer trick for rain or underwater recording is to put the mic inside a balloon and tie it off with a rubber band.

The humidity issue is one of the most vexing problems when combining electronics and costumes. This is why it’s a good idea to start early and do some realistic test runs, not just a few words. An idea might seem to work but then cuts out after 30 minutes. Allow time for experiments.

The MONSTER M4SK needs to be connected to an amplified speaker to make this work. The next page, mirrored from the main MONSTER M4SK guide, gives some recommendations.

The Monoprice amplifier mentioned there includes lanyard holes…it’s easily worn over the chest (maybe hidden under a cloak), a little more natural than a voice coming from your hip.

This used to be a separate program…it now works together with the eyes! This requires the following:

Usage

The PDM microphone connects using a tiny 4-pin cable to the “PDM MIC” port on MONSTER M4SK — it’s near the reset button. You can optionally fashion a pop filter over the mic using a little fabric or foam, it’ll probably sound better.

Connect an audio cable from MONSTER M4SK headphone jack to the aux input on the powered speaker.

The voice changer is off by default! It saps a fair bit of compute cycles (anywhere from about 25 to 50 percent…with a corresponding drop in eye animation frame rates) so you’ll have to turn this on only if you really want it. To do so, you'll add a line to the config.eye JSON file on the root level of your MONSTER M4SK. Use:

"voice" : true

to enable the voice changer. See the link below for an example config file that's been set up with voice changer parameters. Add a trailing comma if it’s not the last line.

There are three buttons along the top edge of the monster’s left eye. Tapping the inner button (the one closest to the nose) raises the pitch by 5%. Tapping the outer button (near the corner) lowers the pitch by 5%. Tapping the middle button resets the pitch to its default.

The default pitch is set with the pitch keyword. This is a floating-point value, where 1.0 is normal (voice is passed straight through, no change), 2.0 will double the frequency (raising the voice by one octave), 0.5 will halve the frequency (lowering by one octave).

pitch can be from 0.4 to 4.0…but the actual usable range where you can still understand things is a bit narrower, perhaps 0.6 to 2.0…you’ll want to experiment a bit to find a setting that achieves the desired effect with your own voice.

Microphone gain (sensitivity) is set with the gain keyword. If installed in a mask and you need to adjust the microphone to compensate for its placement relative to your mouth, use this with a floating-point value where 1.0 is “normal” sensitivity, 0.5 is quieter by half, 2.0 is double the loudness and so forth. There are limits to what can be done here, you may want to experiment a bit with this setting and the volume of an external amplified speaker.

Don’t shout! Speak in a normal to soft voice, let the speaker take care of amplification. This helps the “weird” voice be heard over your own.

Similarly…speak at your normal voice pitch and let the voice changer do its thing. You don’t need to make a funny voice.

Need a Dalek voice effect? With the voice changer enabled as described above, also add "waveform" : "sine" to enable this effect, which applies a 30 Hz sine wave modulation to the pitch-adjusted voice — same as used for the original Dr Who Daleks. You can try other waveforms ("square", "sine", "tri" and "saw" are all supported) and other modulation frequencies ("modulate" : 100 for a 100 Hz modulation wave)…but, to be perfectly honest…this all turned out a bit disappointing, the feature is only left in there because the 30 Hz Dalek modulation was spot-on. With some experimentation with different pitch and modulation settings you might also get a passable “Chicken, fight like a robot!” voice from Berzerk, if anyone even remembers that one.

Example Config.eye File

{
  // Doom-spiral eyes with voice changer
  "voice"          : true, //Turns on voice changer
  "waveform"       : "sine" , //Modulates voice with sine wave
  "modulate"       : 55 , //Modulation wave freq. in Hz
  "eyeRadius"      : 125,
  "eyelidIndex"    : "0x00", // From table: learn.adafruit.com/assets/61921
  "irisRadius"     : 125,    // Iris = whole eye!
  "pupilMin"       : 0,      // Pupil is always 0 size
  "pupilMax"       : 0,
  "pupilColor"     : [ 255, 255, 169 ], // Shouldn't show, but just in case
  "scleraColor"    : [ 255, 0, 0 ],
  "backColor"      : [ 255, 0, 0 ],
  "irisTexture"    : "doom-spiral/spiral.bmp",
  // The doom-red and doom-spiral eyelid bitmaps don't fully close.
  // This is to give the IMPRESSION of a blink without actually blinking,
  // so human eye behind is hidden better when doing Pepper's ghost trick.
  "upperEyelid"    : "doom-spiral/upper.bmp",
  "lowerEyelid"    : "doom-spiral/lower.bmp",
  "left" : {
    "irisSpin"     : 80    // Rotate iris @ 80 RPM
  },
  "right" : {
    "irisMirror"   : true, // Flip spiral image
    "irisSpin"     : 70    // Slightly different speed for weirdness
  }
}

Tips for using the Monoprice 5-Watt Guitar Amplifier

I have a love/hate thing with this speaker. On the plus side: it’s pretty inexpensive, is rechargeable, and is slim(ish) and clips to one’s belt or a lanyard, making it handy for costume use.

It’s really designed for guitar use and MP3 playback (from microSD card) and there’s some hoops necessary to get it to pass through audio undistorted…

  • Connect MONSTER M4SK to the AUX phono jack (center of three), not the MIC input.
  • After powering on, wait a moment and then press the “M” button to pass through audio.

You can see in the photo that I’ve labeled mine and highlighted the correct jack and button…I use it infrequently and forget this ritual (also helps when others are borrowing it).

This is not an Adafruit product and we do not provide support. Please check with Monoprice if you encounter trouble.

So, from a technical perspective, it’s all working. Now, if we want, we can fancy things up on the aesthetic side…

The default eyes seemed…friendly and sad. I whipped up a set of swirling demon eyes more suited to the skull mask. These are included in the graphics bundle described in the main MONSTER M4SK guide, along with installation instructions.

The configuration file for this eye is already set up for a deep monstery voice. Rar!

The mask is just one part (often the most important) of a whole costume. What are we gonna do about the rest of this?

What luck…I already had stuff around to accessorize the goat skull demon!

See? “Having way too many random craft supplies just lying around” isn’t my only superpower.

What if you’re not weird like me and don’t have various monster garb on-hand?

Ask around! Cosplayers, Renaissance faire regulars and Halloween people all seem to collect multipurpose costume detritus over time, and may have hand-me-downs or are willing to trade. Otherwise…

“Generic warlock/monster cloak” and “skeleton jumpsuit” are the hydrogen and helium of the Periodic Table of Monster Costumes…a lot of stuff can build on them. These were literally right next to each other in a Halloween store.

If you’re a costume person, generic monstery items like this can be picked up on clearance after the season and easily find uses in future improvised get-ups. Often very cheaply made though.

Thrift stores can be a gold mine! Coats, belts, ISO Standard Werewolf Flannel. Some tips:

  • Costume hacks have no gender…it’s okay to look in The Other Department. If it fits and works as part of your outfit, it’s fair game. That “ladies” faux-fur vest could be part of a Viking getup. That “mens” motorcycle jacket looks good for a cyborg. You won’t catch cooties.
  • “Too nice” garments can be distressed to look old and tattered…it’s fun! Belt sander, bleach, spray paint and so forth.
  • Give it the sniff test before buying. Sometimes items get donated because the cat got mad, and that smell never washes out.

Maybe you want to DIY a costume, but don’t have much practice with sewing? That’s great! Monsters are notoriously bad at sewing…so if a DIY costume comes out rough-looking, that can be an asset here.

Another haunt/cosplay staple is strips of linen fabric, dyed in dark or earthy colors. Don’t finish the edges, just leave them raw and frayed! Rinse out any extra dye and allow to fully dry, then sew or hot-glue to a costume or mask. These make fantastic monster “hair” or dreadlocks, or as tatters to cover the transitions between costume pieces…at the tops of boots or gloves, for instance.

This guide was first published on Sep 30, 2019. It was last updated on Mar 08, 2024.