It's easy to use the RFM69HCW radio with CircuitPython and the Adafruit CircuitPython RFM69 module. This module allows you to easily write Python code that sends and receives packets of data with the radio. Be careful to note this library is for the RFM69 radio only and will not work with the RFM9X LoRa radios!
Design Considerations
One thing to be aware of before you use the RFM69 series of radios with CircuitPython are some of the limitations and design considerations for its module. Keep these in mind as you think about projects using the RFM69 and CircuitPython:
- You can only send and receive packets up to 60 bytes in length at a time. The size of the radio's internal buffer dictates this limit so if you want to send longer messages you'll need to break them into a series of smaller send calls in your application code.
- Receiving packets is a 'best effort' in pure Python code. Unlike the Arduino versions of the RFM69 library there is no interrupt support which means when a packet is received it must be immediately processed by the Python code or it could be lost. For your application it will work best to only receive small, single packet messages at a time. Don't try to receive kilobytes of data or else you'll lose packets. This module is really intended for simple single packet messages like 'ON', 'OFF', etc.
- Sending and receiving packets will 'block' your Python code until the packet is fully processed. This means you can't do a lot of other things while sending and waiting for packets to be received. Design your application so the radio usage is the primary scenario and very little other tasks need to happen in the background.
- The module is written to be compatible with the RadioHead RFM69 Arduino library. This means by default the module will setup the radio with the same GFSK, 250kbit/s, 250khz deviation, and bit whitening radio configuration so it can send and receive data with itself and other RadioHead-driven modules. In addition the CircuitPython module uses the same sync word and packet preamble (4 bytes) as RadioHead. If you want to use different modulations or settings you'll need to configure the radio yourself (see the initialization code for the registers and bits to access, however you will need to consult the datasheet for the necessary values).
- You can enable encryption and set an AES encryption key.
- The CircuitPython module supports advanced RadioHead features like node addressing and "reliable DataGram". "Reliable DataGram" mode in CircuitPython has some additional parameters to control timing that are not available with the RadioHead library. It may be difficult to get reliable transmission to work between the RadioHead library and CircuitPython.
Wiring With Breakout
First wire up a RFM69 breakout to your board as shown on the previous pages for Arduino. Note that the G0/interrupt line is not used by the CircuitPython module and can remain unconnected. Here's an example of wiring a Feather M0 to the radio with a SPI connection:
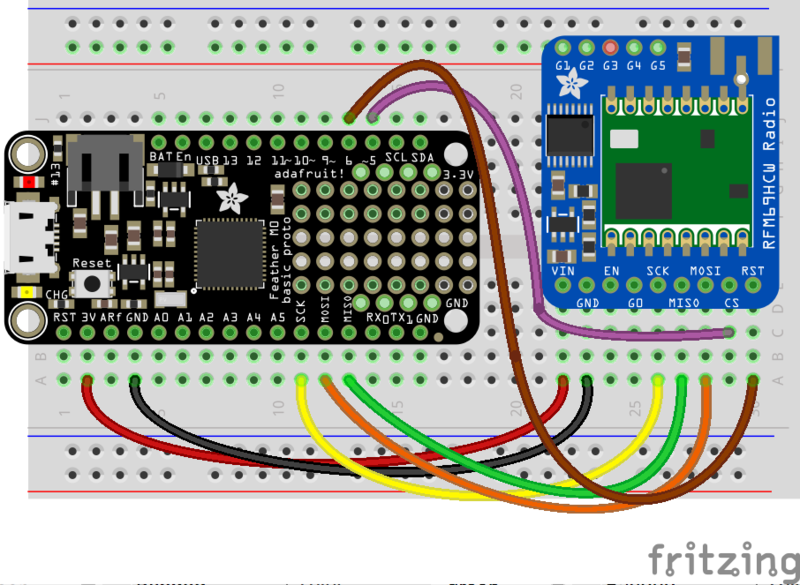
- Board 3V to radio VIN
- Board GND to radio GND
- Board SCK to radio SCK
- Board MOSI to radio MOSI
- Board MISO to radio MISO
- Board D5 to radio CS (or any other digital I/O pin)
- Board D6 to radio RST (or any other digital I/O pin)
Usage with All-In-One Feather M0
Alternatively you can use the Feather M0 RFM69 board but be sure you've loaded the adafruit-circuitpython-feather_m0_rfm69-*.bin version of CircuitPython on your board! This is very important as the RFM69 build has special pins added to the board module which are used to access the radio's control lines!
For details on how to load a binary circuitpython build, check out our Non-UF2-Install guide


Module Install
If you have the Feather M0 RFM69 and have installed CircuitPython 6.0 or later, it is not necessary to install the library modules. They are "frozen into" the Circuitpython build. Skip to the "Usage" section below.
If you are using an older version of CircuitPython you will need to install the modules as described.
Next you'll need to install the Adafruit CircuitPython RFM69 module on your CircuitPython board. Before you do that make sure you are running the latest version of Adafruit CircuitPython for your board too (again be sure to the load the Feather M0 RFM69 version if you're using that board and want to use its built-in radio module).
Next you'll need to install the necessary libraries to use the hardware--carefully follow the steps to find and install these libraries from Adafruit's CircuitPython library bundle. Our introduction guide has a great page on how to install the library bundle for both express and non-express boards.
Remember for non-express boards like the Adafruit Feather M0, you'll need to manually install the necessary libraries from the bundle:
- adafruit_rfm69.mpy
- adafruit_bus_device
You can also download the adafruit_rfm69.mpy from its releases page on Github.
Before continuing make sure your board's lib folder or root filesystem has the adafruit_rfm69.mpy, and adafruit_bus_device files and folders copied over.
Usage
To demonstrate the usage of the radio we'll initialize it and send and receive data from the board's Python REPL.
Connect to the board's serial REPL so you are at the CircuitPython >>> prompt.
Run the following code to import the necessary modules and initialize the SPI connection with the sensor:
import board
import busio
import digitalio
spi = busio.SPI(board.SCK, MOSI=board.MOSI, MISO=board.MISO)
Now define a few of the pins connected to the RFM69, specifically the CS and RST pins:
cs = digitalio.DigitalInOut(board.D5)
reset = digitalio.DigitalInOut(board.D6)
However if you're using the Feather M0 RFM69 board with a built-in RFM69 radio (and you've loaded the special version of CircuitPython just for this board as mentioned above), you instead want to use these pins for the CS and RST lines:
cs = digitalio.DigitalInOut(board.RFM69_CS)
reset = digitalio.DigitalInOut(board.RFM69_RST)
You're ready to import the RFM69 module and create an instance of the RFM69 class inside it. Before you create the radio module instance you'll need to check if you're using a 433mhz or 915mhz radio module as the initializer requires the frequency to be specified--confirm which frequency your module uses and run one of the following lines.
For a 915mhz radio use:
import adafruit_rfm69
rfm69 = adafruit_rfm69.RFM69(spi, cs, reset, 915.0)
Or for a 433mhz radio use:
import adafruit_rfm69
rfm69 = adafruit_rfm69.RFM69(spi, cs, reset, 433.0)
Notice the initializer takes the following required parameters:
- spi - The SPI bus connected to the board.
- cs - The DigitalInOut instance connected to the CS line of the radio.
- reset - The DigitalInOut instance connected to the RST or reset line of the radio.
- frequency - The frequency in megahertz of the radio module. Remember this frequency depends on which type of radio you're using and the frequency you desire to use!
In addition there are some optional parameters you might specify:
- baudrate - The baud rate to use for the SPI connection to the radio. By default this is 10mhz which is as fast as the radio can handle, but in some cases it might be too fast if you're wiring up a breakout to a breadboard (breadboards can be notorious for not working well with high speed signals). If you run into odd errors like being unable to find the RFM69 radio try lowering the baudrate by specifying a baudrate=1000000 keyword (which sets the speed to a lower 1mhz value).
Once the RFM69 class is created and initialized you're ready to start sending and receiving data.
Remember by default the module will be configured to interface with the "RadioHead" RFM69 setup so you can also send and receive packets with an Arduino running the 'raw' TX/RX examples!
To send a message simply call the send function and provide a string or byte string of data:
rfm69.send('Hello world!')
Remember you can only send a message up to 60 bytes in length at a time! Attempting to send a message longer than 60 bytes will fail with an exception error. If you need to send a longer message it will have to be broken up into multiple send calls and reconstructed on the receiving side.
If you have another RFM69 on the same frequency and modulation waiting to receive messages (like another CircuitPython module running receive code below) you should see it receive the message.

You can even have an Arduino running the RadioHead library's raw RX example see the message that was sent (be sure this receiving side has an encryption key setup exactly the same way as the sending side, see the encryption_key property discussion further below):

To receive a message simply call the receive function. This function will wait for half a second for any packet to be received. If a packet is found it will be returned as a byte string (remember packets are at most 60 bytes long), or if no packet was found a result of None is returned.
rfm69.receive()
You can increase the amount of time the module waits for a packet to be received by specifying the time in seconds as a parameter to the receive call:
rfm69.receive(timeout=5.0) # Wait 5 seconds instead of 0.5 seconds.
Notice this waits longer at the REPL for a packet to be received before returning. If you have another RFM69 setup try having it send a message while the other is waiting to receive it. You should see a byte string returned. You can also have an Arduino running the RadioHead library's raw TX example send messages that are received by your code (again it must be setup with the same encryption key):

One thing to note in Python byte strings aren't exactly like text strings and you might not be able to do all the text processing (like find, replace, etc.) as you expect. However you can convert a byte string into text by assuming a specific text encoding like ASCII. For example to receive a packet and convert the contents to an ASCII text string you can run code like:
packet = rfm69.receive()  # Wait for a packet to be received (up to 0.5 seconds)
if packet is not None:
    packet_text = str(packet, 'ascii')
    print('Received: {0}'.format(packet_text))
Notice this code first receives a packet, then checks if one was actually found (the packet is not None check--if no packet is received a value of None is returned), and then converts the packet data to a string assuming an ASCII text encoding.
Beyond RX & TX
Beyond basic sending and receiving there are a few properties of the RFM69 class you might want to interact with:
-
encryption_key - This is an optional 16 byte string that defines the AES encryption key used by the radio for sending and receiving packets. Both the sending and receiving code must have the exact same encryption key set or they'll be unable to see each other's packets! See the simpletest.py example below for an example of setting the
encryption_keyto match the default key from RadioHead library raw examples. By default the RFM69 class assumes no encryption key is set, and you can set this property to the valueNoneto disable encryption. - rssi - The received signal strength indicator is a property you can read to see the strength of the radio signal being received. This is updated when packets are received and returns a value in decibels (typically negative, so the smaller the number and closer to 0, the higher the strength / better the signal).


That's all there is to the basic RFM69 radio usage! Remember the CircuitPython module is designed for sending and receiving small up to 60 byte control messages and not large or high bandwidth amounts of data.
Here's a complete example of sending a message and waiting to receive and print any received messages. Save this as main.py on your board and open the serial REPL to see it print data and any received messages. If you have two boards and radios setup to run this code at the same time they'll send each other a message on start up!
# SPDX-FileCopyrightText: 2018 Tony DiCola for Adafruit Industries
# SPDX-License-Identifier: MIT

# Simple example to send a message and then wait indefinitely for messages
# to be received.  This uses the default RadioHead compatible GFSK_Rb250_Fd250
# modulation and packet format for the radio.
import board
import busio
import digitalio

import adafruit_rfm69


# Define radio parameters.
RADIO_FREQ_MHZ = 915.0  # Frequency of the radio in Mhz. Must match your
# module! Can be a value like 915.0, 433.0, etc.

# Define pins connected to the chip, use these if wiring up the breakout according to the guide:
CS = digitalio.DigitalInOut(board.D5)
RESET = digitalio.DigitalInOut(board.D6)
# Or uncomment and instead use these if using a Feather M0 RFM69 board
# and the appropriate CircuitPython build:
# CS = digitalio.DigitalInOut(board.RFM69_CS)
# RESET = digitalio.DigitalInOut(board.RFM69_RST)

# Define the onboard LED
LED = digitalio.DigitalInOut(board.D13)
LED.direction = digitalio.Direction.OUTPUT

# Initialize SPI bus.
spi = busio.SPI(board.SCK, MOSI=board.MOSI, MISO=board.MISO)

# Initialze RFM radio
rfm69 = adafruit_rfm69.RFM69(spi, CS, RESET, RADIO_FREQ_MHZ)

# Optionally set an encryption key (16 byte AES key). MUST match both
# on the transmitter and receiver (or be set to None to disable/the default).
rfm69.encryption_key = (
    b"\x01\x02\x03\x04\x05\x06\x07\x08\x01\x02\x03\x04\x05\x06\x07\x08"
)

# Print out some chip state:
print("Temperature: {0}C".format(rfm69.temperature))
print("Frequency: {0}mhz".format(rfm69.frequency_mhz))
print("Bit rate: {0}kbit/s".format(rfm69.bitrate / 1000))
print("Frequency deviation: {0}hz".format(rfm69.frequency_deviation))

# Send a packet.  Note you can only send a packet up to 60 bytes in length.
# This is a limitation of the radio packet size, so if you need to send larger
# amounts of data you will need to break it into smaller send calls.  Each send
# call will wait for the previous one to finish before continuing.
rfm69.send(bytes("Hello world!\r\n", "utf-8"))
print("Sent hello world message!")

# Wait to receive packets.  Note that this library can't receive data at a fast
# rate, in fact it can only receive and process one 60 byte packet at a time.
# This means you should only use this for low bandwidth scenarios, like sending
# and receiving a single message at a time.
print("Waiting for packets...")
while True:
    packet = rfm69.receive()
    # Optionally change the receive timeout from its default of 0.5 seconds:
    # packet = rfm69.receive(timeout=5.0)
    # If no packet was received during the timeout then None is returned.
    if packet is None:
        # Packet has not been received
        LED.value = False
        print("Received nothing! Listening again...")
    else:
        # Received a packet!
        LED.value = True
        # Print out the raw bytes of the packet:
        print("Received (raw bytes): {0}".format(packet))
        # And decode to ASCII text and print it too.  Note that you always
        # receive raw bytes and need to convert to a text format like ASCII
        # if you intend to do string processing on your data.  Make sure the
        # sending side is sending ASCII data before you try to decode!
        packet_text = str(packet, "ascii")
        print("Received (ASCII): {0}".format(packet_text))


