
NASA Open API Key
We'll use the NASA API to make our queries and retrieve our image of the day. In order to do so, you'll need to register for a free account with api.nasa.gov and get your API key.
It's easy to do, just head to this link and enter your name and email address. That's all there is to it! Your API key will be generated and sent to you via email, as well as showing up immediately in the browser. Keep that key (or the email containing it) handy, we'll need to copy and paste it into our code in a moment.
Adafruit IO Time Server
In order to get use the Adafruit image converter, this project will require you to have an Adafruit IO username and key. Adafruit IO is absolutely free to use, but you'll need to log in with your Adafruit account to use it. If you don't already have an Adafruit login, create one here.
If you haven't used Adafruit IO before, check out this guide for more info.
Once you have logged into your account, there are two pieces of information you'll need to place in your settings.toml file: Adafruit IO username, and Adafruit IO key. Head to io.adafruit.com and simply click the View AIO Key link on the left hand side of the Adafruit IO page to get this information.
Then, add them to the settings.toml file like this:
CIRCUITPY_WIFI_SSID = "your_wifi_ssid"
CIRCUITPY_WIFI_PASSWORD = "your_wifi_password"
AIO_USERNAME = "your_aio_username"
AIO_KEY = "your_aio_key"
Add CircuitPython Code and Assets
In the Project Code section further down this page, click on the Download Project Bundle button, and save the .zip archive file to your computer.
Then, uncompress the .zip file, it will unpack to a folder named PyPortal_NASA.
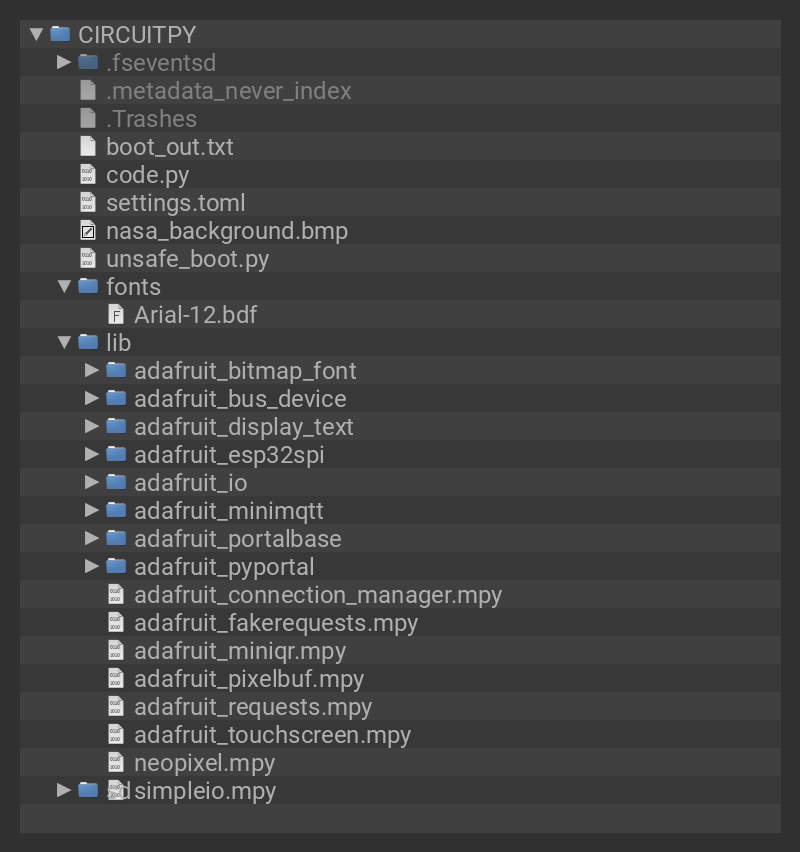
Copy the contents of the PyPortal_NASA directory to your PyPortal CIRCUITPY drive.

Editing the Code
You can edit the code.py file with any text editor you like. Adafruit suggests installing the free Mu Python editor as it's super handy, recognizes Adafruit boards, and has a built in serial monitor/REPL to interact with the board. Find out more about Mu here.
Add NASA API Key
Open up code.py in Mu and then copy and paste your API key from NASA that we got earlier in to the DATA_SOURCE url, getting rid of the words DEMO_KEY and replacing it with your actual API key.
That line will look something like this:
DATA_SOURCE = "https://api.nasa.gov/planetary/apod?api_key=your_actual_really_long_key_here"
When you're done, save the code.py file again to your PyPortal's CIRCUITPY drive.
boot.py
We're using a special file to ensure the .bmp cache writes to the flash properly. This is the unsafe_boot.py file you copied to the drive. Rename it to boot.py now.
Note that you'll see this scary looking text appear during restart, don't worry, it's supposed to say that!
**************** WARNING ******************
Using the filesystem as a write-able cache!
This is risky behavior, backup your files!
**************** WARNING ******************
This is what the final contents of the CIRCUITPY drive will look like:
# SPDX-FileCopyrightText: 2019 Limor Fried for Adafruit Industries
#
# SPDX-License-Identifier: MIT

import time
import board
from adafruit_pyportal import PyPortal

# Set up where we'll be fetching data from
DATA_SOURCE = "https://api.nasa.gov/planetary/apod?api_key=DEMO_KEY"
# There's a few different places we look for data in the photo of the day
IMAGE_LOCATION = ["url"]
TITLE_LOCATION = ["title"]
DATE_LOCATION = ["date"]

# the current working directory (where this file is)
cwd = ("/"+__file__).rsplit('/', 1)[0]
pyportal = PyPortal(url=DATA_SOURCE,
                    json_path=(TITLE_LOCATION, DATE_LOCATION),
                    status_neopixel=board.NEOPIXEL,
                    default_bg=cwd+"/nasa_background.bmp",
                    text_font=cwd+"/fonts/Arial-12.bdf",
                    text_position=((5, 220), (5, 200)),
                    text_color=(0xFFFFFF, 0xFFFFFF),
                    text_maxlen=(50, 50), # cut off characters
                    image_json_path=IMAGE_LOCATION,
                    image_resize=(320, 240),
                    image_position=(0, 0))

while True:
    response = None
    try:
        response = pyportal.fetch()
        print("Response is", response)
    except RuntimeError as e:
        print("Some error occured, retrying! -", e)

    time.sleep(30*60)  # 30 minutes till next check
The NASA Image Viewer is doing a few cool things using CircuitPython and the PyPortal:
Background Splash Screen
First, we'll display a splash screen with the NASA logo. This is a 320x240 pixel RGB 16-bit raster graphic in .bmp format.

Font
We'll be displaying the image title and today's date as text created with a bitmapped font to overlay on top of the background image once that's loaded. The font used here is a bitmap font made from an oblique Arial typeface. You can learn more about converting type in this guide.
JSON
In order to retrieve the NASA Astronomy Picture of the Day (APOD), we'll be making a query to the NASA API.
When you make a request of the APOD server with your API key added, you'll get a JSON file returned as the response.
In fact, you can run the same query as the PyPortal does to see the result. Copy and paste this link https://api.nasa.gov/planetary/apod?api_key=DEMO_KEY
into your browser, except replace DEMO_KEY with your own API key that NASA sent in the registration email.
When you enter this in your web browser, you'll see a result returned like this:
{
  "copyright": "Mario Zauner",
  "date": "2019-04-03",
  "explanation": "The famous Horsehead Nebula in Orion is not alone.  A deep exposure shows that the dark familiar shaped indentation, visible just below center, is part of a vast complex of absorbing dust and glowing gas.  To bring out details of the  Horsehead's pasture, an amateur astronomer used a backyard telescope in Austria to accumulate and artistically combine 7.5 hours of images in the light of Hydrogen (red), Oxygen (green), and Sulfur (blue). The resulting spectacular picture details an intricate tapestry of gaseous wisps and dust-laden filaments that were created and sculpted over eons by stellar winds and ancient supernovas.  The Flame Nebula is visible just to the left of the Horsehead, while the bright star on the upper left is Alnilam, the central star in Orion's Belt. The Horsehead Nebula lies 1,500 light years distant towards the constellation of Orion.    Bounce around the Universe: Random APOD Generator",
  "hdurl": "https://apod.nasa.gov/apod/image/1904/HorseheadFlame_Zauner_4404.jpg",
  "media_type": "image",
  "service_version": "v1",
  "title": "Wisps Surrounding the Horsehead Nebula",
  "url": "https://apod.nasa.gov/apod/image/1904/HorseheadFlame_Zauner_960.jpg"
}
That result is a JSON (JavaScript Object Notation) array. It is comprised of a single element with seven key:value pairs. For example, there is one key called date which has a value of 2019-04-03which is expressed this way:
"date": "2019-04-03"
And another we care about is the title key, which has a value of Wisps Surrounding the Horsehead Nebula
So that is expressed as:
"title": "Wisps Surrounding the Horsehead Nebula"
Another key we really care about is the url which has a value of the image location:
"url": "https://apod.nasa.gov/apod/image/1904/HorseheadFlame_Zauner_960.jpg"
Since this JSON object array has a consistent way to return the results to us, the code we're running on the PyPortal can easily parse the data and display it!
Here's what the JSON file looks like in the "code beautifier" of Firefox.

You can see how it's done in this part of code.py:
DATA_SOURCE = "https://api.nasa.gov/planetary/apod?api_key=xxxxxxx" #put your api key here
IMAGE_LOCATION = ["url"]
TITLE_LOCATION = ["title"]
DATE_LOCATION = ["date"]
Then, in the pyportal query we ask for the date and title names from that URL, and then use the text_ arguments to set the font, position, color, wrap, and maxlen of the text when it is displayed.
We use the url name to get the path to the .jpeg image file.
pyportal = PyPortal(url=DATA_SOURCE,
                    json_path=(TITLE_LOCATION, DATE_LOCATION),
                    status_neopixel=board.NEOPIXEL,
                    default_bg=cwd+"/nasa_background.bmp",
                    text_font=cwd+"/fonts/Arial-12.bdf",
                    text_position=((5, 220), (5, 200)),
                    text_color=(0xFFFFFF, 0xFFFFFF),
                    text_maxlen=(50, 50), # cut off characters
                    image_json_path=IMAGE_LOCATION,
                    image_resize=(320, 240),
                    image_position=(0, 0))
With all of this prepared, during the main loop of while True: the code will query the NASA page for the JSON data.
When it gets the path of the .jpeg file, the pyportal library passes it along to an Adafruit IO image converter server where the file is converted into the format the PyPortal can display, a 320x240 pixel RGB 16-bit .bmp.


This image is then cached onto the PyPortal's storage and displayed on the PyPortal TFT screen.
Finally, the text will be displayed over the image.
This updates every thirty minutes. Be aware, you cannot make more than 50 queries per day to the NASA API!


