Weekly Countdown
We can code the PyPortal in CircuitPython and set the day and time of a weekly occurrence, such as the airing of Adafruit's Ask an Engineer livestream, as well as the duration of the program.
The PyPortal Countdown Clock will do the following:
- Display a custom background .bmp for the event
- Determine the current local time using the WiFi connection to the Internet
- Draw out the countdown time in days, hours, and minutes
- Display a second custom background graphic during the event, such as an "On Air" sign
- After the event, start the countdown for the next week's occurrence of the event

Adafruit IO Time Server
In order to get the precise time, our project will query the Adafruit IO Internet of Things service for the time. Adafruit IO is absolutely free to use, but you'll need to log in with your Adafruit account to use it. If you don't already have an Adafruit login, create one here.
If you haven't used Adafruit IO before, check out this guide for more info.
Once you have logged into your account, there are two pieces of information you'll need to place in your settings.toml file: Adafruit IO username, and Adafruit IO key. Head to io.adafruit.com and simply click the View AIO Key link on the left hand side of the Adafruit IO page to get this information.
Then, add them to the settings.toml file like this:
CIRCUITPY_WIFI_SSID = "your_wifi_ssid"
CIRCUITPY_WIFI_PASSWORD = "your_wifi_password"
AIO_USERNAME = "your_aio_username"
AIO_KEY = "your_aio_key"
Install CircuitPython Code and Assets
In the embedded code element below, click on the Download Project Bundle button, and save the .zip archive file to your computer.
Then, uncompress the .zip file, it will unpack to a folder named PyPortal_WeeklyCountdown.
Copy the contents of the PyPortal_WeeklyCountdown directory to your PyPortal CIRCUITPY drive.

This is what the final contents of the CIRCUITPY drive will look like:
# SPDX-FileCopyrightText: 2019 Limor Fried for Adafruit Industries
#
# SPDX-License-Identifier: MIT

"""
This example will figure out the current local time using the internet, and
then draw out a countdown clock until an event occurs!
Once the event is happening, a new graphic is shown
"""
import time
import board
from adafruit_pyportal import PyPortal
from adafruit_bitmap_font import bitmap_font
from adafruit_display_text.label import Label

# The time of the thing!
EVENT_WEEKDAY = 2       # monday = 0 .. sunday = 6
EVENT_HOUR = 20         # in 24-hour time
EVENT_MINUTE = 00
EVENT_DURATION = 3600   # in seconds!
# Instead of messing around with timezones, just put in
# the *location* of the event, and we'll automatically set the PyPortal's
# time to that location. Then compute the math from there
# for a list of valid locations, see http://worldtimeapi.org/api/timezone
EVENT_LOCATION = "America/New_York"  # set to None if its for your local time

# the current working directory (where this file is)
cwd = ("/"+__file__).rsplit('/', 1)[0]
event_background = cwd+"/countdown_event.bmp"
countdown_background = cwd+"/countdown_background.bmp"

# Initialize the pyportal object and let us know what data to fetch and where
# to display it
pyportal = PyPortal(status_neopixel=board.NEOPIXEL,
                    default_bg=countdown_background)

big_font = bitmap_font.load_font(cwd+"/fonts/Helvetica-Bold-36.bdf")
big_font.load_glyphs(b'0123456789') # pre-load glyphs for fast printing

days_position = (25, 212)
hours_position = (110, 212)
minutes_position = (220, 212)
text_color = 0x000000

text_areas = []
for pos in (days_position, hours_position, minutes_position):
    textarea = Label(big_font, text='  ')
    textarea.x = pos[0]
    textarea.y = pos[1]
    textarea.color = text_color
    pyportal.splash.append(textarea)
    text_areas.append(textarea)
refresh_time = None

while True:
    # only query the online time once per hour (and on first run)
    if (not refresh_time) or (time.monotonic() - refresh_time) > 3600:
        try:
            print("Getting time from internet!")
            pyportal.get_local_time(location=EVENT_LOCATION)
            refresh_time = time.monotonic()
        except RuntimeError as e:
            print("Some error occured, retrying! -", e)
            continue

    the_time = time.localtime()
    print("Time at location", EVENT_LOCATION, ":", the_time)

    # The easiest way to tell when
    mins_remaining = EVENT_MINUTE - the_time[4]
    if mins_remaining < 0:
        mins_remaining += 60
    # add minutes to go forward
    the_time = time.localtime(time.mktime(the_time) + mins_remaining * 60)
    #print("minute fastforward:", the_time)

    hours_remaining = EVENT_HOUR - the_time[3]
    if hours_remaining < 0:
        hours_remaining += 24
    # add hours to go forward
    the_time = time.localtime(time.mktime(the_time) + hours_remaining * 60 * 60)
    #print("hour fastforward:", the_time)

    days_remaining = EVENT_WEEKDAY - the_time[6]
    if days_remaining < 0:
        days_remaining += 7

    total_sec_remaining = days_remaining * 24 * 60 * 60
    total_sec_remaining += hours_remaining * 60 * 60
    total_sec_remaining += mins_remaining * 60

    print("Remaining: %d days, %d hours, %d minutes (%d total seconds)" %
          (days_remaining, hours_remaining, mins_remaining, total_sec_remaining))

    week_of_seconds = 604800
    if (week_of_seconds - total_sec_remaining) < EVENT_DURATION:
        print("ITS HAPPENING!")
        pyportal.set_background(event_background)
    else:
        pyportal.set_background(countdown_background)
        text_areas[0].text = '{:>1}'.format(days_remaining)  # set days textarea
        text_areas[1].text = '{:>2}'.format(hours_remaining) # set hours textarea
        text_areas[2].text = '{:>2}'.format(mins_remaining)  # set minutes textarea

    # update every 30 seconds
    time.sleep(30)
How it Works
The PyPortal Countdown is doing a couple of cool things to make your event display:
Background
First, it displays a bitmap graphic named countdown_background.bmp as the screen's background. This is a 320 x 240 pixel RGB 16-bit raster graphic in .bmp format.

Time
In order to calculate the countdown or count-up value, the PyPortal's CircuitPython code determines the local time by checking the internet time via the WiFi connection. It uses your IP address information to determine the local time. The good news is that once you've set up your timezone (or if the IP is fine) you do not have to adjust for daylight savings, leap years, etc.
In some cases, the time may not appear correctly based on your IP address, but don't fear! You can override that by manually setting the timezone in your secrets.py file. Plus, you can explicitly set your PyPortal to display a different time zone in case you have travel plans or a friend in Tokyo or something!
To do this, you'll add this line to your secrets file:
'timezone' : "America/Los_Angeles"
Here's a great list of valid timezones from the IANA Timezone Database. Head there to find the name of the one you want. Simply find the nearest timezone to your desired location, and use that name as displayed in the TZ database name column.
You can adjust the following variables to make this work:
EVENT_WEEKDAYEVENT_HOUREVENT MINUTEEVENT_DURATIONEVENT_LOCATION
Keep in mind, you'll set these values based on your local time and location. So, for example, here's how I would set the weekly countdown for the Adafruit Ask an Engineer livestream. It plays at 5pm PST (I live in Los Angeles) every Wednesday and is one hour long:
EVENT_WEEKDAY = 2       # monday = 0 .. sunday = 6
EVENT_HOUR = 17           # in 24-hour time
EVENT_MINUTE = 00
EVENT_DURATION = 3600   # in seconds!
# Instead of messing around with timezones, just put in
# the *location* of the event, and we'll automatically set the PyPortal's
# time to that location. Then compute the math from there
# for a list of valid locations, see http://worldtimeapi.org/api/timezone
EVENT_LOCATION = "America/Los_Angeles"
Font
Then, it displays the info with bitmapped fonts to overlay on top of the background. You can learn more about converting type in this guide.
Now, the PyPortal will display the background and weekly countdown until it reaches the event! Then, it will display the second .bmp named countdown_event.bmp for the duration of the event.

Afterwards, it repeats all over again for the next week.
Customization
If you like, you can also customize the background for a different event, by making your own 320x240 16-bit RGB color .bmp file.

Then, adjust your setting to match the new event's time. In the case of the John Park's Workshop livestream:
EVENT_WEEKDAY = 3
EVENT_HOUR = 13
EVENT_MINUTE = 00
EVENT_DURATION = 1800
EVENT_LOCATION = "America/Los_Angeles"

Graphics
Let's have a look at how the code places the elements on screen. Below, we can see the text items that are displayed.

Text Position
Depending on the design of your background bitmap and the length of the text you're displaying, you may want to reposition the text and caption.
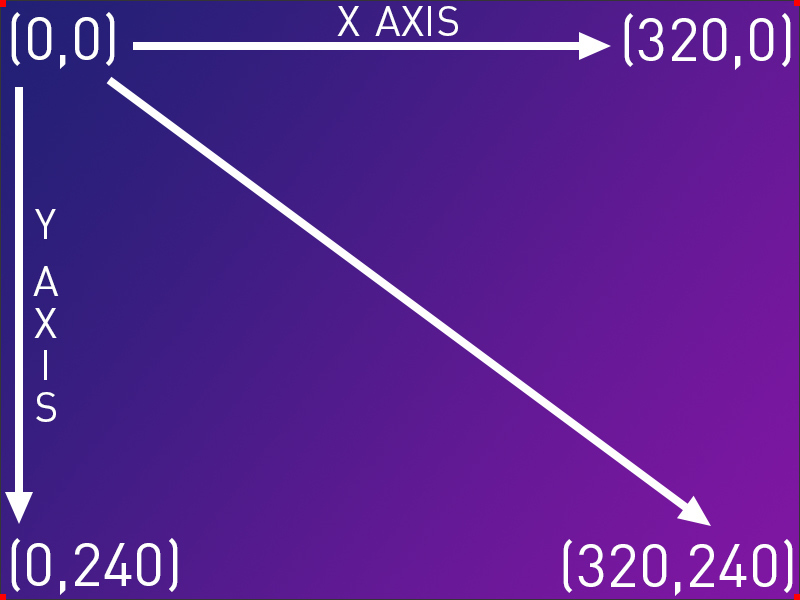
The PyPortal's display is 320 pixels wide and 240 pixels high. In order to refer to those positions on the screen, we use an x/y coordinate system, where x is horizontal and y is vertical.
The origin of this coordinate system is the upper left corner. This means that a pixel placed at the upper left corner would be (0,0) and the lower right corner would be (320, 240).
Text Color
Another way to customize your display is to adjust the color of the text. The line text_color=0xFFFFFF in the constructor shows how. You will need to use the hexadecimal value for any color you want to display.
You can use something like https://htmlcolorcodes.com/ to pick your color and then copy the hex value, in this example it would be 0x0ED9EE
So, in order to customize the position and color of the text, you would adjust the values in these lines of code in code.py:
days_position = (25, 212)
hours_position = (110, 212)
minutes_position = (220, 212)
text_color = 0x000000
3D Printed Stand
If you'd like to create a 3D printed stand for your PyPortal Countdown Clock, you can follow the general instructions in this guide, but use the horizontal PyPortal Stand model linked here.


Use the four sets of standoffs and screws to fasten them together as shown.


