This project works well with the Raspbian “Lite” operating system; it fits easily on a 2 GB card with room to spare. Do not use the “desktop” images, they’re enormous and contain a ton of things we don’t need for this.
Raspberry Pi Downloads Page
While that’s downloading, you can work on assembling the LCD kit.
If you’re new to Raspberry Pi and Linux, we strongly suggest working through the first few guides in the Learn Raspberry Pi tutorial series…know how to “burn” an SD image, perform a first-time setup and get the Raspberry Pi connected to a network. Some familiarity with one of the text editors (such as the simple nano or the more daunting vi or emacs) is also recommended.
Install the Raspbian Lite OS on a 2GB or larger card. You’ll need to connect a monitor and USB keyboard for basic system configuration, but this is only temporary…we’ll set it up to run “headless” later. For networking, connect either an Ethernet cable or use WiFi (built-in on some Pi models, else use a USB WiFi adapter).
At this point you should have an SD card containing the Raspbian Lite software, and an assembled LCD “Pi Plate.”

You don’t need to install the LCD Plate atop the Pi yet, we’ll do that later. Let’s just get the basics set up.
- Connect a monitor and keyboard to the Raspberry Pi.
- Insert the SD card containing the Raspbian OS.
- Connect a “Micro B” USB cable to the power connector on the Raspberry Pi.
- Plug the other end of the USB cable into a power source: a mobile phone charger, a powered USB hub, or simply a USB port on your computer.
The Raspberry Pi should now boot, and you’ll see the monitor fill with lots of “Unix stuff.”
On first boot, you’ll get a login prompt. Log in as user “pi,” password “raspberry”.
Once you’re logged in successfully and have a command-line prompt, run the system configuration utility:
sudo raspi-config
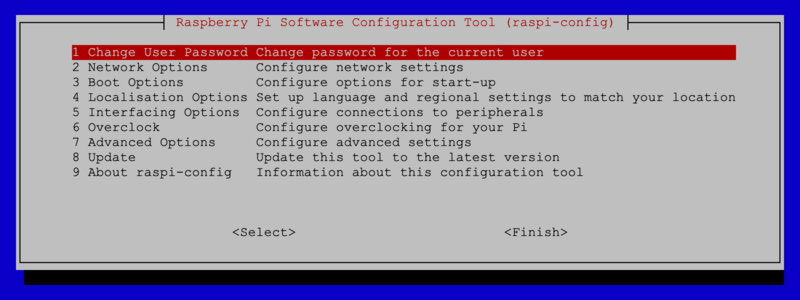
The following selections are required:
- Under “Interfacing Options,” enable I2C.
- If you’ll be using WiFi, under “Localisation Options,” select “Change Wi-fi Country.” Then, under “Network Options,” select “Wi-fi” to enter the SSID/password for your wireless network.
The following are optional, but strongly recommended:
- Change User Password (because everybody knows the default).
- Under “Localisation Options,” select “Change Locale,” “Change Timezone” and “Change Keyboard Layout” to suit your location. If your keyboard isn’t producing the expected symbols, this is why.
- Network Options→Change Hostname. I named mine “pandora” to distinguish it from other Raspberry Pi systems on the network.
- Interfacing Options→Enable SSH. This allows remote login from another system on the network, for performing administration tasks without a display attached.
- You can disable Overscan (under “Advanced Options”) if you like — we’ll reboot a few times during the setup process, and this provides a little extra screen real estate on HDMI monitors.
Tab over to the “Finish” button, press Return and confirm you’d like to reboot the system when prompted. You’ll need to log in again, using the password you established above.
If using a USB WiFi adapter based on the popular Realtek 8192CU chipset, disabling WiFi power management seems to help with reliability. Once you’re logged in, type (or copy and paste) this at the command prompt:
echo "options 8192cu rtw_power_mgnt=0 rtw_enusbss=0" | sudo tee --append /etc/modprobe.d/8192cu.conf
Enable I2C Support for the LCD
The LCD doesn’t need to be attached yet, but we can get some setup started…
sudo nano /etc/modules
Add one or both of these lines if not already present:
i2c-bcm2708
i2c-dev
If you plan to use this with a USB Audio Adapter, this guide explains the process. It’s pretty straightforward, a matter of editing one line in a file.
Finally, shut down the system:
sudo shutdown -h now
Wait for the system to report that it’s halted before disconnecting power. It should take about 20 seconds.
Following shutdown, insert the USB WiFi adapter (if using one) and re-connect power (keep the monitor attached for now).
Is using a Model A board: you’ll need to remove the keyboard to plug in WiFi, or use a powered USB hub temporarily during setup. Without a hub, ssh is now the only way into the system…so if WiFi isn’t working, you’ll need to unplug the adapter, connect a keyboard and check the WiFi configuration.
For all other boards: keyboard can stay attached until you know the networking is properly configured. Log in again and you should be able to access the outside world now:
sudo ping adafruit.com
Do not proceed until internet access is working. If WiFi refuses to cooperate, make sure every step above has been followed carefully. If you’re trying to use a hidden network and it just won’t play nice, change the router configuration to broadcast the network name.
Raspbian Lite includes the “avahi” package by default, so the system appears on the network as “pandora.local” (or whatever hostname you configured) instead of a numeric IP address. You can easily access the Raspberry Pi remotely using an ssh client from another system on the network. For example, using the Terminal application in Mac OS X, one would type:
You should get a password prompt. Once logged in, you can perform all administration duties remotely (including the steps that follow), and the monitor and keyboard are no longer needed on the Raspberry Pi. It’s easier this way because you can cut-and-paste all the commands with their weird syntaxes.