The Temboo service has moved away from Arduino support. The service access in this older guide will no longer work.

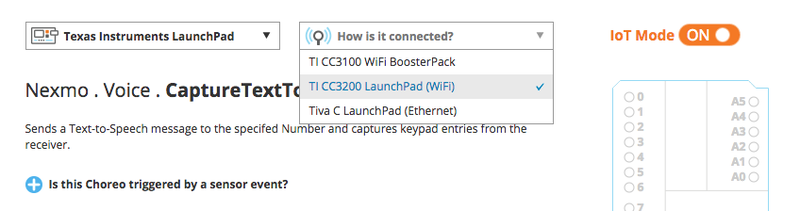
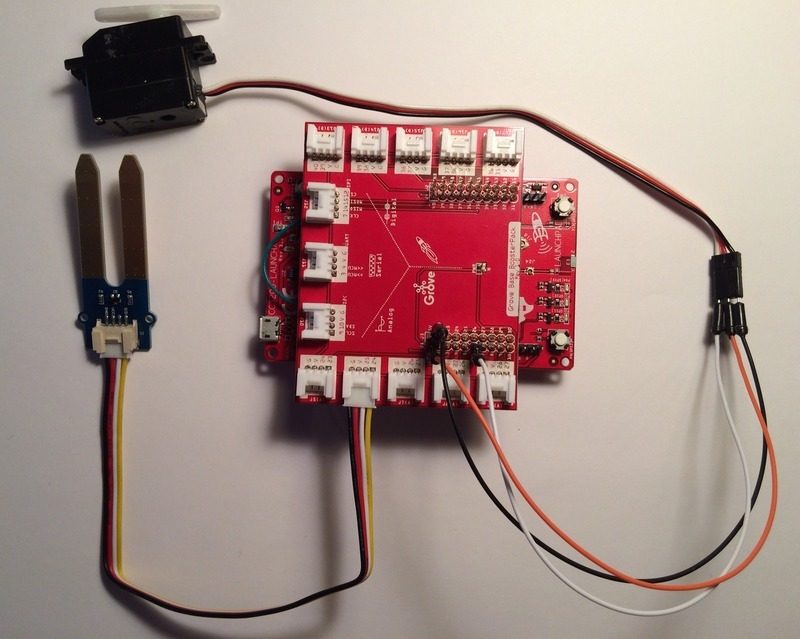
In this guide, you’ll build a device that interacts with the Nexmo API to give you remote control over when a plant gets watered.  We’ll use a TI CC3200 LaunchPad and Seeed Grove Base BoosterPack to detect moisture and turn on the water, and Temboo’s new Conditions feature to connect the hardware to the Nexmo API.

The Temboo service has moved away from Arduino support. The service access in this older guide will no longer work.

To build this example project, you'll be using a TI CC3200 LaunchPad, the Seeed Grove Base BoosterPack, a servo motor, and a few other components. You’ll need:

A TI CC3200 LaunchPad

A Seeed Grove Base BoosterPack

A Grove Base Moisture Sensor

A servo motor (to correspond to the CC3200's 3.3V power supply, you may want to use a micro servo motor)

A USB A – Micro B cable

Some wires

A water tank with a valve

You'll also need a Temboo account and a Nexmo account. You can create a free Temboo account here, and a Nexmo account here.

Make sure that you have the latest version of the Energia IDE installed; if you don't, you can download it here.

The Temboo service has moved away from Arduino support. The service access in this older guide will no longer work.

Now that your accounts are set up, log in to Temboo and go to the Nexmo > Voice > CaptureSpeechToTextPrompt Choreo in the Temboo Library. Turn on IoT Mode and select Texas Instruments LaunchPad and TI CC3200 LaunchPad (WiFi) from the dropdown menus. In the pop-up that appears, give a name to your board (so that you can find it again for future projects), and also fill in your wireless network information (this will enable Temboo to generate code that is preconfigured to work with your network).

Select Is this Choreo triggered by a sensor event? to choose the pin to which you will attach your moisture sensor; the program that you generate will include the code to have data from your moisture sensor trigger the Nexmo Choreo. In the conditional that appears, switch the pin type to analog, the operator to <, and the value to 300 (the maximum value that the Grove moisture sensor should register for dry soil; you'll probably need to adjust this value to find the threshold that works best for you). Then, to select the pin you want to use, click the number in the blue circle; this will allow you to use the graphical pin board on the right of the page to indicate the pin to which you will be attaching your sensor. For now, let's use pin 60. When you're finished, your setup should look like this:

Next, fill out the Input fields using the information from your Nexmo account; you can find your Nexmo API Key and Secret in the API Settings menu on the top right of the Nexmo dashboard. Also fill in the number you’re calling (probably your own), what you want the call to say, and how many digits you want Nexmo to listen for as a response.

Once you've filled out all of the Input fields on the CaptureSpeechToTextPrompt Choreo page, test the Choreo from your browser by clicking Run at the bottom of the window. Two things should happen. First, you should actually receive the call from Nexmo. Then, once you’ve taken the call and pressed a number on your phone’s keypad in response, you should see that number appear in the Response box located under Output (which you’ll find by scrolling down the page a bit).

Also under Output, you'll find the option to select Should an output trigger a hardware event? This interface corresponds to the input trigger that you set up earlier, and is what we'll use to specify the conditions under which the servo motor should be turned on. Set the output field to Digits, the operator to =, and the value returned to 1. Also set the board to write High to Digital pin 59; we'll adjust some of this later as we make the servo's behavior more complex, but for now, it's useful placeholder information. Your output trigger setup should look like this:

The Temboo service has moved away from Arduino support. The service access in this older guide will no longer work.

Now that you've tested the Choreo successfully, you can scroll down to find the Code section of the page. When you're in IoT Mode and you run a Choreo, Temboo automatically generates code that can be used to make the same API call from a LaunchPad. Copy the code, and paste it into a new sketch in the Energia IDE.

In order to run this sketch on your LaunchPad, it needs to be configured with an appropriate TembooAccount.h header file that contains your Temboo account information. To create the header file, make a new tab in Energia, and name it TembooAccount.h.

On the CaptureSpeechToTextPrompt Choreo page beneath the sketch code that you previously copied and pasted into the IDE, you’ll find another block of generated code containing a series of #define statements. This is your header file. Copy the contents of the header into the TembooAccount.h tab that you just made. With both files in place, you are ready to start making calls from your board.

The Temboo service has moved away from Arduino support. The service access in this older guide will no longer work.

Now that your code is set up, let’s build the device itself. The first thing to do is make sure that your LaunchPad firmware is up to date, and that your board is appropriately configured to run a sketch from Energia. There are instructions on how to do that on the Energia website here.

Next, let’s attach the BoosterPack and moisture sensor to the LaunchPad. The pins of the BoosterPack align neatly with those on the CC3200, so attaching the two is fairly simple. Thanks to the modular connections built into the Grove Base BoosterPack and sensors, wiring up the moisture sensor is equally straightforward—we’ve chosen to attach it to the plug with pins 24 and 25.

Finally, we need to attach the motor. It’s a basic three wire interface; red should go to the 3.3V power supply on the board, black/brown to ground, and the third wire (it’s probably yellow or orange) should go to the pin you’re reading from. We’ve chosen P59 (note that on the CC3200, there are two connections to pin 59; use the one in the outer row of pins). Then, hook your motor up to your water tank so that when it turns, the valve opens; every individual arrangement will be different, but in the example we built, we simply taped the motor to the valve and positioned it over our plant.

The Temboo service has moved away from Arduino support. The service access in this older guide will no longer work.

Finally, we need to alter the generated code a bit so that the motor is properly triggered by the Choreo response. To include the servo library and initialize the variables you’ll need for the motor, add the following to the beginning of your sketch:

#include <Servo.h> 

Servo servo;

Under void setup(), add:

servo.attach(outputPin);

Under void loop(), replace

digitalWrite(outputPin, HIGH);

with

servo.write(180);
delay(5000);
servo.write(0);
delay(1000);

That will turn the motor 180 degrees to open the valve, pause for 5 seconds to allow the water to flow out, and then turn back 180 degrees to close the valve. Of course, if you don’t want the valve to be turned 180 degrees or don’t want the delay between opening and closing to last for 5 seconds, feel free to change the values we used here.

Finally, note the line

delay(250);

at the end of void loop(). This puts a small default delay in place between Choreo calls, but for the purposes of this application, you'll probably want a longer one—if you do decide to water your plant, more than 250 milliseconds will be needed for the motor to open the valve and for the water to permeate the soil. Likewise, note that the code has a built-in 10 call Choreo execution limit; this is a useful safegaurd to leave in place while you're testing, but once you're satisfied with how things are working, you may want to remove it.

With that, your sketch is ready to go! You can continue to make changes if you’d like, but no further alterations are required. Save it, upload it to your LaunchPad, stick the moisture sensor in some soil, and open the serial monitor to begin monitoring your plant.

This guide was first published on Mar 26, 2015. It was last updated on Mar 08, 2024.