

RGB LED Wiring
Connect the wires from the 4-pin JST cable to the RGB pins on the Prop-Maker FeatherWing. Reference the wiring from the RGB LED button so the colors match. Use a PCB stickvise to secure the PCB in place while soldering. Solder the wires from the bottom of the Prop-Maker FeatherWing.

Enable Wiring
Connect the accompanying 2-pin JST cable from the toggle switch to the enable and ground pins on the Prop-Maker FeatherWing. Insert the wiring through the strain relief hole. Solder the wires from the top of the PCB. Polarity doesn't matter.

Switch Wiring
Connect the accompanying 2-pin JST cable from the RGB LED pushbutton to the switch and ground pins on the Prop-Maker FeatherWing. Solder the wires from the top of the PCB. Polarity does not matter.
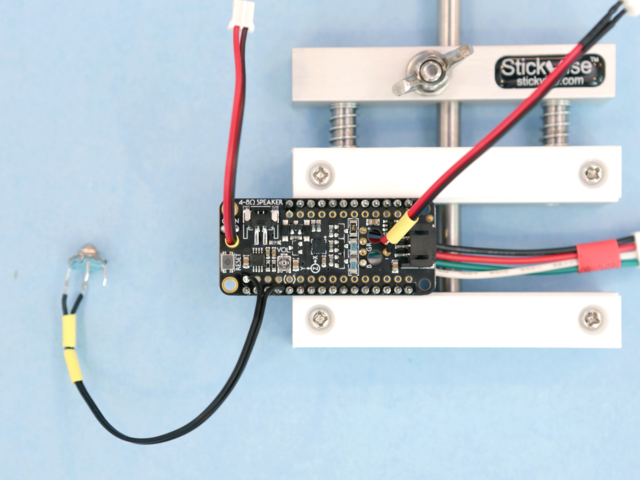
Reset Wiring
Connect the wires from the metal ball tactile button to the RESET and ground pins on the Prop-Maker FeatherWing. Reference the photo or the labels on the Feather M4 Express. Ground wire is soldered to the existing header pin. Solder the wires from the top of the PCB.


NeoTrellis Wiring
Connect the cable from the NeoTrellis to the following pins on the Prop-Maker FeatherWing.
- INT from NeoTrellis to Pin #5 on Prop-Maker FeatherWing
- VIN from NeoTrellis to 3V on Prop-Maker FeatherWing
- GND from NeoTrellis to Ground on Prop-Maker FeatherWin
- SCL from NeoTrellis to SCL on Prop-Maker FeatherWing
- SDA from NeoTrellis to SDA on Pro-Maker FeatherWing


