Let’s suppose you want to go all-out and hatch some creatures of your own.
You will need:
- Image editing software that can create BMP files (I use Photoshop, but even most basic paint programs will do…and if they don’t save BMP directly, you can find free image conversion utilities to help)
- An understanding of image coordinate systems (explained below)
- A text editor (we like Mu for editing CircuitPython projects, but most anything will do)
With the eyes project already installed and running…on the CIRCUITPY drive, each sub-folder inside the “eyes” folder contains 5 files:
- Four BMP image files
- data.py, a bit of Python code describing how the images work together

If making a new creature, it’s easiest to start by duplicating one of the existing folders and giving it a descriptive name, e.g. “gillman”. Then the files within can be edited and renamed as needed.
To activate your new creature, remember to add a line in code.py, telling it to import your new design…as was done with the ready-made creatures. This is based on the name of the folder, e.g.:
from eyes.gillman.data import EYE_DATA
(And then comment out any/all inactive creatures in code.py. Only one should be active.)
Some of the images are partly transparent. The animation code “stacks” these one atop the next, and shuffles them around to create the looking-and-blinking effect.
The top-most image in this stack depicts most of the monster’s face, with cut-outs for the eyes (or single eye, in the case of the cyclops example). For the werewolf example, this image is called werewolf-stencil.bmp. This image is always the same size as the LED matrix (64x32 pixels in the examples) and never moves. The eye holes are bright green in this image (this color was chosen because it’s not used anywhere else in the werewolf set), but in other examples are bright red (for similar reasons).
Below this are two images for the top and bottom eyelids…same deal, bright green represents pixels that will be transparent in the final “stack.”
The bottom-most image is the creature’s eyes…the whites, pupils and so forth. This image does not use the transparent color, since there’s nothing below to show through. It needs to be bigger than just the eye holes, since it will be moving around and we want something to always be filling those pixels.


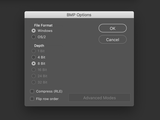
The images all need to be 8-bit “indexed color” or “paletted” BMP files. 24-bit BMPs, and other image formats, will not work with this code.
Here’s an image being converted and saved from Photoshop, but the same functionality is available in many image editors, or there are free tools like ImageMagick.
Your images might appear washed-out and too bright on the matrix…the code that handles the LED matrix doesn’t yet support gamma correction. You can compensate for this somewhat in your image editor…try adjusting the gamma (the middle value in Photoshop’s “Levels” command) to 0.4 or so. Keep a copy of your original art around! Do this level adjustment only as a last step before saving. It’s a destructive process and you might be testing several iterations to get the images just right.
Next is to figure out the pixel coordinates where things will be moving.
Remember that the frontmost “stencil” image is always the same size as the matrix, so that’s a good point of reference. The top left pixel of this image has coordinates (0, 0). Moving right, X (the first value in the coordinate pair) increases by 1 for each pixel, or -1 to the left. Moving down, Y (second value) increases by 1, or -1 for up.
Sometimes the images will be moved to negative coordinates. This is normal and okay! The graphics are automatically “clipped” to the matrix boundaries as needed.

So now, edit the file data.py using your text editor of preference. Here’s what that file looks like for the werewolf:
""" Configuration data for the werewolf eyes """
EYE_PATH = __file__[:__file__.rfind('/') + 1]
EYE_DATA = {
    'eye_image'        : EYE_PATH + 'werewolf-eyes.bmp',
    'upper_lid_image'  : EYE_PATH + 'werewolf-upper-lids.bmp',
    'lower_lid_image'  : EYE_PATH + 'werewolf-lower-lids.bmp',
    'stencil_image'    : EYE_PATH + 'werewolf-stencil.bmp',
    'transparent'      : (0, 255, 0),
    'eye_move_min'     : (-3, -5),
    'eye_move_max'     : (7, 6),
    'upper_lid_open'   : (7, -4),
    'upper_lid_center' : (7, -1),
    'upper_lid_closed' : (7, 8),
    'lower_lid_open'   : (7, 22),
    'lower_lid_center' : (7, 21),
    'lower_lid_closed' : (7, 17),
}
Keep in mind, this is Python code, and so it’s going to be strict about syntax! Make sure strings are quoted, there’s a comma at the end of each line in the table and so forth. If your new creature fails to run, the problem may be with the file syntax…keep a serial connection open to the board and see what it says.
The EYE_PATH line is just weird Python syntax for “wherever this file is located, we want to locate things in the same directory.” It avoids us having to specify an absolute path to every image file.
EYE_DATA is a Python dictionary — it contains pairs of keys and values, each separated by a colon. The key strings must remain unchanged. These are the names that the main Python code (in code.py) will be looking for. Edit only the values.
The first four items in this dictionary specify the BMP image files used for the different layers of the animation, as described earlier. EYE_PATH is mentioned here to indicate “these images are in the same directory as this file.”
The next item, 'transparent', is the RGB color value (red, green, blue) that will “show through” in these images as they’re stacked. It’s green for the werewolf, red for other examples.
'eye_move_min' is the leftmost and topmost position of the eye image when looking directly left and up, respectively. 'eye_move_max' is the rightmost and bottom-most positions. These two points describe a rectangle…but the actual eye movement will be constrained to an ellipse inside this rectangle, so don’t worry if your pupils go out of bounds when at these two points…it’s really the “compass points” left, top, right and bottom that we care about.
The next three items, 'upper_lid_open', 'upper_lid_center' and 'upper_lid_closed' are the top-left pixel coordinates of the upper eyelid image relative to the matrix (or the topmost stencil image), at the eyelid’s most-open position, in a neutral (eyes centered) position, and at its lowest position (when blinking). Having three values here (rather than just two) allows the eyelids to “track” the movement of the eyes, which is a neat thing that eyelids really do. The 'upper_lid_closed' value usually won’t completely cover the eye, unless you’re specifically aiming for that look. It’s normal for the upper and lower eyelids to meet part way. The X values for all these coordinates will usually be the same.
Last three items, 'lower_lid_open' , 'lower_lid_center' and 'lower_lid_closed' are similar, but for the bottom eyelid. Whereas the upper eyelid will usually have increasing Y values for each (going top to bottom), the lower eyelid will usually have decreasing Y values.
Even with careful planning, the various eye images might not be the right sizes or end up in the intended positions on the first try. It’s perfectly normal to take a few iterations through this file to get all the graphics lined up and moving as intended.
If you’re editing data.py but not seeing any changes: make sure you’re also loading the correct file in code.py (as shown earlier on this page).


