I love using slide potentiometers (a.k.a. faders) for this type of project, because at a glance you can tell how much of each color is selected. One problem that can arise, however, when using slide pots, is that they don't usually fit easily on a breadboard or perma proto board. These adorable little 35mm faders solve this problem! Since the bottom pin that is labeled "3" is the ground pin, all of the faders can share the common ground rail on the breadboard!
Slide Pots
Each slide potentiometer will act as a voltage divider, with the Circuit Playground Bluefruit analog pins reading the wiper's varying output.
The pin assignments are as follows:
- Pin 1 = 3.3VDC
- Pin 2 = wiper (to analog input)
- Pin 3 = ground
Insert the three slide potentiometers into the breadboard as shown. You want the pin 3 legs of all three pots to be placed into the ground rail (next to the blue line).
Insert pins 1 and 2 so there is a free row of breadboard pins above them, this is where you'll make the wired connections to the CPB.
Wiring to Voltage
Use three small jumper wires (sometimes called "staples") to connect the pin 1 of each slide pot to the red +V rail of the breadboard as shown here. Looking from the top down, pin 1 is the pin on the left at the top of each slide pot.
Connections to Circuit Playground Bluefruit
Now we can use alligator clip leads with male header pins to connect the sliders to the CPB.
Insert the red lead into the breadboard's top red +V rail.
Insert the black lead into the breadboard's bottom black ground rail.
Insert the yellow lead into the left slider's pin 2 column on the breadboard.
Insert the green lead into the middle slider's pin 2 column on the breadboard.
Insert the blue lead into the right slider's pin 2 column on the breadboard.
Now, you can connect the alligator clips to the associated pads on the Circuit Playground Bluefruit:
- red to 3.3V
- black to GND
- yellow to A4
- green to A5
- blue to A6
Power
You can now power up the Circuit Playground Bluefruit board -- here I've used a 3.7VDC LiPoly battery plugged into the battery JST-SH port. You can also use an AA or AAA battery pack, or power over the USB port.
Remote Color Mixing
Turn off the socket the MagicBulb is plugged into, then turn it back on. This is so that we drop any previous connect between the bulb and your mobile device, since the bulb cannot be connected to more than one Client device at a time.
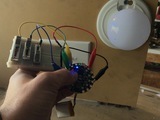
The CPB's first NeoPixel will be lit yellow while it waits to find the bulb, then switch to blue when the connection is made. You'll also get a happy little beep-BEEP!
You can immediately begin mixing the bulb's colors using the faders for red, green, and blue.
Try flipping the CPB's slide switch left for half-brightness mode, or right for full brightness.
The A button will "mute" or "black" the bulb out, and the B button will set the bulb at full brightness while held.
Now you can have fun mixing your colors remotely!


