
You'll use the Feather microcontroller to drive up to thirteen purple UV LEDs. Ultraviolet light causes the special pigments to fluoresce, or emit light of a longer wavelength when lit. This is the same effect you may have seen on a blacklight poster.
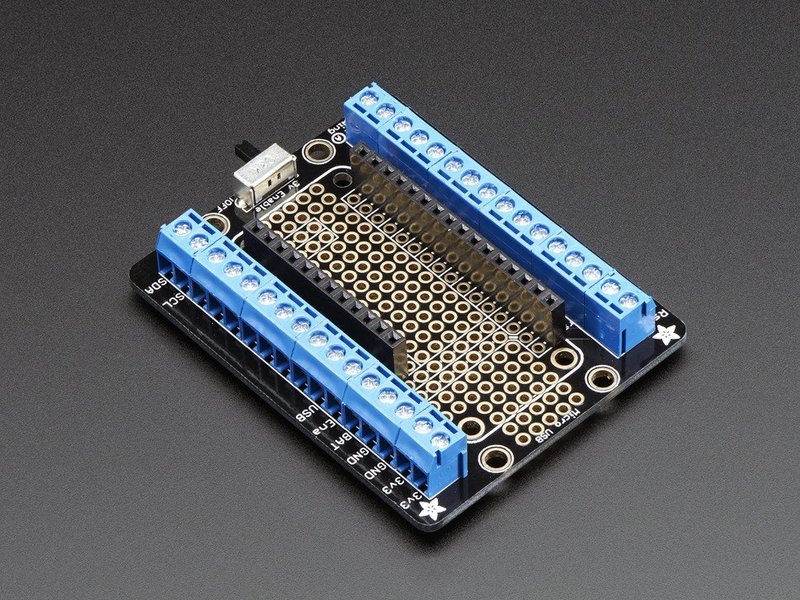
Assemble the TerminalBlock FeatherWing according to these instructions, then fit the Feather Basic Proto onto it. You'll use the screw terminals to make the wiring easy and secure.
Connect the Feather via USB to your computer and upload the code via Arduino IDE.
// ---------------------------------------------------------------------------
//Mad Science Test Tube Rack
// John Park
// for Adafruit Industries
//
// Blinks thirteen LEDs, each in their own timing pattern.
// Designed for use with the Adafruit Feather 32u4 and Feather M0,
// but will work with most Arduino boards.
// MIT license, check LICENSE for more information
// ---------------------------------------------------------------------------

//****************************************************************************
//Output pins
byte LED_PINS[13] = {A0, A1, A2, A3, A4, A5, 5, 6, 9, 10, 11, 12, 13};
//****************************************************************************

//****************************************************************************
//Timing patterns:
//Each row in is the timing in millis of a single LED
//Adjust these to tune the timing
//****************************************************************************
unsigned int TIMING[][13] = {
  {random(4500, 8500), 6000, 12000, random(4000, 6000), random (10000, 20000)},
  {3500, random (1000, 5000), 14000, 500, 6500, 800, 4000},
  {5850, 800, 3500, random (3000, 10000)},
  {random(500, 3000), random (1000,3000), 700, 2000, 9000},
  {6500, 600, 3000, random (3000, 7000), 7000, 30000},
  {4000, random(1000, 7000), 4000, 5000, 4500},
  {7000, 800, 5000, random(2000, 4000)},
  {random(5000, 8000), 500, random(7000, 25000), 200, random(1000, 8000), 3000, 500, random(5000, 9000)},
  {random(300, 1000), random (1000, 7000), 1400, 500, 3500},
  {random (2500, 3500), 800, 18050, random(1000, 20000)},
  {13000, 1000, random (300, 2000), 2000, random (500, 4000)},
  {15000, random (500, 7000), random(1000, 4000), 5000, random (1000, 1500)},
  {random(2000, 6000), 800, 3500, random (500, 2500), 1000, 300, 400, 500, random (200, 18000)}
};

// Keep track of timing sequence
unsigned long last_change[sizeof(LED_PINS)/sizeof(LED_PINS[0])];
byte timing_i[sizeof(LED_PINS)/sizeof(LED_PINS[0])];

void setup() {
  //Set all 13 pins to output mode and turn on
  for (byte i = 0; i < sizeof(LED_PINS)/sizeof(LED_PINS[0]); i++) {
    pinMode(LED_PINS[i], OUTPUT);
    digitalWrite(LED_PINS[i], HIGH);
  }
}

void loop() {
  unsigned long now = millis(); // Current time

  // Keep track of pattern for each LED
  for (byte i = 0; i < sizeof(LED_PINS)/sizeof(LED_PINS[0]); i++) {
    if (now - last_change[i] >= TIMING[i][timing_i[i]]) {
      digitalWrite(LED_PINS[i], !digitalRead(LED_PINS[i]));
      timing_i[i]++;
      timing_i[i] %= sizeof(TIMING[i])/sizeof(TIMING[i][0]); // Repeat pattern when done
      last_change[i] = now;
    }
  }
}

Next, you'll wire the LEDs to the TerminalBlock FeatherWing. Depending on the number of test tubes you use, the wiring may vary, but this scheme allows for one LED per output pin on the Feather (a total of thirteen) and uses the four GND terminals to best effect.

Prep your wires by cutting pairs of wires for each test tube LED you plan to use, approximately 10" in length each. In the version made for this guide there are thirteen of them. We can use one Feather output pin per LED, but we don't have thirteen GND pins, so we'll create a few short wire splices to accomodate.

Strip the ends of each wire, and trim the cloth if using a fabric covered wire. You may also use short lengths of heat shrink tubing to keep the cloth from fraying or wires from shorting.

Slip a bit of heat shrink tubing over the end of each wire and then push the LEDs through a 1x2 jumper houseing (this is optional, it just keeps the legs from shorting and looks neat) solder a wire to each leg of the LEDs. Be sure to keep track of polarity -- you can use a multimeter's continuity testing mode to be certain -- and then screw each anode (long leg, +) wire into an output pin on the TerminalBlock FeatherWing. The thirteen output pins we'll use are 5, 6, 9-13, and A0-A5.


Next, create the ground cables to share among the LEDs. Solder two short wires (optionally with 1x1 female jumper sockets on one end) to the ground wire.

Solder this ground splitter to the cathode (short) leg of one LED, then you will be able to share this ground with the two short leads to two other LEDs.

Place a length of heat shrink tubing over the positive wire before soldering to the anode (longer) leg of the LED. Solder the wire to the leg, then slide the heat shrink tubing over it and heat it to shrink.


