At the time this guide was being written, it was necessary to cobble together two pieces to create a battery switch. We now have a JST extension cable with built-in switch! If using the newer part, you can skip ahead to the “More Lights” section below. Otherwise, if you already have these components in your stash, or want something ever-so-slightly smaller, here's how the two-part solution was made:


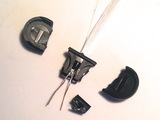
A small battery switch is made from our Tactile On/Off Switch with Leads and a JST-PH Battery Extension Cable.
Trim the leads on your tactile on/off switches to around 2 inches.
Cut both ends from your battery extension cables, with about 1 inch of wire attached. Solder the ground (black) wires together. Solder the switch in between the two power (red) wires. This will plug into your battery and directly into the Feather. Insulate the solder connections with heat-shrink tubing to prevent electrical shorts.
You'll need two of these; one each for the bouquet and boutonniere.
More Lights
Now it's time to add more neopixels, fiber optics, and light strands to make your bouquet into something truly magical.
A good design has texture and variation. I wanted three separate types of lighting in my final bouquet, so I added a modified glowby hair barette for fiber optics and a warm white LED strand.
For my bouquet, I used 17 neopixels, a fiber optic glowby and a warm whie LED strand.
For my boutonniere I used just one neopixel and a fiber optic glowby.
String your Neopixels
Here's a silly video showing my favorite technique for making a neopixel strand. Remember to leave enough wire between each pixel to thread into the flower and back out again -- for calla lilies, 6-8 inches of wire seemed to be about right.
Fiber Optics & Warm White LEDs
One option is to keep the build simple and just add these elements in as they are, and use the coin cell batteries to power them. But with a little more soldering and a couple resistors, you can hook them up to the same battery and on/off switch as the Feather and neopixels. That way the bride and groom just have one button to think about, instead of having to fiddle with three separate switches.
Glowbys


Open the glowby and straighten out the two LED leads. Cut off any extraneous plastic.
Be sure you know which is the positive and which is the negative lead (test it with a coin cell battery).
Solder a resistor onto your positive lead. I used a 33 ohm resistor, which gave me maximum brightness without blowing out the LED. Test and be sure it's working with your Gemma tester.
Warm White LEDs


Cut the battery pack off the warm white LED strand (cut one wire at a time to avoid damaging your lights). Scrape the wires with a utility knife to remove the clear coating.
Use a coin cell battery to determine which is the + and which is the - lead.
Solder a resistor onto one of the leads. Experiment to find the right brightness. I found that a 33 ohm resistor was just right to balance the neopixels.


