
Overview

You can build a large RGB LED matrix display to monitor your favorite sport teams. A Matrix Portal S3 running CircuitPython requests data from the ESPN API to show your teams' gameplay data alongside team logos that are resized and gamma corrected to look crisp and bright on the matrices. If you've ever wanted to see all of your sportsball stats in one spot, this project is for you.
Hardware and Power Requirements
The ESPN API generates a JSON response that is huge. It also takes a lot of processing power to interface with not one, not two but four 64x32 RGB LED matrices. Luckily the ESP32-S3 on the Matrix Portal S3 is able to handle the JSON and the matrices with its 8MB of flash and 2MB of SRAM. Previously this project would not have been possible with less powerful chips, like the SAMD51 on the original Matrix Portal. TL;DR: make sure you are using a Matrix Portal S3 for this project.
On top of processing power, four RGB LED matrices require a good power supply to ensure top pixel performance. In working on this project, the best results were seen using two 5V 4A power supplies: one for the two top panels and one for the two bottom panels. In this scenario, the Matrix Portal S3 is powered via its USB-C port, separately from the matrices.


Page last edited March 08, 2024
3D Printing

You can 3D print brackets to hold the matrices together. Note that these have been designed to fit the 4mm pitch matrices. You'll print one center bracket and six of the smaller 1x2 brackets. The parts can be downloaded from Printables or directly below.

A plus sign shaped bracket fits over the intersection in the middle of the four matrices. It is secured with four M3 screws.

Page last edited March 08, 2024
Prep the Team Logos
One of the biggest challenges for this project is how to gather all of the team logos since it isn't just a matter of downloading them but also formatting them so that they will work with and look nice on an RGB LED matrix. To handle all of this you can run the get_team_logos.py Python script on your desktop or laptop computer.
# SPDX-FileCopyrightText: 2023 Liz Clark for Adafruit Industries
#
# SPDX-License-Identifier: MIT

# Written by Liz Clark (Adafruit Industries) with OpenAI ChatGPT v4 Aug 3rd, 2023 build
# https://help.openai.com/en/articles/6825453-chatgpt-release-notes

# https://chat.openai.com/share/2fabba2b-3f17-4ab6-a4d9-58206a3b9916

# process() function originally written by Phil B. for Adafruit Industries
# https://raw.githubusercontent.com/adafruit/Adafruit_Media_Converters/master/protomatter_dither.py

import os
import math
import requests
from PIL import Image

# the name of the sports you want to follow
sport_names = ["football", "baseball", "soccer", "hockey", "basketball"]
# the name of the corresponding leages you want to follow
sport_leagues = ["nfl", "mlb", "usa.1", "nhl", "nba"]
# directory to match CircuitPython code folder names
bitmap_directories = ["team0_logos", "team1_logos", "team2_logos", "team3_logos", "team4_logos"]

# Constants and function for image processing
GAMMA = 2.6

PASSTHROUGH = ((0, 0, 0),
               (255, 0, 0),
               (255, 255, 0),
               (0, 255, 0),
               (0, 255, 255),
               (0, 0, 255),
               (255, 0, 255),
               (255, 255, 255))

def process(filename, output_8_bit=True, passthrough=PASSTHROUGH):
    """Given a color image filename, load image and apply gamma correction
       and error-diffusion dithering while quantizing to 565 color
       resolution. If output_8_bit is True, image is reduced to 8-bit
       paletted mode after quantization/dithering. If passthrough (a list
       of 3-tuple RGB values) is provided, dithering won't be applied to
       colors in the provided list, they'll be quantized only (allows areas
       of the image to remain clean and dither-free).
    """
    img = Image.open(filename).convert('RGB')
    err_next_pixel = (0, 0, 0)
    err_next_row = [(0, 0, 0) for _ in range(img.size[0])]
    for row in range(img.size[1]):
        for column in range(img.size[0]):
            pixel = img.getpixel((column, row))
            want = (math.pow(pixel[0] / 255.0, GAMMA) * 31.0,
                    math.pow(pixel[1] / 255.0, GAMMA) * 63.0,
                    math.pow(pixel[2] / 255.0, GAMMA) * 31.0)
            if pixel in passthrough:
                got = (pixel[0] >> 3,
                       pixel[1] >> 2,
                       pixel[2] >> 3)
            else:
                got = (min(max(int(err_next_pixel[0] * 0.5 +
                                   err_next_row[column][0] * 0.25 +
                                   want[0] + 0.5), 0), 31),
                       min(max(int(err_next_pixel[1] * 0.5 +
                                   err_next_row[column][1] * 0.25 +
                                   want[1] + 0.5), 0), 63),
                       min(max(int(err_next_pixel[2] * 0.5 +
                                   err_next_row[column][2] * 0.25 +
                                   want[2] + 0.5), 0), 31))
            err_next_pixel = (want[0] - got[0],
                              want[1] - got[1],
                              want[2] - got[2])
            err_next_row[column] = err_next_pixel
            rgb565 = ((got[0] << 3) | (got[0] >> 2),
                      (got[1] << 2) | (got[1] >> 4),
                      (got[2] << 3) | (got[2] >> 2))
            img.putpixel((column, row), rgb565)

    if output_8_bit:
        img = img.convert('P', palette=Image.ADAPTIVE)

    img.save(filename.split('.')[0] + '.bmp')

# Create a base directory to store the logos if it doesn't exist
base_dir = 'sport_logos'
if not os.path.exists(base_dir):
    os.makedirs(base_dir)

# Loop through each league to get the teams
for i in range(len(sport_leagues)):
    sport = sport_names[i]
    league = sport_leagues[i]

    # Create a directory for the current sport if it doesn't exist
    sport_dir = os.path.join(base_dir, bitmap_directories[i])
    if not os.path.exists(sport_dir):
        os.makedirs(sport_dir)

    # Set the URL for the JSON file for the current league
    url = f"https://site.api.espn.com/apis/site/v2/sports/{sport}/{league}/teams"

    # Fetch the JSON data
    response = requests.get(url)
    data = response.json()

    # Extract team data
    teams = data.get('sports', [{}])[0].get('leagues', [{}])[0].get('teams', [])

    # Download, process, resize, and save each logo
    for team in teams:
        abbreviation = team['team']['abbreviation']
        logo_url = team['team']['logos'][0]['href']

        print(f"Downloading logo for {abbreviation} from {league}...")

        img_path_png = os.path.join(sport_dir, f"{abbreviation}.png")
        response = requests.get(logo_url, stream=True)
        with open(img_path_png, 'wb') as file:
            for chunk in response.iter_content(chunk_size=1024):
                file.write(chunk)

        # Open, resize, and save the image with PIL
        with Image.open(img_path_png) as the_img:
            img_resized = the_img.resize((32, 32))
            img_resized.save(img_path_png)
            process(img_path_png)

        # Delete the original .png file
        os.remove(img_path_png)

print("All logos have been downloaded, processed, and resized!")
To run the script you will need a desktop or laptop computer with Python 3 installed. A Raspberry Pi running Raspberry Pi OS would also be a great option.
Python Dependencies
First, you'll use pip to install the Python libraries required to run the script:
pip install pillow
pip install requests
Customize the Script
Open the get_team_logos.py script in your preferred text editor or IDE. At the top of the code, you can customize which sports and corresponding leagues you want to gather the logos for. Edit the sport_names array with the name of the sport (baseball, basketball, etc) and edit the sport_leagues array with the corresponding name of the league (MLB, NBA, etc).
import os
import math
import requests
from PIL import Image

# the name of the sports you want to follow
sport_names = ["football", "baseball", "soccer", "hockey", "basketball"]
# the name of the corresponding leages you want to follow
sport_leagues = ["nfl", "mlb", "usa.1", "nhl", "nba"]
# directory to match CircuitPython code folder names
bitmap_directories = ["team0_logos", "team1_logos", "team2_logos", "team3_logos", "team4_logos"]
Each set of team logos will be saved in the corresponding folders named in the bitmap_directories array. These folder names are utilized in the CircuitPython code that will run on your Matrix Portal S3.
Run the Script
After customizing the script, you can run the get_team_logos.py script on your computer with:
python get_team_logos.py


When the script finishes, you'll see a folder called /sport_logos in the same directory where you have the get_team_logos.py script saved. If you go into the /sport_logos folder, you'll see the folders containing the team logos. You'll want to drag and drop these five folders onto your Matrix Portal S3 CIRCUITPY drive.
How the Script Works
The script creates a folder called /sport_logos in the same directory where you have the script saved. Then it fetches the ESPN API Teams JSON feed associated with each league that you defined at the top of the script. There is a URL for each team logo in that feed. The logo .PNG image file is downloaded to your computer. Then it is resized to be 32x32 pixels and run thru the process() function to add gamma correction and save the image as a bitmap. The script finishes by deleting the previously downloaded .PNG image since you don't need it anymore.
This script utilizes the process() function from the protomatter_dither.py script that is used in the Image Correction for RGB LED Matrices guide. That script provides gamma correction for the images so that they look beautiful on RGB LED matrices. By including the function in the get_team_logos.py, all of the images are automatically converted without having to run another script.
Page last edited March 08, 2024
Install CircuitPython
CircuitPython is a derivative of MicroPython designed to simplify experimentation and education on low-cost microcontrollers. It makes it easier than ever to get prototyping by requiring no upfront desktop software downloads. Simply copy and edit files on the CIRCUITPY drive to iterate.
Set up CircuitPython Quick Start!
Follow this quick step-by-step for super-fast Python power :)
Further Information
For more detailed info on installing CircuitPython, check out Installing CircuitPython.

Click the link above and download the latest UF2 file.
Download and save it to your desktop (or wherever is handy).

Plug your MatrixPortal S3 into your computer using a known-good USB cable.
A lot of people end up using charge-only USB cables and it is very frustrating! So make sure you have a USB cable you know is good for data sync.
Click the Reset button (indicated by the green arrow) on your board. When you see the NeoPixel RGB LED (indicated by the magenta arrow) turn purple, press it again. At that point, the NeoPixel should turn green. If it turns red, check the USB cable, try another USB port, etc.
If double-clicking doesn't work the first time, try again. Sometimes it can take a few tries to get the rhythm right!

You will see a new disk drive appear called MATRXS3BOOT.
Drag the adafruit_circuitpython_etc.uf2 file over to MATRXS3BOOT.

Page last edited March 08, 2024
Create Your settings.toml File
CircuitPython works with WiFi-capable boards to enable you to make projects that have network connectivity. This means working with various passwords and API keys. As of CircuitPython 8, there is support for a settings.toml file. This is a file that is stored on your CIRCUITPY drive, that contains all of your secret network information, such as your SSID, SSID password and any API keys for IoT services. It is designed to separate your sensitive information from your code.py file so you are able to share your code without sharing your credentials.
CircuitPython previously used a secrets.py file for this purpose. The settings.toml file is quite similar.
CircuitPython settings.toml File
This section will provide a couple of examples of what your settings.toml file should look like, specifically for CircuitPython WiFi projects in general.
The most minimal settings.toml file must contain your WiFi SSID and password, as that is the minimum required to connect to WiFi. Copy this example, paste it into your settings.toml, and update:
your_wifi_ssidyour_wifi_password
CIRCUITPY_WIFI_SSID = "your_wifi_ssid"
CIRCUITPY_WIFI_PASSWORD = "your_wifi_password"
Many CircuitPython network-connected projects on the Adafruit Learn System involve using Adafruit IO. For these projects, you must also include your Adafruit IO username and key. Copy the following example, paste it into your settings.toml file, and update:
your_wifi_ssidyour_wifi_passwordyour_aio_usernameyour_aio_key
CIRCUITPY_WIFI_SSID = "your_wifi_ssid" CIRCUITPY_WIFI_PASSWORD = "your_wifi_password" ADAFRUIT_AIO_USERNAME = "your_aio_username" ADAFRUIT_AIO_KEY = "your_aio_key"
Some projects use different variable names for the entries in the settings.toml file. For example, a project might use ADAFRUIT_AIO_ID in the place of ADAFRUIT_AIO_USERNAME. If you run into connectivity issues, one of the first things to check is that the names in the settings.toml file match the names in the code.
Here is an example settings.toml file.
# Comments are supported
CIRCUITPY_WIFI_SSID = "guest wifi"
CIRCUITPY_WIFI_PASSWORD = "guessable"
CIRCUITPY_WEB_API_PORT = 80
CIRCUITPY_WEB_API_PASSWORD = "passw0rd"
test_variable = "this is a test"
thumbs_up = "\U0001f44d"
In a settings.toml file, it's important to keep these factors in mind:
- Strings are wrapped in double quotes; ex:
"your-string-here" - Integers are not quoted and may be written in decimal with optional sign (
+1,-1,1000) or hexadecimal (0xabcd).- Floats (decimal numbers), octal (
0o567) and binary (0b11011) are not supported.
- Floats (decimal numbers), octal (
- Use
\uescapes for weird characters,\xand\oooescapes are not available in .toml files- Example:
\U0001f44dfor 👍 (thumbs up emoji) and\u20acfor € (EUR sign)
- Example:
- Unicode emoji, and non-ASCII characters, stand for themselves as long as you're careful to save in "UTF-8 without BOM" format

When your settings.toml file is ready, you can save it in your text editor with the .toml extension.
In your code.py file, you'll need to import the os library to access the settings.toml file. Your settings are accessed with the os.getenv() function. You'll pass your settings entry to the function to import it into the code.py file.
import os

print(os.getenv("test_variable"))

In the upcoming CircuitPython WiFi examples, you'll see how the settings.toml file is used for connecting to your SSID and accessing your API keys.
Page last edited March 08, 2024
Code the Scoreboard
Once you've finished setting up your Matrix Portal S3 with CircuitPython, you can access the code and necessary libraries by downloading the Project Bundle.
To do this, click on the Download Project Bundle button in the window below. It will download to your computer as a zipped folder.
# SPDX-FileCopyrightText: 2023 Liz Clark for Adafruit Industries
#
# SPDX-License-Identifier: MIT

import os
import gc
import ssl
import time
import wifi
import socketpool
import adafruit_requests
import adafruit_display_text.label
import board
import terminalio
import displayio
import framebufferio
import rgbmatrix
import adafruit_json_stream as json_stream
import microcontroller
from adafruit_ticks import ticks_ms, ticks_add, ticks_diff
from adafruit_datetime import datetime, timedelta
import neopixel

displayio.release_displays()

# font color for text on matrix
font_color = 0xFFFFFF
# your timezone UTC offset and timezone name
timezone_info = [-4, "EDT"]
# the name of the sports you want to follow
sport_name = ["football", "baseball", "soccer", "hockey", "basketball"]
# the name of the corresponding leages you want to follow
sport_league = ["nfl", "mlb", "usa.1", "nhl", "nba"]
# the team names you want to follow
# must match the order of sport/league arrays
# include full name and then abbreviation (usually city/region)
team0 = ["New England Patriots", "NE"]
team1 = ["Boston Red Sox", "BOS"]
team2 = ["New England Revolution", "NE"]
team3 = ["Boston Bruins", "BOS"]
team4 = ["Boston Celtics", "BOS"]
# how often the API should be fetched
fetch_timer = 300 # seconds
# how often the display should update
display_timer = 30 # seconds

pixel = neopixel.NeoPixel(board.NEOPIXEL, 1, brightness = 0.3, auto_write=True)

# matrix setup
base_width = 64
base_height = 32
chain_across = 2
tile_down = 2
DISPLAY_WIDTH = base_width * chain_across
DISPLAY_HEIGHT = base_height * tile_down
matrix = rgbmatrix.RGBMatrix(
    width=DISPLAY_WIDTH, height=DISPLAY_HEIGHT, bit_depth=3,
    rgb_pins=[
        board.MTX_R1,
        board.MTX_G1,
        board.MTX_B1,
        board.MTX_R2,
        board.MTX_G2,
        board.MTX_B2
    ],
    addr_pins=[
        board.MTX_ADDRA,
        board.MTX_ADDRB,
        board.MTX_ADDRC,
        board.MTX_ADDRD
    ],
    clock_pin=board.MTX_CLK,
    latch_pin=board.MTX_LAT,
    output_enable_pin=board.MTX_OE,
    tile=tile_down, serpentine=True,
    doublebuffer=False
)
display = framebufferio.FramebufferDisplay(matrix)

# connect to WIFI
wifi.radio.connect(os.getenv("CIRCUITPY_WIFI_SSID"), os.getenv("CIRCUITPY_WIFI_PASSWORD"))
print(f"Connected to {os.getenv('CIRCUITPY_WIFI_SSID')}")

# add API URLs
SPORT_URLS = []
for i in range(5):
    d = (
    f"https://site.api.espn.com/apis/site/v2/sports/{sport_name[i]}/{sport_league[i]}/scoreboard"
    )
    SPORT_URLS.append(d)

context = ssl.create_default_context()
pool = socketpool.SocketPool(wifi.radio)
requests = adafruit_requests.Session(pool, context)

# arrays for teams, logos and display groups
teams = []
logos = []
groups = []
# add team to array
teams.append(team0)
# grab logo bitmap name
logo0 = "/team0_logos/" + team0[1] + ".bmp"
# add logo to array
logos.append(logo0)
# create a display group
group0 = displayio.Group()
# add group to array
groups.append(group0)
# repeat:
teams.append(team1)
logo1 = "/team1_logos/" + team1[1] + ".bmp"
logos.append(logo1)
group1 = displayio.Group()
groups.append(group1)
teams.append(team2)
logo2 = "/team2_logos/" + team2[1] + ".bmp"
logos.append(logo2)
group2 = displayio.Group()
groups.append(group2)
teams.append(team3)
logo3 = "/team3_logos/" + team3[1] + ".bmp"
logos.append(logo3)
group3 = displayio.Group()
groups.append(group3)
teams.append(team4)
logo4 = "/team4_logos/" + team4[1] + ".bmp"
logos.append(logo4)
group4 = displayio.Group()
groups.append(group4)

# initial startup screen
# shows the five team logos you are following
def sport_startup(logo):
    try:
        group = displayio.Group()
        bitmap0 = displayio.OnDiskBitmap(logo[0])
        grid0 = displayio.TileGrid(bitmap0, pixel_shader=bitmap0.pixel_shader, x = 0)
        bitmap1 = displayio.OnDiskBitmap(logo[1])
        grid1 = displayio.TileGrid(bitmap1, pixel_shader=bitmap1.pixel_shader, x = 32)
        bitmap2 = displayio.OnDiskBitmap(logo[2])
        grid2 = displayio.TileGrid(bitmap2, pixel_shader=bitmap2.pixel_shader, x = 64)
        bitmap3 = displayio.OnDiskBitmap(logo[3])
        grid3 = displayio.TileGrid(bitmap3, pixel_shader=bitmap3.pixel_shader, x = 96)
        bitmap4 = displayio.OnDiskBitmap(logo[4])
        grid4 = displayio.TileGrid(bitmap4, pixel_shader=bitmap4.pixel_shader, x = 48, y=32)
        group.append(grid0)
        group.append(grid1)
        group.append(grid2)
        group.append(grid3)
        group.append(grid4)
        display.root_group = group
    # pylint: disable=broad-except
    except Exception:
        print("Can't find bitmap. Did you run the get_team_logos.py script?")

# takes UTC time from JSON and reformats how its displayed
def convert_date_format(date, tz_information):
    # Manually extract year, month, day, hour, and minute from the string
    year = int(date[0:4])
    month = int(date[5:7])
    day = int(date[8:10])
    hour = int(date[11:13])
    minute = int(date[14:16])
    # Construct a datetime object using the extracted values
    dt = datetime(year, month, day, hour, minute)
    # Adjust the datetime object for the target timezone offset
    dt_adjusted = dt + timedelta(hours=tz_information[0])
    # Extract fields for output format
    month = dt_adjusted.month
    day = dt_adjusted.day
    hour = dt_adjusted.hour
    minute = dt_adjusted.minute
    # Convert 24-hour format to 12-hour format and determine AM/PM
    am_pm = "AM" if hour < 12 else "PM"
    hour_12 = hour if hour <= 12 else hour - 12
    minute = f"{minute:02}"
    # Determine the timezone abbreviation based on the offset
    time_zone_str = tz_information[1]
    return f"{month}/{day} - {hour_12}:{minute} {am_pm} {time_zone_str}"

# the actual API and display function
# pylint: disable=too-many-locals, too-many-branches, too-many-statements
def get_data(data, team, logo, group):
    pixel.fill((0, 0, 255))
    print(f"Fetching data from {data}")
    playing = False
    names = []
    scores = []
    info = []
    index = 0
    # the team you are following's logo
    bitmap0 = displayio.OnDiskBitmap(logo)
    grid0 = displayio.TileGrid(bitmap0, pixel_shader=bitmap0.pixel_shader, x = 2)
    home_text = adafruit_display_text.label.Label(terminalio.FONT, color=font_color,
                                                  text=" ")
    away_text = adafruit_display_text.label.Label(terminalio.FONT, color=font_color,
                                                  text=" ")
    vs_text = adafruit_display_text.label.Label(terminalio.FONT, color=font_color,
                                                text=" ")
    vs_text.anchor_point = (0.5, 0.0)
    vs_text.anchored_position = (DISPLAY_WIDTH / 2, 14)
    info_text = adafruit_display_text.label.Label(terminalio.FONT, color=font_color,
                                                  text=" ")
    info_text.anchor_point = (0.5, 1.0)
    info_text.anchored_position = (DISPLAY_WIDTH / 2, DISPLAY_HEIGHT)
    # make the request to the API
    resp = requests.get(data)
    # stream the json
    json_data = json_stream.load(resp.iter_content(32))
    for event in json_data["events"]:
        # clear the date and then add the date to the array
        # the date for your game will remain
        info.clear()
        info.append(event["date"])
        # check for your team playing
        if team[0] not in event["name"]:
            continue
        for competition in event["competitions"]:
            for competitor in competition["competitors"]:
                # if your team is playing:
                playing = True
                # get team names
                # index indicates home vs. away
                names.append(competitor["team"]["abbreviation"])
                # the current score
                scores.append(competitor["score"])
            # gets info on game
            info.append(event["status"]["type"]["shortDetail"])
        break
    if playing and len(names) != 2:
        print("did not get expected response, fetching full JSON..")
        try:
            resp.close()
        # pylint: disable=broad-except
        except Exception as e:
            print(f"{e}, continuing..")
            # pylint: disable=unnecessary-pass
            pass
        names.clear()
        scores.clear()
        info.clear()
        resp = requests.get(data)
        response_as_json = resp.json()
        for e in response_as_json["events"]:
            if team[0] in e["name"]:
                print(index)
                info.append(response_as_json["events"][0]["date"])
                names.append(response_as_json["events"][0]["competitions"]
                             [0]["competitors"][0]["team"]["abbreviation"])
                names.append(response_as_json["events"][0]["competitions"]
                             [0]["competitors"][1]["team"]["abbreviation"])
                scores.append(response_as_json["events"][0]["competitions"]
                             [0]["competitors"][0]["score"])
                scores.append(response_as_json["events"][0]["competitions"]
                             [0]["competitors"][1]["score"])
                info.append(response_as_json["events"][0]["status"]["type"]["shortDetail"])
            else:
                index += 1
    # debug printing
    print(names)
    print(scores)
    print(info)
    if playing and len(names) == 2:
        # pull out the date
        date = info[0]
        # convert it to be readable
        date = convert_date_format(date, timezone_info)
        print(date)
        # pull out the info
        info = info[1]
        # check if it's pre-game
        if str(info) == date or str(info) == "Scheduled":
            status = "pre"
            print("match, pre-game")
        else:
            status = info
        # home and away text
        # teams index determines which team is home or away
        home_text.text="HOME"
        away_text.text="AWAY"
        if team[1] is names[0]:
            home_game = True
            home_text.anchor_point = (0.0, 0.5)
            home_text.anchored_position = (5, 37)
            away_text.anchor_point = (1.0, 0.5)
            away_text.anchored_position = (124, 37)
            vs_team = names[1]
        else:
            home_game = False
            away_text.anchor_point = (0.0, 0.5)
            away_text.anchored_position = (5, 37)
            home_text.anchor_point = (1.0, 0.5)
            home_text.anchored_position = (124, 37)
            vs_team = names[0]
        # if it's pre-game, show "VS"
        if status == "pre":
            vs_text.text="VS"
            info_text.text=date
        # if it's active or final show score
        else:
            info_text.text=info
            if home_game:
                vs_text.text=f"{scores[0]} - {scores[1]}"
            else:
                vs_text.text=f"{scores[1]} - {scores[0]}"
        # load in logo from other team
        vs_logo = logo.replace(team[1], vs_team)
    # if there is no game matching your team:
    else:
        status = "pre"
        vs_logo = logo
        info_text.text="NO DATA AVAILABLE"
    # load in the other team's logo
    bitmap1 = displayio.OnDiskBitmap(vs_logo)
    grid1 = displayio.TileGrid(bitmap1, pixel_shader=bitmap1.pixel_shader, x = 94)
    print("done")
    # update the display group. try/except in case its the first time it's being added
    try:
        group[0] = grid0
        group[1] = grid1
        group[2] = home_text
        group[3] = away_text
        group[4] = vs_text
        group[5] = info_text
    except IndexError:
        group.append(grid0)
        group.append(grid1)
        group.append(home_text)
        group.append(away_text)
        group.append(vs_text)
        group.append(info_text)
    # close the response
    try:
        # sometimes an OSError is thrown:
        # "invalid syntax for integer with base 16"
        # the code can continue depite it though
        resp.close()
    # pylint: disable=broad-except
    except Exception as e:
        print(f"{e}, continuing..")
        # pylint: disable=unnecessary-pass
        pass
    pixel.fill((0, 0, 0))
    # return that data was just fetched
    fetch_status = True
    return fetch_status

# index and clock for fetching
fetch_index = 0
fetch_timer = fetch_timer * 1000
# index and clock for updating display
display_index = 0
display_timer = display_timer * 1000
# load logos
sport_startup(logos)
# initial data fetch
for z in range(5):
    try:
        just_fetched = get_data(SPORT_URLS[z],
                 teams[z],
                 logos[z],
                 groups[z])
        display.root_group = groups[z]
    # pylint: disable=broad-except
    except Exception as Error:
        print(Error)
        time.sleep(10)
        gc.collect()
        time.sleep(5)
        microcontroller.reset()
# start clocks
just_fetched = True
fetch_clock = ticks_ms()
display_clock = ticks_ms()

while True:
    try:
        if not just_fetched:
            # garbage collection for display groups
            gc.collect()
            # fetch the json for the next team
            just_fetched = get_data(SPORT_URLS[fetch_index],
                     teams[fetch_index],
                     logos[fetch_index],
                     groups[fetch_index])
            # advance index
            fetch_index = (fetch_index + 1) % len(teams)
            # reset clocks
            fetch_clock = ticks_add(fetch_clock, fetch_timer)
            display_clock = ticks_add(display_clock, display_timer)
        # update display seperate from API request
        if ticks_diff(ticks_ms(), display_clock) >= display_timer:
            print("updating display")
            display.root_group = groups[display_index]
            display_index = (display_index + 1) % len(teams)
            display_clock = ticks_add(display_clock, display_timer)
        # cleared for fetching after time has passed
        if ticks_diff(ticks_ms(), fetch_clock) >= fetch_timer:
            just_fetched = False
    # pylint: disable=broad-except
    except Exception as Error:
        print(Error)
        time.sleep(10)
        gc.collect()
        time.sleep(5)
        microcontroller.reset()
Upload the Code and Libraries to the Matrix Portal S3
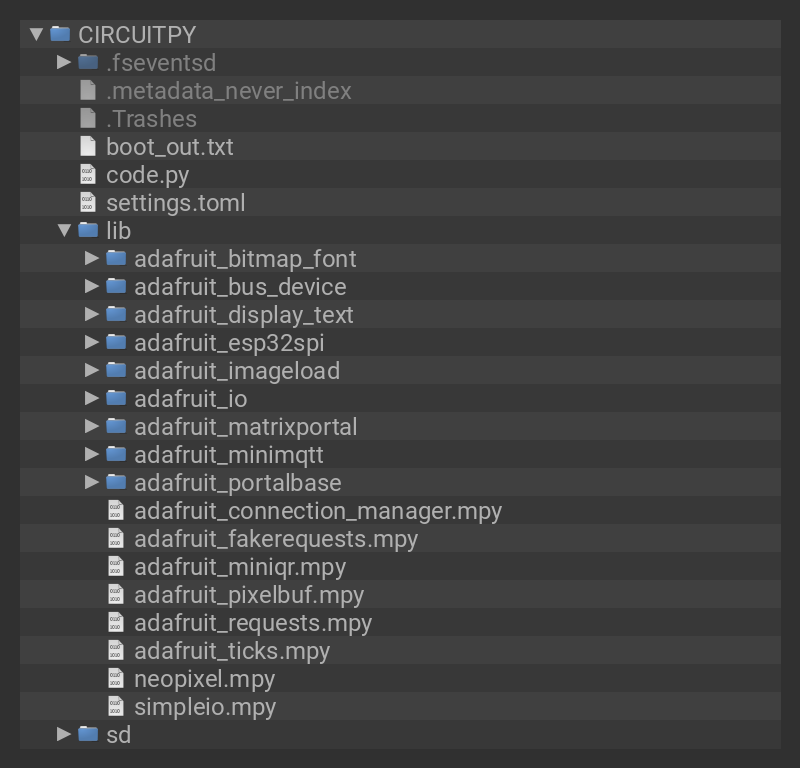
After downloading the Project Bundle, plug your Matrix Portal S3 into the computer's USB port with a known good USB data+power cable. You should see a new flash drive appear in the computer's File Explorer or Finder (depending on your operating system) called CIRCUITPY. Unzip the folder and copy the following items to the Matrix Portal S3's CIRCUITPY drive.
- lib folder
- code.py
Your Matrix Portal S3 CIRCUITPY drive should look like this after copying the lib folder and the code.py file.
Add Your settings.toml File
As of CircuitPython 8.0.0, there is support for Environment Variables. Environment variables are stored in a settings.toml file. Similar to secrets.py, the settings.toml file separates your sensitive information from your main code.py file. Add your settings.toml file as described in the Create Your settings.toml File page earlier in this guide. You'll need to include your CIRCUITPY_WIFI_SSID and CIRCUITPY_WIFI_PASSWORD.
CIRCUITPY_WIFI_SSID = "your-ssid-here"
CIRCUITPY_WIFI_PASSWORD = "your-ssid-password-here"
Add Your Team Logo Bitmaps
You'll need to run the get_team_logos.py script that is included on the Prep the Team Logos page earlier in this guide to download the team logo bitmaps to display on the RGB LED matrices.

When the script finishes, you'll see a folder called /sport_logos in the same directory where you have the get_team_logos.py script saved. If you go into the /sport_logos folder, you'll see the folders containing the team logos:
- /team0_logos
- /team1_logos
- /team2_logos
- /team3_logos
- /team4_logos
You'll drag and drop these five folders onto the main directory of your Matrix Portal S3 CIRCUITPY drive.
How the CircuitPython Code Works
At the top of the code you can find all of the parameters that you can edit to customize the project. You can add your time zone, sports, leagues and team names. There are also two timers: fetch_timer determines how often the API should be pinged and display_timer determines the speed of the team display rotation.
# font color for text on matrix
font_color = 0xFFFFFF
# your timezone UTC offset and timezone name
timezone_info = [-4, "EDT"]
# the name of the sports you want to follow
sport_name = ["football", "baseball", "soccer", "hockey", "basketball"]
# the name of the corresponding leages you want to follow
sport_league = ["nfl", "mlb", "usa.1", "nhl", "nba"]
# the team names you want to follow
# must match the order of sport/league arrays
# include full name and then abbreviation (usually city/region)
team0 = ["New England Patriots", "NE"]
team1 = ["Boston Red Sox", "BOS"]
team2 = ["New England Revolution", "NE"]
team3 = ["Boston Bruins", "BOS"]
team4 = ["Boston Celtics", "BOS"]
# how often the API should be fetched
fetch_timer = 300 # seconds
# how often the display should update
display_timer = 30 # seconds
Matrix
An RGBMatrix object is instantiated to be 128 pixels wide by 64 pixels high. It is then passed to be a FramebufferDisplay.
# matrix setup
base_width = 64
base_height = 32
chain_across = 2
tile_down = 2
DISPLAY_WIDTH = base_width * chain_across
DISPLAY_HEIGHT = base_height * tile_down
matrix = rgbmatrix.RGBMatrix(
    width=DISPLAY_WIDTH, height=DISPLAY_HEIGHT, bit_depth=3,
    rgb_pins=[
        board.MTX_R1,
        board.MTX_G1,
        board.MTX_B1,
        board.MTX_R2,
        board.MTX_G2,
        board.MTX_B2
    ],
    addr_pins=[
        board.MTX_ADDRA,
        board.MTX_ADDRB,
        board.MTX_ADDRC,
        board.MTX_ADDRD
    ],
    clock_pin=board.MTX_CLK,
    latch_pin=board.MTX_LAT,
    output_enable_pin=board.MTX_OE,
    tile=tile_down, serpentine=True,
    doublebuffer=False
)
display = framebufferio.FramebufferDisplay(matrix)
URLs
The ESPN API URLs are added to the SPORT_URLS array by passing the entries from the sport_name and sport_league arrays to the base URL with an f-string.
# add API URLs
SPORT_URLS = []
for i in range(5):
    d = (
    f"https://site.api.espn.com/apis/site/v2/sports/{sport_name[i]}/{sport_league[i]}/scoreboard"
    )
    SPORT_URLS.append(d)
Logos
Each team logo is added to the logos array. The logos are named for the team abbreviations, which allows the code to pass the second entry from the team# array to find the logo in the appropriate logo folder.
# arrays for teams, logos and display groups
teams = []
logos = []
groups = []
# add team to array
teams.append(team0)
# grab logo bitmap name
logo0 = "/team0_logos/" + team0[1] + ".bmp"
# add logo to array
logos.append(logo0)
# create a display group
group0 = displayio.Group()
# add group to array
groups.append(group0)
# repeat:
Start-Up Screen
The sport_startup() function runs at the start of the code. It displays all five of your team logos.
# initial startup screen
# shows the five team logos you are following
def sport_startup(logo):
    try:
        group = displayio.Group()
        bitmap0 = displayio.OnDiskBitmap(logo[0])
        grid0 = displayio.TileGrid(bitmap0, pixel_shader=bitmap0.pixel_shader, x = 0)
        bitmap1 = displayio.OnDiskBitmap(logo[1])
        grid1 = displayio.TileGrid(bitmap1, pixel_shader=bitmap1.pixel_shader, x = 32)
        bitmap2 = displayio.OnDiskBitmap(logo[2])
        grid2 = displayio.TileGrid(bitmap2, pixel_shader=bitmap2.pixel_shader, x = 64)
        bitmap3 = displayio.OnDiskBitmap(logo[3])
        grid3 = displayio.TileGrid(bitmap3, pixel_shader=bitmap3.pixel_shader, x = 96)
        bitmap4 = displayio.OnDiskBitmap(logo[4])
        grid4 = displayio.TileGrid(bitmap4, pixel_shader=bitmap4.pixel_shader, x = 48, y=32)
        group.append(grid0)
        group.append(grid1)
        group.append(grid2)
        group.append(grid3)
        group.append(grid4)
        display.root_group = group
    # pylint: disable=broad-except
    except Exception:
        print("Can't find bitmap. Did you run the get_team_logos.py script?")
UTC to Your Time Zone
The convert_date_format() function is used to reformat the time that is fetched from the ESPN API. It rearranges the string to be formatted as "MM/DD - HH:MM AM/PM TZ" and converts the time from UTC to your defined time zone.
# takes UTC time from JSON and reformats how its displayed
def convert_date_format(date, tz_information):
    # extract year, month, day, hour, and minute from the string
    year = int(date[0:4])
    month = int(date[5:7])
    day = int(date[8:10])
    hour = int(date[11:13])
    minute = int(date[14:16])
    # make a datetime object using the extracted values
    dt = datetime(year, month, day, hour, minute)
    # adjust the datetime object for the time zone
    dt_adjusted = dt + timedelta(hours=tz_information[0])
    # pull out the data from the datetime
    month = dt_adjusted.month
    day = dt_adjusted.day
    hour = dt_adjusted.hour
    minute = dt_adjusted.minute
    # convert 24 hour time to 12 hour time and determine AM/PM
    am_pm = "AM" if hour < 12 else "PM"
    hour_12 = hour if hour <= 12 else hour - 12
    minute = f"{minute:02}"
    # bring in time zone name for display
    time_zone_str = tz_information[1]
    return f"{month}/{day} - {hour_12}:{minute} {am_pm} {time_zone_str}"
MVP of the Code: Fetch the Data
The get_data() function takes care of making a request to the ESPN API and updating the display attributes for each team group. The URL, team, team logo and team display group are passed to the function.
The function starts by bringing in the team logo as an OnDiskBitmap and prepping the different text elements.
def get_data(data, team, logo, group):
    pixel.fill((0, 0, 255))
    print(f"Fetching data from {data}")
    playing = False
    names = []
    scores = []
    info = []
    # the team you are following's logo
    bitmap0 = displayio.OnDiskBitmap(logo)
    grid0 = displayio.TileGrid(bitmap0, pixel_shader=bitmap0.pixel_shader, x = 2)
    home_text = adafruit_display_text.label.Label(terminalio.FONT, color=font_color,
                                                  text=" ")
    away_text = adafruit_display_text.label.Label(terminalio.FONT, color=font_color,
                                                  text=" ")
    vs_text = adafruit_display_text.label.Label(terminalio.FONT, color=font_color,
                                                text=" ")
    vs_text.anchor_point = (0.5, 0.0)
    vs_text.anchored_position = (DISPLAY_WIDTH / 2, 14)
    info_text = adafruit_display_text.label.Label(terminalio.FONT, color=font_color,
                                                  text=" ")
    info_text.anchor_point = (0.5, 1.0)
    info_text.anchored_position = (DISPLAY_WIDTH / 2, DISPLAY_HEIGHT)
Then the request is made to the ESPN API using the json_stream library. This streams the JSON rather than storing the entire JSON response. This is a lot faster and uses less memory. However, because the data is literally streaming by, you have to be thoughtful about how you are logging the information from the JSON. JSON entries have to be accessed in the order in which they are listed in the JSON response. This is why the date entry is continually added and cleared from the info array, since it is listed before you know if it matches your team's game.
# make the request to the API
    resp = requests.get(data)
    # stream the json
    json_data = json_stream.load(resp.iter_content(32))
    for event in json_data["events"]:
        # clear the date and then add the date to the array
        # the date for your game will remain
        info.clear()
        info.append(event["date"])
        # check for your team playing
        if team[0] not in event["name"]:
            continue
        for competition in event["competitions"]:
            for competitor in competition["competitors"]:
                # if your team is playing:
                playing = True
                # get team names
                # index indicates home vs. away
                names.append(competitor["team"]["abbreviation"])
                # the current score
                scores.append(competitor["score"])
            # gets info on game
            info.append(event["status"]["type"]["shortDetail"])
        break
If your team shows up in the API response, the date is converted using the convert_date_format() function. There are checks to see if the game is active and which team is home and away. These checks determine the content of the text elements. The opposing team's logo is accessed by replacing your team's abbreviation name with the opposing team's abbreviation.
if playing:
        # pull out the date
        date = info[0]
        # convert it to be readable
        date = convert_date_format(date, timezone_info)
        print(date)
        # pull out the info
        info = info[1]
        # check if it's pre-game
        if str(info) == date or str(info) == "Scheduled":
            status = "pre"
            print("match, pre-game")
        else:
            status = info
        # home and away text
        # teams index determines which team is home or away
        home_text.text="HOME"
        away_text.text="AWAY"
        if team[1] is names[0]:
            home_game = True
            home_text.anchor_point = (0.0, 0.5)
            home_text.anchored_position = (5, 37)
            away_text.anchor_point = (1.0, 0.5)
            away_text.anchored_position = (124, 37)
            vs_team = names[1]
        else:
            home_game = False
            away_text.anchor_point = (0.0, 0.5)
            away_text.anchored_position = (5, 37)
            home_text.anchor_point = (1.0, 0.5)
            home_text.anchored_position = (124, 37)
            vs_team = names[0]
        # if it's pre-game, show "VS"
        if status == "pre":
            vs_text.text="VS"
            info_text.text=date
        # if it's active or final show score
        else:
            info_text.text=info
            if home_game:
                vs_text.text=f"{scores[0]} - {scores[1]}"
            else:
                vs_text.text=f"{scores[1]} - {scores[0]}"
        # load in logo from other team
        vs_logo = logo.replace(team[1], vs_team)
If your team does not match any of the entries in the JSON response, then your team's logo is shown twice and the text "NO DATA AVAILABLE" is shown.
# if there is no game matching your team:
    else:
        status = "pre"
        vs_logo = logo
        info_text.text="NO DATA AVAILABLE"
Finally the display group is updated with the logo and text elements and the response is closed.
# update the display group. try/except in case its the first time it's being added
    try:
        group[0] = grid0
        group[1] = grid1
        group[2] = home_text
        group[3] = away_text
        group[4] = vs_text
        group[5] = info_text
    except IndexError:
        group.append(grid0)
        group.append(grid1)
        group.append(home_text)
        group.append(away_text)
        group.append(vs_text)
        group.append(info_text)
    # close the response
    resp.close()
The Loop
Two processes are happening concurrently in the loop with the help of ticks. The matrices are cycling through the five sport display groups by advancing through the groups array.
# update display seperate from API request
        if ticks_diff(ticks_ms(), display_clock) >= display_timer:
            print("updating display")
            display.root_group = groups[display_index]
            display_index = (display_index + 1) % len(teams)
            display_clock = ticks_add(display_clock, display_timer)
The different ESPN API URLs are being fetched on a rotation. The display groups are updated in the get_data() function. As a result, when a team display group is shown it will have the updated data.
if not just_fetched:
  # garbage collection for display groups
  gc.collect()
  # fetch the json for the next team
  just_fetched = get_data(SPORT_URLS[fetch_index],
                          teams[fetch_index],
                          logos[fetch_index],
                          groups[fetch_index])
  # advance index
  fetch_index = (fetch_index + 1) % len(teams)
  # reset clocks
  fetch_clock = ticks_add(fetch_clock, fetch_timer)
  display_clock = ticks_add(display_clock, display_timer)
# cleared for fetching after time has passed
if ticks_diff(ticks_ms(), fetch_clock) >= fetch_timer:
  just_fetched = False
All of this is wrapped in a try/except in case any errors occur while making a request to the ESPN API. If an error occurs, the Matrix Portal S3 resets itself.
try:
  ...
except Exception as Error:
        print(Error)
        time.sleep(10)
        gc.collect()
        time.sleep(5)
        microcontroller.reset()
Page last edited March 08, 2024
Wiring and Assembly

Making sure your matrices are laid out in the correct order can be confusing. Before plugging in any cables, lay them out to make sure they are oriented properly. Each matrix has arrow markings which you can use to help during layout.
- Matrix 1 - This matrix will have the Matrix Portal S3 plugged into its IDC port on the left. Its arrow markings will be pointing up and to the right.
- Matrix 2 - This matrix is placed to the right of Matrix 1. Its arrow markings will be pointing up and to the right.
- Matrix 3 - This matrix is placed below Matrix 2. Its arrow markings will be pointing down and to the left.
- Matrix 4 - This matrix is placed to the left of Matrix 3 and below Matrix 1. Its arrow markings will be pointing down and to the left.
Once you have your four matrices laid out in the correct order you can start plugging in the IDC cables.


Plug the last IDC cable into the left-hand port on the Matrix 3 and the right-hand port on the Matrix 4. This completes the data wiring for the matrices.

Place the center bracket over the intersection in the middle of the four matrices. Use the bracket to make sure that the matrices are aligned with each other. Secure it with four M3 screws.

Use four 2x1 brackets to join the matrices together to the left and right of the center bracket. Secure the brackets with M3 screws.

Use two 2x1 brackets to secure the matrices above and below the center bracket. Secure the brackets with M3 screws.

Gather two power cables that came with your matrices. Plug one of the cables into the two power inputs on the top two matrices. Plug the other cable into the two power inputs on the bottom two matrices.


Secure the positive cable (red wire) into the positive terminal on the DC jack adapter (labeled with a raised +). Secure the ground cable (black wire) into the negative terminal on the DC jack adapter (labeled with a raised -). Repeat this for the second power cable.
Now you can plug both sets of two matrices into 5V 4A power supplies.


Page last edited March 08, 2024
Use and Customization

This project is meant to be customized to follow your favorite sports and teams. You can do this by editing the parameters at the top of the code.py file.
Time Zone
The ESPN API stores the timestamp for games in UTC. There is a function in the code that converts the UTC time to your defined time zone. You'll add your time zone UTC offset and time zone name into the timezone_info array:
# your timezone UTC offset and timezone name
timezone_info = [-4, "EDT"]
Sports and Teams
The sport_name and sport_league array determine which ESPN API feeds are fetched in the code. You'll add the name of the sport (football, basketball, etc) to the sport_name array and the corresponding league (NFL, NBA, etc.) to the sport_league array.
# the name of the sports you want to follow
sport_name = ["football", "baseball", "soccer", "hockey", "basketball"]
# the name of the corresponding leagues you want to follow
sport_league = ["nfl", "mlb", "usa.1", "nhl", "nba"]
You'll add your team names to the team0 thru team4 arrays. You'll include the full name of the team, followed by the team abbreviation. If you aren't sure about your team information, you can open the ESPN API JSON URL in a browser and find your team to see how it is being referred to by the API.
# the team names you want to follow
# must match the order of sport/league arrays
# include full name and then abbreviation (usually city/region)
team0 = ["New England Patriots", "NE"]
team1 = ["Toronto Blue Jays", "TOR"]
team2 = ["Chicago Fire FC", "CHI"]
team3 = ["Los Angeles Kings", "LA"]
team4 = ["Minnesota Timberwolves", "MIN"]
Timers
Two timers are used in the code loop. The fetch_timer determines how often the API is fetched by the Matrix Portal S3. The display_timer determines the speed at which the matrices scroll thru your different team data.
# how often the API should be fetched
fetch_timer = 300 # seconds
# how often the display should update
display_timer = 60 # seconds


If a game is scheduled for your team, the date and time in your time zone are shown at the bottom of the matrices. Your team is always shown on the left and the opposing team is shown on the right. "HOME" and "AWAY" information are shown below the team logos.

While a game is happening, the score and game details are shown on the matrices. The details will vary depending on the sport.

When a game is completed, the final score is shown along with the text "Final" at the bottom of the matrices.

If your team is not found in the API response, then your team's logo is shown twice on the display along with "NO DATA AVAILABLE" at the bottom of the matrices. This could mean that the team does not have a game currently scheduled according to the JSON response or the league could be in the off-season.
Page last edited March 08, 2024


