This whip ain't just for whippin' cows. It's for whippin' the darkness away.

Now most folks believed it couldn't be done. "Lefty," they told me, "ain't no way you're makin' a whip that both cracks up loud n' lights up bright at the same time. Them e-lectronics is delicate," they said, "ain't no way you can do it." 

Well, like my momma always taught me, there's plenty-a ways to skin a cat. The proof is in the pudding. And after throwin' out half a dozen puddings, you always find one that hangs together. Sometimes, you find one that grabs you by the roots of your soul and don't let go.

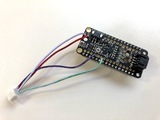
This whip is made from a Feather NRF32840 Sense board soldered to a PropMaker wing. It's got sound reactivity - whenever the whip cracks, a bright animation lights up the whole length of the whip.

But we can do you one better n' that. This whip's also got motion sensitivity, with two levels of swing-based animations, triggered by the motion of your arm. Choose your own custom colors and speeds to truly make it yours.

This project requires a bit of tricky solderin' and a bit of patience. But the end result will complete you, and feed that little outlaw in your soul.

Adafruit Parts Needed

Angled shot of Adafruit Feather.
The Adafruit Feather Bluefruit Sense takes our popular Feather nRF52840 Express and adds a smorgasbord of sensors...
Out of Stock
Angled shot of a Adafruit Prop-Maker FeatherWing.
The Adafruit Feather series gives you lots of options for a small, portable, rechargeable microcontroller board. Perfect for fitting into your next prop build! This FeatherWing will...
$9.95
In Stock
4 x 2" LED Strands
Adafruit NeoPixel LED Dots Strand - 20 LEDs at 2" Pitch
1 x On/Off Switch
Rugged Metal On/Off Switch with Green LED Ring
1 x Ribbon Cable
Silicone Cover Stranded-Core Ribbon Cable - 10 Wire 1 Meter Long
1 x Battery
Lithium Ion Cylindrical Battery - 3.7v 2200mAh
1 x Battery Extension Cable
JST PH 2-Pin Cable – Male Header 200mm
1 x Female USB Connector
USB DIY Connector - MicroB Female Plug
1 x Male USB Connector
USB DIY Slim Connector Shell - MicroB Plug

Additional Materials

  • A 6ft bullwhip - we used this leather one
  • 12" PVC pipe with a 1" interior (not exterior) diameter. The electronics won't fit in a 1" exterior pipe so be sure to get the right size! We found this at our local ACE hardware.
  • PVC end cap that fits onto your pipe
  • Sports grip tape or leather cord to wrap your handle
  • Strong tape and/or needle & heavy duty thread

Tools Needed

  • Soldering iron & accessories
  • Saw for cutting the wooden handle
  • Drill & various sized bits
  • Screwdriver
  • Rotary tool or chisel & file
  • Patience

This circuit diagram is a reference -- the layout will be a bit different for the actual build. This diagram was created using Fritzing.

We'll add a battery extension cable to the Feather Sense, soldered to the + and - pads behind the JST connector, since just plugging the battery in directly makes the package too large for the PVC tube.

The PropMaker Wing will be stacked on top of the Feather Sense, using the attached headers.

We'll solder the LED on/off switch to the PropMaker Wing as shown:

  • Leftmost pin to G
  • Second pin to switch G
  • Third pin not used
  • Fourth pin to switch EN
  • Rightmost pin to A1

The two LED strands will both be soldered to a single connector that plugs into the NeoPixel port on the PropMaker Wing.

We'll also create a USB extension cable (not shown in the diagram above) so our USB port will be accessible from the side of the handle.

It's always a good idea to get your software loaded onto your board before the build. That way you'll be able to test your solder joints at each step of the way, and you'll get instant gratification when you plug in the lights.

Getting the software loaded is a 3-step process:

  1. Install the operating system (CircuitPython) on the board
  2. Copy the required libraries into the /lib folder on the board
  3. Save the code.py file to the board

CircuitPython is a fairly new OS that's changing rapidly. New features are being added and bugs are being fixed all the time, so it's always best to get a fresh version of CircuitPython and the library files before coding.

Install CircuitPython

The Adafruit Feather Sense ships with CircuitPython, but let's go ahead and update it to the latest version. It's super easy with the circuitpython.org website. Follow the directions on the Feather Bluefruit Sense guide, or click the button below for a direct download link.

Download the file, plug your Feather Sense into your computer via the USB port, and double-click the reset button. You'll see a drive appear called FTHR840BOOT. Drag the .uf2 file you just downloaded onto this drive to install CircuitPython.

You'll know it worked if the FTHR840BOOT drive name changes to CIRCUITPY.

Adafruit Circuit Python Libraries

Download the CircuitPython library bundle per the Feather Sense guide instructions here. Unzip the files into a folder on your computer. Create a new folder on the CIRCUITPY drive and name it lib

Open the library download folder and find the following files. Copy them into the lib folder on your CIRCUITPY drive.

  • adafruit_bus_device (directory)
  • adafruit_lsm6ds.mpy
  • adafruit_register (directory)
  • neopixel.mpy

Upload Files

Click the link below to download the project zip – This contains the code. Upload the code.py file to the CIRCUITPY drive root (main) folder.

Check out the image above to see what your CIRCUITPY drive should look like when all the files are in place.

# SPDX-FileCopyrightText: 2020 Erin St Blaine for Adafruit Industries
# SPDX-FileCopyrightText: 2020 Limor Fried for Adafruit Industries
#
# SPDX-License-Identifier: MIT
"""
Prop-Maker based LED Bullwhip
Adafruit invests time and resources providing this open source code.
Please support Adafruit and open source hardware by purchasing
products from Adafruit!
Written by Erin St Blaine & Limor Fried for Adafruit Industries
Copyright (c) 2019-2020 Adafruit Industries
Licensed under the MIT license.
All text above must be included in any redistribution.
"""

import time
import array
import math
import digitalio
import audiobusio
import board
import neopixel
import adafruit_lsm6ds

# CUSTOMISE COLORS HERE:
COLOR = (40, 3, 0)      # Default idle is blood orange
HIT_COLOR = (0, 250, 0)  # hit color is green
LIGHT_WAVE_COLOR = (200, 50, 200) # purple
DARK_COLOR = (0, 0, 0)
CRACK_COLOR = (250, 250, 250) #white


# CUSTOMISE IDLE PULSE SPEED HERE: 0 is fast, above 0 slows down
IDLE_PULSE_SPEED = 0  # Default is 0 seconds
SWING_BLAST_SPEED = 0.007

# CUSTOMISE BRIGHTNESS HERE: must be a number between 0 and 1
IDLE_PULSE_BRIGHTNESS_MIN = 0.1  # Default minimum idle pulse brightness
IDLE_PULSE_BRIGHTNESS_MAX = 0.5  # Default maximum idle pulse brightness

# CUSTOMISE SENSITIVITY HERE: smaller numbers = more sensitive to motion
HIT_THRESHOLD = 1150
SWING_THRESHOLD = 750
SOUND_THRESHOLD = 2000

# Set to the length in seconds for the animations
POWER_ON_DURATION = 1.7
LIGHT_WAVE_DURATION = 1
HIT_DURATION = 2
SWING_DURATION = 0
FADE_DURATION = 1
WHIP_CRACK_DURATION = 0.5

NUM_PIXELS = 60  # Number of pixels used in project
NEOPIXEL_PIN = board.D5
POWER_PIN = board.D10
ONSWITCH_PIN = board.A1

led = digitalio.DigitalInOut(ONSWITCH_PIN)
led.direction = digitalio.Direction.OUTPUT
led.value = True

enable = digitalio.DigitalInOut(POWER_PIN)
enable.direction = digitalio.Direction.OUTPUT
enable.value = False

strip = neopixel.NeoPixel(NEOPIXEL_PIN, NUM_PIXELS, brightness=1, auto_write=False)
strip.fill(0)  # NeoPixels off ASAP on startup
strip.show()

WAVE_FILE = None

i2c = board.I2C()  # uses board.SCL and board.SDA
# i2c = board.STEMMA_I2C()  # For using the built-in STEMMA QT connector on a microcontroller

#Set up accelerometer & mic

sensor = adafruit_lsm6ds.LSM6DS33(i2c)
mic = audiobusio.PDMIn(board.MICROPHONE_CLOCK,
                       board.MICROPHONE_DATA,
                       sample_rate=16000,
                       bit_depth=16)

COLOR_IDLE = COLOR # 'idle' color is the default
COLOR_HIT = HIT_COLOR  # "hit" color is HIT_COLOR set above
COLOR_SWING = LIGHT_WAVE_COLOR  # "swing" color is HIT_COLOR set above
COLOR_ACTIVE = LIGHT_WAVE_COLOR


def mean(values):
    ''' Remove DC bias before computing RMS.'''
    return sum(values) / len(values)

def normalized_rms(values):
    ''' Normalize values'''
    minbuf = int(mean(values))
    samples_sum = sum(
        float(sample - minbuf) * (sample - minbuf)
        for sample in values
    )

    return math.sqrt(samples_sum / len(values))


samples = array.array('H', [0] * 160)
mic.record(samples, len(samples))

def mix(color_1, color_2, weight_2):
    """
    Blend between two colors with a given ratio.
    :param color_1:  first color, as an (r,g,b) tuple
    :param color_2:  second color, as an (r,g,b) tuple
    :param weight_2: Blend weight (ratio) of second color, 0.0 to 1.0
    :return (r,g,b) tuple, blended color
    """
    if weight_2 < 0.0:
        weight_2 = 0.0
    elif weight_2 > 1.0:
        weight_2 = 1.0
    weight_1 = 1.0 - weight_2
    return (int(color_1[0] * weight_1 + color_2[0] * weight_2),
            int(color_1[1] * weight_1 + color_2[1] * weight_2),
            int(color_1[2] * weight_1 + color_2[2] * weight_2))

def power_on(duration):
    """
    Animate NeoPixels for power on.
    :param duration: estimated duration of sound, in seconds (>0.0)
    """
    prev = 0
    start_time = time.monotonic()  # Save start time
    while True:
        elapsed = time.monotonic() - start_time  # Time spent
        if elapsed > duration:  # Past duration?
            break  # Stop animating
        animation_time = elapsed / duration  # Animation time, 0.0 to 1.0
        threshold = int(NUM_PIXELS * animation_time + 0.5)
        num = threshold - prev  # Number of pixels to light on this pass
        if num != 0:
            strip[prev:threshold] = [COLOR] * num
            strip.show()
            prev = threshold

def fade(duration):
    """
    Animate NeoPixels for hit/fade animation
    :param duration: estimated duration of sound, in seconds (>0.0)
    """
    prev = 0
    hit_time = time.monotonic()  # Save start time
    while True:
        elapsed = time.monotonic() - hit_time  # Time spent
        if elapsed > duration:  # Past duration?
            break  # Stop animating
        animation_time = elapsed / duration  # Animation time, 0.0 to 1.0
        threshold = int(NUM_PIXELS * animation_time + 0.5)
        num = threshold - prev  # Number of pixels to light on this pass
        if num != 0:
            blend = time.monotonic() - hit_time  # Time since triggered
            blend = abs(0.5 - blend) * 2.0  # ramp up, down
            strip.fill(mix(COLOR_ACTIVE, COLOR, blend))  # Fade from hit/swing to base color
            strip.show()

def light_wave(duration):
    """
    Animate NeoPixels for swing animatin
    :param duration: estimated duration of sound, in seconds (>0.0)
    """
    prev = 0
    swing_time = time.monotonic()  # Save start time
    while True:
        elapsed = time.monotonic() - swing_time  # Time spent
        if elapsed > duration:  # Past duration?
            break  # Stop animating
        animation_time = elapsed / duration  # Animation time, 0.0 to 1.0
        threshold = int(NUM_PIXELS * animation_time + 0.5)
        num = threshold - prev  # Number of pixels to light on this pass
        if num != 0:
            strip[prev:threshold] = [CRACK_COLOR] * num
            strip.show()
            prev = threshold

def whip_crack(duration):
    """
    Animate NeoPixels for swing animatin
    :param duration: estimated duration of sound, in seconds (>0.0)
    """
    prev = 0
    crack_time = time.monotonic()  # Save start time
    while True:
        elapsed = time.monotonic() - crack_time  # Time spent
        if elapsed > duration:  # Past duration?
            break  # Stop animating
        animation_time = elapsed / duration  # Animation time, 0.0 to 1.0
        threshold = int(NUM_PIXELS * animation_time + 0.5)
        num = threshold - prev  # Number of pixels to light on this pass
        if num != 0:
            strip.fill(CRACK_COLOR)
            strip.show()
            time.sleep(0.01)
            strip.fill(DARK_COLOR)
            strip.show()
            time.sleep(0.03)
            strip.fill(CRACK_COLOR)
            strip.show()
            time.sleep(0.02)
            strip.fill(DARK_COLOR)
            strip.show()
            time.sleep(0.005)
            strip.fill(CRACK_COLOR)
            strip.show()
            time.sleep(0.01)
            strip.fill(DARK_COLOR)
            strip.show()
            time.sleep(0.03)
            prev = threshold


MODE = 0  # Initial MODE = OFF

# Setup idle pulse
IDLE_BRIGHTNESS = IDLE_PULSE_BRIGHTNESS_MIN  # current brightness of idle pulse
IDLE_INCREMENT = 0.01  # Initial idle pulse direction

# Main loop
while True:
    if MODE == 0:  # If currently off...
        enable.value = True
        power_on(POWER_ON_DURATION)  # Power up!
        MODE = 1  # Idle MODE

        # Setup for idle pulse
        IDLE_BRIGHTNESS = IDLE_PULSE_BRIGHTNESS_MIN
        IDLE_INCREMENT = 0.01
        strip.fill([int(c*IDLE_BRIGHTNESS) for c in COLOR])
        strip.show()

    elif MODE >= 1:  # If not OFF MODE...
        samples = array.array('H', [0] * 160)
        mic.record(samples, len(samples))
        magnitude = normalized_rms(samples)
        print("Sound level:", normalized_rms(samples))
        if magnitude > SOUND_THRESHOLD:
            whip_crack(WHIP_CRACK_DURATION)
            MODE = 4
        x, y, z = sensor.acceleration
        accel_total = x * x + z * z
        # (Y axis isn't needed, due to the orientation that the Prop-Maker
        # Wing is mounted.  Also, square root isn't needed, since we're
        # comparing thresholds...use squared values instead.)
        if accel_total > HIT_THRESHOLD:  # Large acceleration = HIT
            TRIGGER_TIME = time.monotonic()  # Save initial time of hit
            #play_wav("/sounds/hit1.wav")  # Start playing 'hit' sound
            COLOR_ACTIVE = COLOR_HIT  # Set color to fade from
            MODE = 3  # HIT MODE
            print("playing HIT")
        elif MODE == 1 and accel_total > SWING_THRESHOLD:  # Mild = SWING
            # make a larson scanner animation_time
            strip.fill(DARK_COLOR)
            strip_backup = strip[0:-1]
            for p in range(-1, len(strip)):
                for i in range(p-1, p+10): # shoot a 'ray' of 3 pixels
                    if 0 <= i < len(strip):
                        strip[i] = COLOR_SWING
                strip.show()
                time.sleep(SWING_BLAST_SPEED)
                if 0 <= (p-1) < len(strip):
                    strip[p-1] = strip_backup[p-1]  # restore previous color at the tail
                strip.show()
            MODE = 2  # we'll go back to idle MODE
            print("playing SWING")
        elif MODE == 1:
            # Idle pulse
            IDLE_BRIGHTNESS += IDLE_INCREMENT  # Pulse up
            if IDLE_BRIGHTNESS > IDLE_PULSE_BRIGHTNESS_MAX or \
               IDLE_BRIGHTNESS < IDLE_PULSE_BRIGHTNESS_MIN:  # Then...
                IDLE_INCREMENT *= -1  # Pulse direction flip
            strip.fill([int(c*IDLE_BRIGHTNESS) for c in COLOR_IDLE])
            strip.show()
            time.sleep(IDLE_PULSE_SPEED)  # Idle pulse speed set above
        elif MODE > 1:  # If in SWING or HIT MODE...
            if MODE == 3:
                fade(FADE_DURATION)
#             elif MODE == 2:  # If SWING,
#                 power_on(POWER_ON_DURATION)
            MODE = 1  # Return to idle mode

Customizing Your Code

The best way to edit and upload your code is with the Mu Editor, a simple Python editor that works with Adafruit CircuitPython hardware. It's written in Python and works on Windows, MacOS, Linux and Raspberry Pi. The serial console is built right in so you get immediate feedback from your board's serial output. Instructions for installing Mu is here.

Open the code in the Mu editor (or another text editor) and look near the top. You'll see a lot of variables that you can change to customize the color palettes and sensitivity of the motion of your whip.

First, change the value of NUM_PIXELS to match the actual number of pixels in one of your NeoPixel strands. Since they're both wired to the same pin, they'll mirror each other, so we only need to count the pixels in one strand.

NUM_PIXELS = 60  # Number of pixels in your NeoPixel strand

Colors

The default color for the whip at idle is a dark blood orange. The format here is R, G, B -- so we've made orange by mixing 40 Red, 3 Green, and 0 Blue values.  You can play with the numbers here to mix your own colors, but be sure to keep the values under around 200. Smaller numbers will make a dimmer light -- I want the idle color to be much dimmer than the animation colors, for extra contrast.

More about mixing colors in CircuitPython can be found here.

# CUSTOMISE COLORS HERE:
COLOR = (40, 3, 0)      # Default idle is blood orange
HIT_COLOR = (0, 250, 0)  # hit color is green
LIGHT_WAVE_COLOR = (200, 50, 200) # purple
DARK_COLOR = (0, 0, 0)
CRACK_COLOR = (250, 250, 250) #white

Idle Pulse Animation Speed

Next, you can customize the speed and brightness of the idle pulse animation and the swing blast speed. 

# CUSTOMISE IDLE PULSE SPEED HERE: 0 is fast, above 0 slows down
IDLE_PULSE_SPEED = 0  # Default is 0 seconds
SWING_BLAST_SPEED = 0.007

# CUSTOMISE BRIGHTNESS HERE: must be a number between 0 and 1
IDLE_PULSE_BRIGHTNESS_MIN = 0.1  # Default minimum idle pulse brightness
IDLE_PULSE_BRIGHTNESS_MAX = 0.5  # Default maximum idle pulse brightness

Sensitivity

This section allows you to adjust the motion and sound sensitivity of the whip. I have it set up so that the swing animation triggers fairly easily, the hit threshold is a bit harder. The sound threshold is set to 2000, to trigger only when a loud crack is heard.

These numbers will really affect the feel and control of your whip, so don't be afraid to play around with them until it all feels just right.

# CUSTOMISE SENSITIVITY HERE: smaller numbers = more sensitive to motion
HIT_THRESHOLD = 1150
SWING_THRESHOLD = 750
SOUND_THRESHOLD = 2000

Animation Timing

Finally, you can change the duration of each animation. If you're a fast whip-cracker, you can set these to fire more quickly. Slow them down if you're more of a whip dancer with fewer cracks.

# Set to the length in seconds for the animations
POWER_ON_DURATION  = 1.7
LIGHT_WAVE_DURATION = 1
HIT_DURATION = 2
SWING_DURATION = 0
FADE_DURATION = 1
WHIP_CRACK_DURATION = 0.5

Troubleshooting

If it doesn't seem to be working, here are a few things to try:

  1. Double check you have all the correct libraries installed. Some of the names are really similar -- make sure you've got the right ones.
  2. Try reinstalling CircuitPython again
  3. Open the REPL in the Mu editor by clicking the "serial" button. Press <ctrl>D. This will error-check your code and let you know what line number may be the problem. More about the REPL here.

More tips and tricks can be found on the Intro to CircuitPython guide and the Feather Sense guide.

First we'll build a super low-profile USB extension cable so we can put our charging / programming port on the side of the handle. This way we can just plug it in to charge the battery without having to take anything apart.

This is the trickiest part of the whole project since it requires some tight soldering work. Once you get through this part, the rest is cake.

We'll need a 5-strand ribbon cable. I'm using a multicolored one for clarity. Cut the ribbon cable to 4 inches long.

Make sure you've got all the pieces. You'll need a female connector and snap-fit plastic sheath, 4" of ribbon cable, and your male connector and 2-piece plastic sheath. 

Separate the wires at both ends of your ribbon cable and tin all five wires. Trim just a smidgen off the tips of the wires so they're nice and tidy.

Tin the pads on the female USB connector and solder all five wires to the five pads.

Slip the plastic cover onto the wire and snap it into place around the USB connector.

Plug the male side into the female side for a moment, so you're 100% sure you've got both sides the same way up. 

Once you're sure it's aligned right, tin the pads on the male connector on both sides. Solder the wires as shown - the first, third, and fifth wire go on the the 3-pad side, and the second and fourth go on the 2-pad side. 


Plug your Feather into your computer's USB port via your newly soldered cable. Press the reset button and be sure your Feather shows up as a drive on your computer, in order to be sure the data lines and power lines are all in working order.

Once you're sure your soldering is 100% solid, clip the housing onto the male end of your cable. 

Squeeze a bead of hot glue across the exposed contacts on the female end to keep them nice and secure as well.

First we'll add a battery extension cable. Then we'll solder the on/off switch, and then stack the Feather and PropMaker FeatherWing using the pre-soldered headers.

Battery Extension Cable

Add some solder to tin the two pads/wires on the back of the JST battery connector on your Feather. Be generous, but also careful not to get any solder on the other components on the board.

Solder the wires as shown -- with the JST port facing away from you, the black wire goes on the left and the red wire goes on the right. Be careful not to get this backwards! It's probably the quickest way to fry your board.

Plug your battery in and make sure your board turns on. Once you're sure the soldering is rock-solid, put some hot glue on top of the connections. 

Tug on the wires and make extra, extra sure they are secure and won't come off. This connection will get buried inside the FeatherWing sandwich and be totally inaccessible later on, so if it comes undone you'll basically need to scrap the whole project and start over. So make sure it's a good connection before proceeding!

On/Off Switch

The on/off switch is designed to mount in your enclosure. We'll solder a connector to it, so we can mount it later on and plug it into the Feather at final assembly.

Trim your male 4-pin connector to about 4 inches. Slip a piece of heat shrink onto each wire. Strip a bit of shielding from the ends of the wires.

With the switch pins facing you, arrange them along the bottom edge of the switch (like a smile!). The green wire gets soldered to the leftmost pin, then the white wire to the second pin. The third pin we'll leave alone. Solder the red wire to the fourth pin and the black wire to the fifth and final pin.

Now we'll solder the female connector to the PropMaker Featherwing as follows:

Solder the black wire to G and the green wire to A1. These are the pins on either side of the pin with "(o)" parentheses around it.

Solder the white wire to G and the red wire to EN. These pins are located right next to the speaker connector.


Stack the Boards

Stack the PropMaker FeatherWing on top of the Feather Sense, with all the pins sliding into all the holes. Flip the assembly upside down and solder all the pins.

Plug all the components in and click the switch to "on" to test and be sure everything is working. If you've already uploaded the code, the LED light on your button should glow when it's in its "on" position, and the yellow "charging" light should appear on your Feather, showing that the battery is being charged.

We're using four LED dot strands total. They'll both be connected to the same pin via a 3-pin STEMMA connector, and will plug into the PropMaker FeatherWing's NeoPixel port.

Each strand will be daisy-chained to a second strand for more length. We found that two full strands are the perfect length for a 6' bullwhip. If your whip is longer, you may want to add a third strand to each side.

Find the "in" end of your NeoPixel strands. Usually this is the end with the male connector. There's a tiny printed "IN" on the back of the pixels, so it never hurts to double check to make sure the strand you're using is assembled the same way. The lights won't work if you connect to the wrong end.

Cut the in-end connector off both your strips, leaving plenty of wire to work with. I like to save all the connectors for use with other projects.

Strip about 1/4" of shielding from all the wires and twist them together in matching pairs -- the two red wires twist together (these are the power wires, or +, the two middle wires (these are the data wires) and the two third wires (these are G).


Cut about 16-18" of wire in red, black, and white. Solder the red wire to the red twisted pair, the white wire to the middle pair and the black wire to the remaining pair.

Grab your 3-pin STEMMA connector and solder it to the other end of the wires, matching colors.

This is a great time to plug your strands in to your PropMaker Wing and make sure they're both fully functional.

To add the second strand, you could just plug it in to the "out" end -- but then you'll end up with bulky connectors and a bit of a dark spot in the middle of your whip. 

To make it slicker, we cut the female connectors off the "out" end of the first strand, and the male connectors off the "in" end of the second strand and soldered them together to create two long strands.

At the very tail end of the second strand, cut the connectors off as well, leaving a good amount of wire so you've got plenty to work with when securing the ends of the strands to the end of the whip.

Plug your STEMMA connector into your PropMaker FeatherWing's NeoPixel port and test to be sure all the lights are working. Shake it around and make some noise to trigger the animations. 

Troubleshooting

If your lights aren't coming on, here are a few things to check:

  1. Did you solder to the IN end of the strands? It's easy to mix this up! Double check your wiring.
  2. Is the code loaded onto the board correctly? Check the software page for code troubleshooting tips
  3. Is your battery charged up? Try plugging in a USB cable to see if that fixes the problem.
  4. Is your switch turned on? The button has a lock mechanism that can be fiddly if you've got bigger fingers.

Cut the leather wrapped handle of the whip 6" below the hilt knot. This will allow enough length to slide inside the new PVC handle we'll be making to hold the electronics.

Use gaffers tape to secure the wires of the two LED strands to your shortened whip handle.  Run the wires together down the handle in a straight line.  Do not wrap them around the handle as this may cause problems later when we are inserting the whip into the PVC handle.


Use gaffers tape to secure the wires in place.

Clamp your whip handle securely and braid the two LED strands around the length of the whip.  

Alternate the strands so that strand 1 goes over strand 2, then strand 2 goes over strand 1 and so on.

When you reach the end of the LED strands dab a bit of E6000 glue onto the end wires and secure them in place with some gaffers tape.  Apply some glue to the seams of the gaffers tape to give it added strength.  When you crack this whip there is a *lot* of force that transfers through the whip and if your LED strands are not well secured they will break loose with time and use.

It's time to make the handle that will hold the electronics for our whip.  We'll be using a 12" length of PVC pipe with a 1" interior diameter. You can buy this at most hardware stores in the irrigation department.  

NOTE: Most pipe is measured by its exterior diameter so be sure to find a length of 1" interior diameter pipe. You need this 1" interior size so that your Feather board will fit inside.

Somewhere close by in that same aisle of the store you'll find a PVC cap that fits your pipe.  You'll need this to hold your electronics in place and to house the spiffy activation button for your whip.

Hold your USB port up to the PVC handle and mark its approximate size on the pipe with a Sharpie.  Place it about an inch from the end of the handle so that there's room for the PVC cap to fit over the end of the pipe.  

This end we will refer to as the "pommel" end of the handle.  The leather whip will be inserted into the other end which we'll call the "hilt" end.

Use a drill to rough out the hole for the USB port and then fine tune it with a small file.  You want the USB port to fit snuggly.

Put a small dab of E6000 glue on the outer housing of the USB port and using needle nosed pliers insert the port into the hole you've made.

Seat the port so it sits flush with the exterior wall of the pipe.

Connect the LED strands to the Feather board and then connect the battery.  Feed the whole assembly into the PVC handle from the hilt end being careful not to let the wires get pinched inside the handle.

Once the electronics are well fitted inside the PVC handle slide the whip handle into PVC pipe.  It should fit snugly.

We're now going to secure the whip handle to the PVC handle with a screw.  Be sure you position the wires such that the screw will not damage them.

Drill a small pilot hole through the PVC pipe and into the whip handle.  You can counter sink it if you like so that the screw head will fit flushly with the exterior of the PCV.

Drive a wood screw through your pilot hole and into the whip handle. Again, be sure your wires are positioned so as to avoid being damaged.

Use some tennis racket tape to give your whip a good solid grip.  Be careful not to cover your USB port.  You'll need to access that to charge your battery.

Use a 5/8" spade bit to drill a hole in the PVC cap. 

Remove the hex nut ring from the button assembly and slide the assembly through the hole in the PVC cap.

Place the button wires through the hex nut ring and use some needle nose pliers to tighten the ring down on the barrel of the button assembly.

Connect the USB cable and activator button to the Feather board and test that everything works (that the LEDs light).

Be sure to make that classic lightsaber ignition sound as you press the activation button!

Use a pencil, barbecue skewer or hat pin to carefully insert the battery and then the Feather board.  Be careful that the Feather board is turned so that it fits past the USB port and that there is room for the cables.

Everything should fit just right so that the cap can hold it all snug inside the PVC handle.

Now, put on some eye protection, don your best space cowboy outfit and crack that whip!

This guide was first published on Jul 08, 2020. It was last updated on Jun 03, 2020.