Hi there!

If you're here, it's because you want to learn how to build and make stuff with electronics! (If, rather than learn electronics, you'd like to look at pictures of cats instead, please check https://www.adafruit.com/galleries/cats-of-engineering)

And, you're in luck: there's never been a better time.

Gone are the days where you need thousands of dollars of equipment and lots physics/math background. Nowadays, if you want to learn to work with electronics, you can jump right in for $100 or less, and any sort of computer. And we're talking about learning a lot of electronics - from the basics of analog to the complexities of firmware. With a good pack of parts, you can build a base of knowledge that will take you from your first blinking LED to someone who can start prototyping and inventing custom products.

Who is this for?

Anyone with a computer they can install software on, an Arduino or compatible and the ability to type and click a mouse. That's pretty much the minimum.

You don't need to know a lot of physics or math, and just like an Art Degree isn't required for making art and being creative, you don't need to have a computer science degree. It helps if you're comfortable using computers but that's a skill most people pick up through life.

If you know how to program already - great! If not, don't worry, we'll teach you enough to be dangerous.

Who are you?

Great question. This is me:

Temporarily unable to load embedded content:
https://www.youtube.com/watch?v=lHC10q_a7Nc

I'm Ladyada, and I love to teach people how to build stuff and how they can be creative with technology.

So, are you ready?

Let's do this thing!
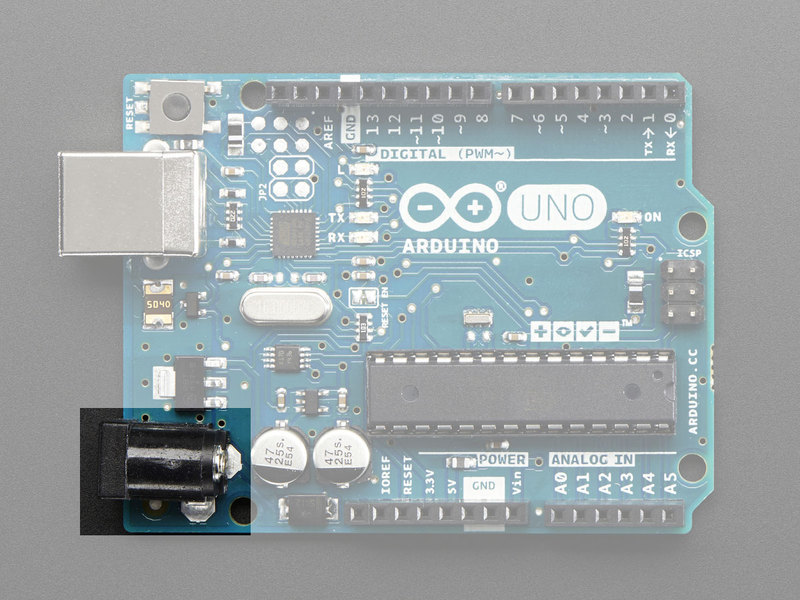
What is an Arduino?

Arduino is the name of the little electronic circuit board that you are going to use as a tool to investigate and explore programming & electronics.

It is manufactured by arduino.cc a company led by Massimo Banzi, CEO of Arduino. Here is how they describe themselves:

Arduino is an open-source prototyping platform based on easy-to-use hardware and software. Arduino boards are able to read inputs - light on a sensor, a finger on a button, or a Twitter message - and turn it into an output - activating a motor, turning on an LED, publishing something online. You can tell your board what to do by sending a set of instructions to the microcontroller on the board. To do so you use the Arduino programming language (based on Wiring), and the Arduino Software (IDE), based on Processing.

Over the years Arduino has been the brain of thousands of projects, from everyday objects to complex scientific instruments. A worldwide community of makers - students, hobbyists, artists, programmers, and professionals - has gathered around this open-source platform, their contributions have added up to an incredible amount of accessible knowledge that can be of great help to novices and experts alike.

Here's a photo of Massimo and I at the Adafruit factory, showing off the first Arduino UNO made in the USA!

This lesson won't teach any electronics, really. Its more for making sure that everything is setup and ready for the future lessons. It will verify the board is working as intended and that the computer you are using is compatible.

Think of this tutorial as the 'home base' of your journey. If things ever get into a weird spot come back here and re-verify this lesson!

One of the most important skills you'll have to learn is that when things go wrong (and they will, tons) come back to the most basic assumptions. This is a little bit of the "are you sure its on" of electronics. It's surprising how many skilled engineers will spend hours debugging a circuit to realize that...it wasn't plugged in!

In the ten years since Arduino was first released, there's been a huge proliferation of hundreds of different "Arduino boards" available. On one hand, there's an Arduino for just about every kind of specialized purpose, but on the other hand - it can get quite confusing!

In this tutorial we'll be focusing on the Arduino UNO which is the classic Arduino, by far the most popular and is what 99% of projects use. It's basic, well supported, and is a great starter-duino.

As you do more you will find that there may be other Arduino compatibles you could want!

For example the Arduino Mega is...well, Mega! Its a big sister to the UNO with a ton more memory and pins, and a different chip, the ATmega2560. It's a good upgrade when your project no longer fits in an UNO

The Arduino Micro, on the other hand...is a bit smaller! It has a different Atmega32u4 chip that can do native USB so it can act like a keyboard or mouse. Its slim and has downward-pin headers so you can plug it into a breadboard.

The Arduino MKR1000 is a little like an Arduino Micro but has a more powerful 32-bit ATSAM ARM chip and built-in WiFi! A great upgrade for when you want to do Internet of Things projects

There's also Arduino-compatibles like the Flora we make here at Adafruit. It's a round wearable Arduino and rather than use wires you can sew it into clothing for portable soft-electronic projects

And really, there are hundreds of others... once you start with the Arduino you can take it anywhere!

Required:

Assembled Arduino board, preferrably an Uno or Duemilanove (or whatever the latest version is)

Arduino compatibles will work but there's a lot of issues with ultra low cost 'Arduino compatibles' (e.g. eBay, Amazon, etc) where they have shoddy substitutions that can bite you later. It's good to have at least one known-genuine Arduino UNO!

Available at Adafruit

You can also use an Adafruit Metro which is a drop-in replacement for the UNO, some components like the LEDs are in different locations.

Available at Adafruit

USB Cable, any length. The cable should match your Arduino's USB connector. Official Arduino UNOs use USB "Printer Cable", a blocky cable. Some compatibles use USB Mini-B or Micro-B.

USB Cables available at Adafruit

A HUUUUUUGE number of people have problems because they pick a 'charge only' USB cable rather than a "Data/Sync" cable. Make 100% sure you have a good quality syncing cable. Srsly, I can't even express how many times students have nearly given up due to a flakey USB cable!

Not Required but... Recommended!

A plug in wall adapter is handy if you want to run your Arduino project 'standalone'

You can use any adapter that is Center Positive and 7 to 12VDC output - we recommend 9V DC if possible Check the second photo for the symbol that indicates Center Positive and for the 9V output text. The Arduino is fairly rugged and can survive plugging in the wrong adapter as long as the voltage isn't higher than 20V but it's 'stressful' to the 'duino and you should aim for 9V!

Available at Adafruit

4 rubber bumpers

OK these are really optional but we include them because they're so nice to have on an Arduino and they help keep your table from getting scratched up. You can pick these up from a hardware store

Available from Adafruit

Ah time to get your little hands on the hardware.

Take your Arduino out of its protective bag or box. Look at it and make sure it looks kinda like this:

Check It Out

If there's anything missing or really wrong, make sure to contact the store you bought it from. For example, here is an Arduino that is missing the two round silver capacitors! (This is extremely rare but it has happened)

If you have an Arduino compatible, it might look a little different. For example, here's an Adafruit Metro.

If you're using a compatible, make sure that for sure:

  • It is an Atmel ATmega328 or Atmega328P
  • There are headers for plugging wires into
  • It runs at 5V (check the product documentation)
  • It has a USB-serial chip on board, such as FT232, FT231x, PL2303 or CP2102/CP2103/CP2104 which are the most popular and a USB plug

We'll discuss these parts in more detail later but, sometimes 'Arduino compatibles' use completely different chips, so the most important thing is that is an ATmega328 at the core.

Bump it!

OK, now that you are satisfied that your Arduino looks good, put the rubber bumpers on the bottom of the board. This will protect your Arduino from spills and dirty tables. If your table is made out of metal, this is essential!

Keep your desk clean and keep the 'duino away from paperclips or other metallic items

If your Arduino came with a silver antistatic bag, don't place the Arduino on top of it while in use! The bag is conductive and can cause all sorts of problems. (You can store it in the bag when not in use, though)

It's handy to know the names for parts of a cow when talking about cuts of meat!

Here we'll take a tour and point out the names of the Arduino. You'll want to refer back to this page a ton, so keep it handy when we say something like "DC Jack" or "RX and TX LEDs"

The Parts of an Arduino

Here's a rough version of the parts of an Arduino we'll refer to. First up is the Arduino UNO R3, at the time of writing it's the most popular Arduino. Each part is covered in more detail in the next sections

Here is an Arduino compatible, Adafruit Metro.

You'll notice that some things are the same

  • Same overall board size and shape
  • Same location of holes (used for attaching the board to something)
  • Reset button in the same location
  • High and Low Digital Header in the same location
  • Power and Analog Header in the same location
  • DC Power Jack in the same location

Some things are similar

  • Both have a USB Jack, but the UNO has a large style USB jack, the Metro has a USB Micro jack
  • Both have a Fuse but in different locations and different look
  • Both have a 5V power supply, but in different locations and organized a little differently
  • Both have four LEDs: Pin 13 LED, RX and TX LED, and ON LED. But they are in different locations. The UNO has them in the middle of the board, the Metro they are all on the left.
  • Both have the same Headers but Metro may have the headers soldered on the top whereas the UNO has the pins go through the board and soldered to the bottom.

Some things are different!

  • Both have a USB Interface chip, but they are different parts. They act almost the same but the driver is different. This only matters the first time you install the software
  • UNO has a large silver Crystal, but the Metro does not (the USB interface chip on the Metro doesn't use a crystal)
  • UNO has a large socketted ATmega328 chip. Metro has a slimmer square version that is not in a socket.
  • Metro has an On/Off switch, this lets you turn off the power when plugged into DC power. UNO does not have one, its not required just a nicety
Don't feel like you have to understand this part fully! Skim it for now, and consider it a resource for you when you want to take a deeper dive into understanding the hardware!

Main Chip / Microcontroller

This is the 'brains' of the Arduino. The thing that you program when you program! It's what runs the code, the CPU (Central Processing Unit). Kinda like the processor that runs in your computer but much much much simpler and smaller.

The chip has legs! In this case, the legs are plugged into a socket. If you took it out of the socket (not recommended because its easy to accidentally damage it!) you'd see something like this:

Each of those little legs is a pin (they're sharp like pins too, so don't step on one of these by accident, its incredibly painful - don't ask how I know). If you look carefully you will be able to read ATMEGA328P on the top.

Sometimes an Arduino has a different shape or form of microcontroller. Like the Metro:

This chip is a more compact version, but its functionally identical for use. It doesn't go into a socket, instead it is attached directly to the Arduino. It also has pins but the pins are much smaller and they sit on the surface of the circuit board, rather than go through holes in it. The main trade off is the bigger through hole version is user-replaceable (with care) whereas this surface mount version is less expensive but cannot be replaced.

Our Pal, the ATMEGA328

The '328 microcontroller has:

  • 28 Pins
  • Powered by 3 or 5 Volts
  • Requires about 0.1 Watts of power
  • Runs at 16 MHz
  • 32 KB of flash storage
  • 2 KB of RAM
  • Costs about $5 per

Compare this to, at the time of writing, a common computer chip, the Intel i5-6400

  • 1151 Pins
  • Powered by 1.35 Volts
  • Requires about 35 Watts of power
  • Runs at 2800 MHz
  • No internal Flash storage, but most computers have at least 250 GB = 250,000 MB = 250,000,000 KB* of storage
  • No internal RAM but most computers have at least 4 GB = 4,000 MB = 4,000,000* KB of RAM
  • Costs about $200

(* yes I know its not exactly 1000)

So, clearly if you want an ultra powerful computer processor that can play the latest games, an i5 is the way to go. But its expensive, and requires a ton of power, and you need to have a full motherboard to run it so it's kinda big. If you just want to do some simple tasks, a microcontroller like the '328 is peachy. Also, its quite handy that it has the RAM and storage inside of it - its not a lot but that means you don't need to hook up a hard drive to this chip, its very compact and complete.

Simplicity & Sturdiness

What's cool about the microcontroller is that unlike your computer which requires an operating system (Mac OS X or Windows) and booting up, the microcontroller is 'barebones'. When you plug it in, it immediately runs whatever you asked it to do.

And, you don't have to worry about a diskette or hard drive or cd-rom getting scratched or damaged. The storage inside of the chip lasts for a really long time. You could program your Arduino, leave it alone for decades, & come back and power it up with a post-apocalyptic-cyber-battery and it would work just as new.

Don't feel like you have to understand this part fully! Skim it for now, and consider it a resource for you when you want to take a deeper dive into understanding the hardware!

DC Power Jack

There are two ways to power your Arduino: you can use the USB connector to connect to a computer or portable power pack or you can plug into a wall adapter. USB can be used to power and program. DC can only be used for power - but it's great for when you want to connect your Arduino and leave it plugged in for a long term project.

This is the DC Power Jack:

The technical specifications for the jack is:

2.1mm inner diameter, 5.5mm outer diameter with Positive Tip

That's just the mechanical size of the plug in case you're looking to match it up. It's an extremely common power plug size, so it isn't too hard to find a matching power plug. Sometimes they're just referred to as "2.1mm DC Plug"

You can use a wall adapter like this:

You can use any adapter that is Center Positive and 7 to 12VDC output - we recommend 9V DC if possible. Check the following photo for the symbol that indicates Center Positive and for the 9V output text. The Arduino is fairly rugged and can survive plugging in the wrong adapter as long as the voltage isn't higher than 20V but it's 'stressful' to the 'duino and you should aim for 9V!

Onboard Power Supply

The Arduino and Metro is designed for beginners so it has some protection and regulation circuitry so that it can use just about any power supply you throw at it. In particular there is a polarity protection diode (to avoid destroying the board if you have a Negative Tip adapter). It also has an onboard 5V Power Supply:

Input DC Voltage

The onboard power supply allows you to use any wall adapter that gives you 7 Volts to 20 Volts and will regulate (adjust) that voltage down to a very clean 5 volts

The tricky thing to remember is you need to have at least 7 volts for the power supply to do its thing.

Think of it like a barber. When you go to the hair salon, you have long uneven hair (just like the large, uneven power that is fed into the Arduino). The stylist takes out the scissors and says OK how long do you want your hair? and you reply 5 inches long!

>snip snip< and your hair is cut straight off, leaving a very clean line

That's pretty much what a voltage regulator does. Except that unlike the scissors that can cut even 5.1" long hair down to 5", the regulator needs some extra hair (er, voltage) to work with. To be precise, it needs 2 Volts above the desired level. In this case, 5 Volts + 2 Volts = 7 V. That's where the 7V minimum comes from.

Now, the 2 Volts minimum isn't a hard and fast rule, it does vary a little from Arduino to Arduino, but basically:

Don't expect to plug in 5 Volts into the DC jack and have your Arduino running at 5 Volts. Rather, the regulator will take 2 Volts off the input and leave you with 3 Volts!

Your Arduino will sorta run but it will be weak and act oddly

Output Current

When powering off of the DC jack, you can pull at most 800 milliAmps of current. This is not a guarantee because you also have to make sure that the regulator doesn't overheat. If you're using some other voltage input, the max current you can pull continously is approximately

1.5 Watt / (Input Voltage - 1 V - 5 V) = in Amps

So for 9V, the max for continuous current is 1.5/(9-1-5) = 0.5 Amps

This is just a rough estimate and depends on if the power usage is continuous or just once in a while.

Portable Power

OK so if you're plugging into the wall, that wall adapter is great. But what if you're on the go? You can use batteries! Because the voltage regulator doesn't care what is power it, as long as it's higher than 5V you can use a 9V with a plug adapter in a battery case

Or even just a simple 9V clip (also with a 2.1mm DC plug)

or for very long running projects, a AA battery pack with a 2.1mm DC jack will last for hours and can power a ton of LEDs, motors, and more! Great for use with rechargeable batteries

Don't feel like you have to understand this part fully! Skim it for now, and consider it a resource for you when you want to take a deeper dive into understanding the hardware!

The USB Jack and Interface is next up in our tour

There's a few parts here.

USB Jack

As we talked about in the beginning, this is how you connect your Arduino to your computer. You can use any computer with a USB port. You will need a cable to connect! This cable is usually not included.

Make sure your USB cable matches the Arduino. Arduino UNO uses a type B cable, a Metro uses a Micro USB cable

BUT!

A HUUUUUUGE number of people have problems because they pick a 'charge only' USB cable rather than a "Data/Sync" cable. Make 100% sure you have a good quality syncing cable. Srsly, I can't even express how many times students have nearly given up due to a flakey USB cable!

I can't stress it enough. Make sure you have a good USB cable. Naughty USB cables will really ruin your day, like a stone in your shoe. Just thow out bad cables and replace with a good one - they are designed to be disposable!

USB Inteface Chip

OK so you plug your Arduino into a computer with a USB cable. But you may be surprised to learn, the main processor chip (ATmega328) cannot speak "USB". Instead it can talk an interface language called "Serial". Serial is a much simpler, much older interface. (It's also a lot less expensive to build into a chip) So, how do you connect a chip that does not speak USB to a USB port? Easy! you just need a USB to Serial Interface Translator chip. Much like a human translator, it can understand and speak both languages and can seamlessly translate between the two.

The USB to Serial translator or converter is just a necessary evil to get an Arduino to talk to a computer. Sometimes to save space and money, there is no USB/Serial chip on board. Instead, a USB to Serial cable is used. The cable is more expensive but you can use it over and over. There's a lot of different translator chips, some common part numbers are FTDI FT232, FTDI FT231X, CP2102 or CP2104, PL2303, CH430 and probably a dozen others. They're all nearly identical but some require different operating system drivers.

Powering over USB

 You can power an Arduino using a USB wall adapter - these come with almost every phone and gadget these days. They have a nice clean 5V output. Some have an output up to 5.5V but thats OK. Basically, if it has a USB connection it will power your 'duino just fine!

You can sometimes power an Arduino project off of a portable USB power pack but these packs are often designed to charge a phone and the Arduino uses so little power that it will cause the pack to think that it is "done charging" and auto-shutoff

So, try it out but your mileage may vary.

Don't feel like you have to understand this part fully! Skim it for now, and consider it a resource for you when you want to take a deeper dive into understanding the hardware!

Your Arduino has some lights that it can use to give you an idea of what it is up to.

These lights, called LEDs (pronounced Ell Eee Dee), are on just about every electronic device you own. Often times they're used to let you know if something is on and if there's an error. For example, here's a cable modem with multiple LEDs.

Each LED indicates the status of the modem.  For example, on this device the one on the top is the POWER LED, its lit if there's good power. In the middle is the ONLINE LED, which lets you know if the modem was able to connect to the Internet. Below, there is the 2.4GHz and 5GHz LEDs, that blink when you upload or download data through the modem.

Arduino LEDs

Likewise, the Arduino has four LEDs: LRXTX, and ON

On the UNO, three are in the middle and one is to the right

On different Arduino variants, the LEDs may be in a different location. Like on this Metro, they're all on the left in a row

The four LEDs include three 'automatic' LEDs and one 'user controllable' LED:

ON LED - this LED will shine green whenever the Arduino is powered. Always check this LED if your Arduino is not acting right, if its flickering or off then you should check your power supply

RX and TX LEDs - these are like the 'send' and 'receive' LEDs on your cable modem. They blink whenever information is sent from or to the Arduino through the USB connection

The TX LED lights up yellow whenever data is sent from the Arduino to the computer USB port

The RX LED lights up yellow whenever data is sent to the Arduino from the computer USB port

L LED - this is the one LED that you can control. The ON, RX and TX LEDs all light up automatically no matter what. The L LED, however, is connected to the Arduino main chip and you can turn it on or off when you start writing code.

For future reference, L is connected to Digital Pin #13

Don't feel like you have to understand this part fully! Skim it for now, and consider it a resource for you when you want to take a deeper dive into understanding the hardware!

The best part of the Arduino is the Headers - this is the name of the two lines of sockets that line up with the edges of the circuit board.

These thin sockets allow you to plug wires into them. You can then connect those wires to all sorts of electronic parts like LEDs, displays, sensors, motors, and more!

For example, here's a future project you'll likely build, its an Arduino wired to a light up text display:

Those wires that are jumping between the display and the Arduino are called Jumper Wires, Jumpers, or sometimes Hook up Wires or even just Wires.

You can use fancy premium jumpers with rubber or plastic tips to make gripping them easy:

Or cut your own using 22 AWG Solid Core wire

Header Sections

There are three groups of headers available:

Power Header

The power header is in the middle bottom. This header lets you connect to the power pins in order to borrow your power connection from the USB or DC jack and use that to drive motors, sensors, motors, anything you like.

You'll soon get very comfortable with these, but let's just introduce them for now and you can refer back when necessary

Starting from the right...

  • Vin - This is connected to the power input from the DC Jack, so it is going to range from 7 V to 12 VDC, depending on what is plugged into the DC Jack. If the DC Jack is not powered, it will provide the 5V from the USB connection. Provides as much as the DC power supply can.
  • GND - You get two of these here, they are the common ground connection for all power and data
  • 5V - This is the clean regulated 5V power that the Arduino runs on, provided from the DC jack (if plugged in) or USB connection (if DC is not plugged in). Provides up to about 500mA current draw.
  • 3.3V - This is a clean regulated 3.3V power, sometimes you'll need exactly this voltage for some sensors. Provides up to about 100mA current draw.
  • Reset - This is the same pin connected to the reset button
  • IOref - Used by shields to know what the IO voltage is. You can ignore this pin.
  • Unnamed pin - Reserved for future use, don't connect to it!

Digital Pin Headers

The two digital pin headers are along the top. These are the digital inputs or outputs that you'll be using to control a relay, blink and LED, listen for switches or connect to more complex components. They use 5 Volts for 'high' signals, and 0 Volts for 'low' signals.

You'll soon get very comfortable with these, but let's just introduce them for now and you can refer back when necessary

Do not connect a voltage higher than 5V to the analog input pins or you could damage them!

Starting from the right...

The two pins labeled 0 (RX) and 1 (TX) are the two Serial pins that are used to send data to and from the Arduino to the USB-Serial translator chip

Don't connect anything to Digital 0 or 1 unless you are super sure because it will affect your Arduino's ability to communicate!
  • Digital 2 through Digital 12 are normal every day digital pins. Some can do PWM (we'll talk about that later) and have a squiggly line next to them.
  • Digital 13 is a little special because it is also connected to the L LED. You can use this pin without affecting the Arduino just be aware that the L LED will also blink at the same time.

And a few extra straggler pins:

  • A spare power GND Ground pin
  • AREF - Analog Reference pin. Used for advanced analog sensor reading (You'll learn about this later)
  • Two unlabeled pins (the labels are on the bottom). These are the SDA and SCL pins, which are used for connecting I2C type sensors. They are connected inside the PCB to A5 and A4 We do not recommend usin these unless you have an I2C sensor (You'll learn about these later)

Analog Pin Headers

The analog input pins are special pins that can read sensors. You'll soon get your hands dirty with analog sensors, it'll be so much fun!

Shh! It's a secret but those 6 analog input pins? They can also be used as digital input/output pins, they really are the most versatile pins!

Each analog pin can read a voltage between 0 and 5 V (the same voltage used to power the Arduino.

Once you get advanced analog skills you can connect the ARef pin to a different voltage like 3.3V and direct the Arduino to use Aref as the max voltage, then you can get more precision. But we'll cover that some other day.

Do not connect a voltage higher than 5V to the analog input pins or you could damage them!

Shield Add-ons!

As you get more experience with Arduino you'll want to soup it up. Accessories for the Arduino are super popular and many plug into the headers. Normally these would be called "Daughter-cards" but in Arduino parlance they are refered to as shields. There are hundreds if not thousands of shields out there that add all sorts of capabilites that the native bare UNO cannot do. Here are a few of our most popular shields:

The Adafruit DC & Stepper Motor shield lets you add high current motor drivers to control up to 2 stepper motors or 4 DC motors, as well as two hobby servos, for all sorts of robotics.

The Adafruit 1.8" TFT shield adds a cute little color display, micro SD card storage and a joystick to create custom graphical interfaces.

The Adafruit Ultimage GPS Data-logger shield adds GPS location capability and data logging for geocaching, location-based projects and tracking.

The Adafruit NFC/RFID Shield lets you read and write RFID tags and talk to NFC tags and devices for interactivity and identification.

Don't feel like you have to understand this part fully! Skim it for now, and consider it a resource for you when you want to take a deeper dive into understanding the hardware!

There are a smattering of parts that we didn't cover yet so we'll introduce them now.

USB Fuse

The little USB fuse is a part that is used to protect your Arduino and computer. You'll be connecting all sorts of wires to your Arduino and there's a chance you will accidentally short out the power. To keep your electronics safe this resettable fuse will open up, much like the circuit breakers in your home

Unlike a circuit breaker you do NOT have to switch or replace anything. Instead you just have to wait a few minutes and it will automatically heal itself

If you find your Arduino's ON LED is no longer on, or it is not connecting over USB. Try disconnecting it, shutting down your computer and waiting 5 minutes before restarting and trying again. That will fix it 99% of the time!

Reset Button

The Reset button is often right next to the USB jack but sometimes its on the right side of the board. This button is what you can use to restart the Arduino. It's handy if you want to re-run your program or if it gets stuck. It's just like restarting  your phone if it hangs, but resetting an Arduino is instantaneous, it only takes about a second to restart.

On/Off Switch

This is a part that only appears on the Adafruit Metro.

This switch lets you turn on or off the DC Jack only! It is handy when powering from a wall adapter or battery pack and you want to shut off the Arduino. It does not affect the USB connection so if you power the Arduino from USB it will stay on no matter which way the switch is flipped

Now we are ready for the moment of truth, it's time to plug your Arduino in and power it up. The easiest way to do this is to plug one end of the USB cable into the Arduino and the other end into a computer. The computer will then power the Arduino.

For an Arduino UNO, you'll need a USB cable with a square B-type end:

Make sure that the USB cable is plugged in directly to a computer port. Sometimes monitors or keyboards have a USB port you can plug into. Most of the time this is fine, but I strongly suggest you plug it directly into the computer as that will eliminate any possible problems. Same goes for USB hubs - skip those for now and go direct

Later on, once you've verified you can power the Arduino and upload sketches no problem, then you can try plugging it into other ports.

OK anyways, so plug int he USB cable and check that your Arduino looks like this:

In particular, make sure the green ON LED is lit! The yellow or red L LED might also be lit or blinking, and the RX and TX LEDs might be blinking or lit right after plugging in - this is normal.

If no lights or blinking occurs, double check:

  • Is the USB cable plugged into the computer and into the Arduino?
  • Try another USB cable
  • Check there's nothing metallic touching the Arduino that could be shorting out the device
  • Is the computer on?
  • Try another USB port, USB cable, and computer?

If you still can't get it working, your Arduino may be faulty.

Bootloader Reset Test

Next up, you can do a quick bootloader test - this will let you know that the Arduino chip has been programmed with a bootloader which is required!

While powered, click the Reset button - you will see the L LED blink 3 times very rapidly. Don't worry about counting the blinks, just make sure it flashes quickly when reset.

DC Power Test (Optional)

Another way to power up the Arduino is to plug in a battery or wall adapter into the DC jack.

Verify that you have a 9V DC 100mA or greater power adapter, with a 2.1mm barrel plug and positive tip.

If the box doesn't have any information about the adapter, you can look for these clues.

Make sure the symbol near the bottom of the label is present. It means that the outside of the plug is negative and the inside is positive. A center-negative plug will not work with the Arduino.

To verify the DC plug is the right shape, just try plugging it in. If it doesn't fit or is wobbly, it's the wrong kind. You can learn how to test wall adapters using a multimeter here.

Plug in the adapter and verify you get the green ON light!

If not, double check:

  • Is the DC adapter plugged in?
  • Is the DC adapter the right kind? Check voltage, polarity, plug size, etc.
  • Try another adapter.

If you still can't get it working, your Arduino or wall adapter may be faulty.

To get you all set up, start by installing the Arduino IDE Software

This is the free application you'll use to write programs and talk to your Arduino or compatible. Did we mention it is free? How awesome is that?

You can download Arduino from

https://www.arduino.cc/en/Main/Software

There's a lot of other companies and groups that may try to get you to download the Arduino software but it could have viruses or malware. Only download from arduino.cc !

When you visit the Arduino site you'll see a section like this:

The Arduino software is under constant revision. As of this writing, the version available is 1.6.9 but you may have a more recent version. Just grab whatever is the most recent

Windows

Download and install with the Installer. The Zip file (non-admin install) is not recommended unless you cannot run the installer

Mac

Download and drag the Application out of the compressed folder.

Linux

Available for 32-bit or 64-bit Linux, once you download you will need to manually decompress and install

Raspberry Pi and other ARM-based Linux

There's a new version you can use that is compiled for ARM processors! It works on the Raspberry Pi and will likely work on any other ARM core Linux

Installing Arduino

Visit arduino.cc to download the latest version of Arduino

Click on the Windows Installer link to download the installer, then double click to launch it

You may get a warning asking if you're sure you want to run the installer. It's ok, click YES

There is an open source license to click through. Install in the default location

You can use the default setup installation options

Finally it will take a minute or two to install

When done you'll have the software installed

Other Drivers

Depending on your Arduino compatible you may need to install seperate drivers for the USB to serial converter

For all Adafruit compatibles, we have an all in one installer that will install all of the Adafruit board drivers. It will also install the FTDI and CP210x drivers

Click below to download our Driver Installer

Download and run the installer

Run the installer! Since we bundle the SiLabs and FTDI drivers as well, you'll need to click through the license

Select which drivers you want to install (we suggest selecting all of them so you never have to worry about installing drivers when you start to explore other Arduino-compatibles)

Click Install to do the installin'

You should not need to restart your computer but it's not a bad idea!

Find your Serial (COM) Port

To verify your Arduino driver installed properly, plug it into USB and open up the Device Manager. You can find the Device Manager in the Control Panel (search for Device Manager)

When you open the Device Manager, find the section called Ports and expand it:

You'll see an icon next to some text that says Arduino UNO (COMxx) where xx is a number

If you have a Metro, it won't say Arduino UNO, just USB Serial Port (COMxx)

The COM number may vary but it should be something like COM3 or COM4. The COM stands for "communication", and each one has a unique number, known as the COM Port number. In this case the COM Port number is COM18.

You can unplug your Arduino to see the COM port device disappear and re-appear when plugged in.

If you don't see the Arduino show up, check:

  • Is your cable a data cable or charge only? Try another USB cable
  • Try another USB port!
  • Verify you installed the drivers, you can always try installing them again (never hurts)
  • Check your Arduino does not need some other drivers, your vendor can point you at the right driver if necessary

Installing Arduino

Visit arduino.cc to download the latest version of Arduino

Click on the Mac OS X Installer link to download the installer

Then double click to expand/launch it

it will automatically give you the Arduino app the teal icon:

Install Drivers (if not using Arduino UNO)

If you have an official Arduino UNO you won't need to install any other software. However, if you have an Arduino compatible with a CP210x or FTDI USB to serial converter, you may need to install a driver.

You can download the latest CP210x driver here and the latest FTDI driver here

Installing SiLabs CP210x Drivers

You can download the latest CP210x driver here

Visit the website, download and double-click the pkg to install the driver. Once done, reboot!

Installing FTDI Drivers

You can download the latest FTDI driver here

Visit the website, download and double-click the pkg to install the driver. Once done, reboot!

Find your Serial Port Device

You can use Terminal to help find and verify your Arduino. First, launch the Terminal app - you can Command-F to Find the Terminal.app program:

Double click to launch it. At the text prompt, type in ls /dev/cu* (note the first letter is a lower-case L)

Make sure you see a line with the text /dev/cu.usbmodemxxxx or /dev/cu.usbserial-xxxxx where the xxx's can be anything. This indicates that the driver installed properly and that the Arduino was found.

You can close the Terminal program now

Installing Arduino

Visit arduino.cc to download the latest version of Arduino

Do not use yum or apt-get to install Arduino! You will get an ancient version, always download the latest from arduino.cc!

Click on the matching Linux Installer link (32 bit, 64 bit or ARM) to download the installer - save the file to your Downloads folder

From within your Terminal program, cd to the Downloads directory, and untar the package with tar xf arduino*.xz then cd into the arduino-n.n.n folder created:

Run ./install.sh to install the software. I've got an old Ubuntu install so I got warnings, but it did create that desktop icon for me!

Driver Installation

Linux doesn't have any drivers to install, assuming you're running a v2.6 kernel or higher, which is almost certainly true. These instructions assume you're running Ubuntu. Each Linux distribution is different, but the instructions should be basic enough to follow for other distros.

You can verify your kernel version by running uname -a in a terminal window, note that this kernel is version 2.6.20

And this one is 3.2.0-23

Some older Linux distributions used to install brltty (braille device) which will conflict with the Arduino. You must uninstall brltty if it is installed! Do so by running sudo apt-get remove brltty or equivalent In a terminal window. If it says it's not installed then thats OK. If you're not running a Debian-derived installation use whatever tool is necessary to verify that you don't have brltty running

Verify your Serial Port

Plug in the Arduino, verify that the green LED is lit, and type ls /dev/ttyUSB* into a terminal window, you should see a device file called something like ttyUSB0

If you can't seem to find it, use dmesg | tail right after plugging in the Arduino and look for hints on where it may put the device file. For example here is says Serial Device converter now attached to ttyUSB0

If you see something like this

[ 1900.712000] ftdi_sio 2-10:1.0: FTDI USB Serial Device converter detected
[ 1900.712000] drivers/usb/serial/ftdi_sio.c: Detected FT232BM
[ 1900.712000] usb 2-10: FTDI USB Serial Device converter now attached to ttyUSB0
[ 1901.868000] usb 2-10: usbfs: interface 0 claimed by ftdi_sio while 'brltty' sets config #1
[ 1901.872000] ftdi_sio ttyUSB0: FTDI USB Serial Device converter now disconnected from ttyUSB0
[ 1901.872000] ftdi_sio 2-10:1.0: device disconnected

That means you have not uninstalled brltty and you should try again.

It's possible to use a Chromebook/ChromeOS for programming Arduino. The good news is that you don't need to install any software. Instead you will register and use Codebender.cc which is an online version of the Arduino software. We'll still primarily have examples that use the desktop version because it's a little more powerful and is the latest and greatest but codebender does 95% of what the desktop version does and its free too!

Visit codebender.cc to register an account

Go through their walkthrough setup procedure and install the Chrome Plugin

When you get to this step, select Arduino UNO

And in the next step, your Serial port:

If you're using Windows or Mac you may still need to install drivers so be sure to do that in case the serial port doesnt appear

This guide was first published on Jul 14, 2016. It was last updated on Mar 08, 2024.