In this guide we’re building yet another infinity mirror! This makes a really cool optical illusion that uses acrylic mirrors and a strip of NeoPixel smart RGB LEDs.

Bluetooth Remote Control

With the ItsyBitsy nRF52840, you can remotely control the LEDs. Set different colors and change animations with the Bluefruit connect app for iOS or Android.
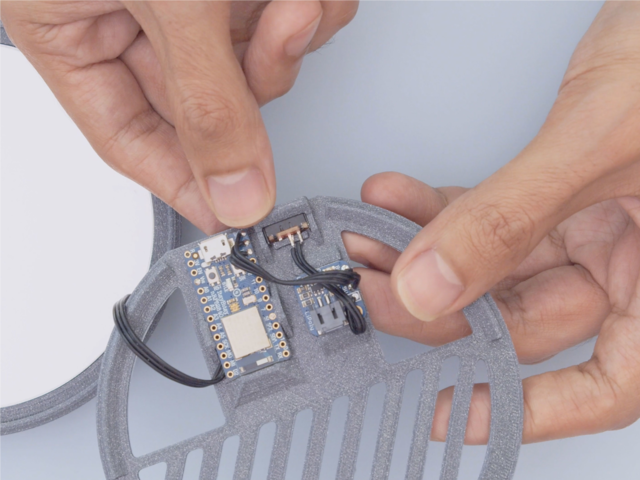
3D Printed Snap Fit

The 3D printed parts are designed to snap fit together so it’s easy to build. It's portable with a rechargeable battery and switch so you can easily turn it off.

Circuit Python Code

The code for this project was written in Adafruit’s CircuitPython. It’s really easy to setup hardware with Bluetooth using the BLE library for CircuitPython. With the LED animation library, we can customize the settings and create different effects.

Parts

Adafruit NeoPixel Digital RGB LED Strip wired to a microcontroller, with all the LEDs in a rainbow
So thin. So mini. So teeeeeeny-tiny. It's the 'skinny' version of our classic NeoPixel strips!These NeoPixel strips have 144 digitally-addressable pixel Mini LEDs...
$49.95
In Stock
Angled shot of Adafruit ItsyBitsy nRF52840 Express - Bluetooth LE.
What's smaller than a Feather but larger than a Trinket? It's an Adafruit ItsyBitsy nRF52840 Express featuring the Nordic nRF52840 Bluetooth LE...
$19.95
In Stock
Adafruit LiIon/LiPoly Backpack soldered onto a Pro Trinket, plugged into a solderless breadboard.
If you have an ItsyBitsy or Pro Trinket you probably know it's the perfect little size for a portable project. This LiPoly backpack makes it really easy to do! Instead of wiring 2...
$4.95
In Stock
Angled shot of a Lithium Ion Polymer Battery 3.7V 500mAh with JST-PH connector.
Lithium-ion polymer (also known as 'lipo' or 'lipoly') batteries are thin, light, and powerful. The output ranges from 4.2V when completely charged to 3.7V. This...
$7.95
In Stock
Breadboard-friendly SPDT Slide Switch
These nice switches are perfect for use with breadboard and perfboard projects. They have 0.1" spacing and snap in nicely into a solderless breadboard. They're easy to switch...
$0.95
In Stock
Fully Reversible Pink/Purple USB A to micro B Cable
This cable is not only super-fashionable, with a woven pink and purple Blinka-like pattern, it's also fully reversible! That's right, you will save seconds a day by...
$3.95
In Stock
10 wire Silicone Cover Stranded-Core Ribbon Cable
For those who are fans of our silicone-covered wires, but are always looking to up their wiring game. We now have Silicone Cover Ribbon cables! These may look...
$3.95
In Stock
1 x Roll of Mirror Film
BDF S05 One Way Mirror Film
1 x Acrylic Disc
4in (101.6mm) diameter x 1/16in (1.6mm) thick

Project Inspired by MN Maker
https://www.youtube.com/watch?v=HhfsTSldXTI

The diagram below provides a visual reference for wiring of the components. This diagram was created using the software package Fritzing.

Adafruit Library for Fritzing

Use Adafruit's Fritzing parts library to create circuit diagrams for your projects. Download the library or just grab individual parts. Get the library and parts from GitHub - Adafruit Fritzing Parts.

Wired Connections

The ItsyBitsy nRF52840 is powered by 500mAh battery via the Lipo Backpack. This allows the USB port from the ItsyBitsy nRF52840 to charge the 500mAh battery. A slide switch is connected to the two switch pin on the Lipo Backpack. 

  • BAT from Lipo Backpack to BAT on ItsyBitsy nRF52840
  • Ground from Lipo Backpack to GND on ItsyBitsy nRF52840
  • 5V from Lipo Backpack to USB on ItsyBitsy nRF52840

Slide Switch

A 2-pin slide switch is wired to the switch pins on the Trinket/ItsyBitsy Lipo Backpack. 

NeoPixel Strip

The neopixel strip is connected to the ItsyBitsy with three wired connections, data, voltage and ground.

  • 5V+ from NeoPixel Ring to Vhi on ItsyBitsy nRF52840
  • G from NeoPixel Ring to G on ItsyBitsy nRF52840
  • DIN from NeoPixel Ring to Pin #5 on ItsyBitsy nRF52840

Setup ItsyBitsy nRF52840 with CircuitPython

We'll need to get our board setup so we can run the CircuitPython code. Let's walk through these steps to get the latest version of CircuitPython onto your board. 

The Mu Python Editor

Mu is a simple Python editor that works with Adafruit CircuitPython hardware. It's written in Python and works on Windows, MacOS, Linux and Raspberry Pi. The serial console is built right in, so you get immediate feedback from your board's serial output! While you can use any text editor with your code, Mu makes it super simple. Instructions for Mu are available here.

Installing or upgrading CircuitPython

You should ensure you have CircuitPython 4.0 or greater on your board. Plug your board in with a known good data + power cable (not the cheesy USB cable that comes with USB power packs, they are power only). You should see a new flash drive pop up.

If the drive is CIRCUITPY, then open the boot_out.txt file to ensure the version number is 4.0 or greater. 

Adafruit CircuitPython 5.0.0-beta.3 on 2020-01-08; Adafruit ItsyBitsy nRF52840 Express with nRF52840

If you need to install or upgrade CircuitPython, see this guide page on the ItsyBitsy nRF52840.

Download the Adafruit CircuitPython Library Bundle

In order to run the code, we'll need to download a few libraries. Libraries contain code to help interface with hardware a lot easier for us.

Use the ItsyBitsy nRF52840 page on Installing Libraries to get the library that matches the major version of CircuitPython you are using noted above, i.e. 4.x for the versiond starting with 4, 5.x for the versions starting with 5, etc.

To run the code for this project, we need the two libraries in the Required Libraries list below. Unzip the library bundle and search for the libraries. Drag and drop the files into a folder named lib on the CIRCUITPY drive (create the folder if it is not already on the ItsyBitsy nRF52840).

Required Libraries 

  • neopixel.mpy
  • adafruit_dotstar.mpy
  • adafruit_bluefruit_connect
  • adafruit_ble
  • adafruit_led_animation

Once we have all the files we need, a directory listing will look similar to above as far as files and directories.

Upload Code

Click on the download link below to grab the main code directly from GitHub. Ensure the file is named code.py and drop it onto the CIRCUITPY drive main (root) directory that appears when your ItsyBitsy nRF52840 is plugged into your computer via a known good USB data cable. The code will run properly when all of the files have been uploaded including libraries.

Use any text editor or favorite IDE to modify the code. We suggest using Mu as noted above.

# SPDX-FileCopyrightText: 2019 Kattni Rembor for Adafruit Industries
#
# SPDX-License-Identifier: MIT

"""
NeoPixel Animator code for ItsyBitsy nRF52840 NeoPixel Animation and Color Remote Control.
"""

import board
import neopixel
from adafruit_led_animation.animation.comet import Comet
from adafruit_led_animation.animation.sparkle import Sparkle
from adafruit_led_animation.group import AnimationGroup
from adafruit_led_animation.sequence import AnimationSequence
import adafruit_led_animation.color as color

from adafruit_ble import BLERadio
from adafruit_ble.advertising.standard import ProvideServicesAdvertisement
from adafruit_ble.services.nordic import UARTService

from adafruit_bluefruit_connect.packet import Packet
from adafruit_bluefruit_connect.color_packet import ColorPacket
from adafruit_bluefruit_connect.button_packet import ButtonPacket

# The number of NeoPixels in the externally attached strip
# If using two strips connected to the same pin, count only one strip for this number!
STRIP_PIXEL_NUMBER = 44

# Setup for comet animation
COMET_SPEED = 0.05  # Lower numbers increase the animation speed
STRIP_COMET_TAIL_LENGTH = 10  # The length of the comet on the NeoPixel strip
STRIP_COMET_BOUNCE = False  # Set to False to stop comet from "bouncing" on NeoPixel strip

# Setup for sparkle animation
SPARKLE_SPEED = 0.1  # Lower numbers increase the animation speed

# Create the NeoPixel strip
strip_pixels = neopixel.NeoPixel(board.D5, STRIP_PIXEL_NUMBER, auto_write=False)

# Setup BLE connection
ble = BLERadio()
uart = UARTService()
advertisement = ProvideServicesAdvertisement(uart)

# Setup animations
animations = AnimationSequence(
    AnimationGroup(
        Comet(strip_pixels, COMET_SPEED, color.TEAL, tail_length=STRIP_COMET_TAIL_LENGTH,
              bounce=STRIP_COMET_BOUNCE)
    ),
    AnimationGroup(
        Sparkle(strip_pixels, SPARKLE_SPEED, color.TEAL)
    ),
)

animation_color = None
mode = 0
blanked = False

while True:
    ble.start_advertising(advertisement)  # Start advertising.
    was_connected = False
    while not was_connected or ble.connected:
        if not blanked:  # If LED-off signal is not being sent...
            animations.animate()  # Run the animations.
        if ble.connected:  # If BLE is connected...
            was_connected = True
            if uart.in_waiting:  # Check to see if any data is available from the Remote Control.
                try:
                    packet = Packet.from_stream(uart)  # Create the packet object.
                except ValueError:
                    continue
                if isinstance(packet, ColorPacket):  # If the packet is color packet...
                    if mode == 0:  # And mode is 0...
                        animations.color = packet.color  # Update the animation to the color.
                        print("Color:", packet.color)
                        animation_color = packet.color  # Keep track of the current color...
                    elif mode == 1:  # Because if mode is 1...
                        animations.color = animation_color  # Freeze the animation color.
                        print("Color:", animation_color)
                elif isinstance(packet, ButtonPacket):  # If the packet is a button packet...
                    if packet.pressed:  # If the buttons on the Remote Control are pressed...
                        if packet.button == ButtonPacket.LEFT:  # If button A is pressed...
                            print("A pressed: animation mode changed.")
                            animations.next()  # Change to the next animation.
                        elif packet.button == ButtonPacket.RIGHT:  # If button B is pressed...
                            mode += 1  # Increase the mode by 1.
                            if mode == 1:  # If mode is 1, print the following:
                                print("B pressed: color frozen!")
                            if mode > 1:  # If mode is > 1...
                                mode = 0  # Set mode to 0, and print the following:
                                print("B pressed: color changing!")

Double Check

See the directory listing above and double check that you have all the files listed to make this project function. If any are missing or in an incorrect directory, move them so they're in the right places.

Bluetooth App

This project uses the Adafruit Bluefruit LE connect app (available free for Android and iOS) to trigger the lights and sounds. It uses the control pad to trigger up to 8 different colors and sound effects. If you haven't downloaded the app yet, use the button below to install it on your mobile device.

Connect to ItsyBitsy nRF52840

Power on the ItsyBitsy nRF52840 by connecting it via USB to your computer.

Using Bluefruit LE Connect App

Open the Bluefruit LE Connect app and locate the device named CIRCUITPY and tap the connect button. Locate and tap on Controller. Under module, tab on Control Pad

Use the LEFT arrow button to cycle between the two animations.

Color Picker

You can change the color of the animations by using the Color Picker. Tap connect, select Controller. Under module, tap on Color Picker. Use the color wheel to select a color and the slider to adjust the brightness. Tap the send color button to trigger the color.

Apple Watch

If you have an Apple Watch, you can use the Bluefruit LE Connect App just like the mobile app. The Apple Watch app is included with the iOS app download. 

3D Printed Parts

STL files for 3D printing are oriented to print "as-is" on FDM style machines. Original design source may be downloaded using the links below.

  • ic-case-frame.stl
  • ic-case-bottom.stl
  • ic-case-top.stl
  • ic-ring.stl

Exploded View

The CAD animation shows how the parts fit together. A ring of neopixels are sandwiched in between the two acrylic discs. The top cover snap fits onto the frame. The electronics are housed in the bottom cover with built-in snap fit tabs. The switch and USB port are accessible on the outside of the frame.

Design Source Files

The project assembly was designed in Fusion 360. This can be downloaded in different formats like STEP, STL and more. Electronic components like Adafruit's board, displays, connectors and more can be downloaded from the Adafruit CAD parts GitHub Repo.

Slicing Parts

No supports are required. Slice with setting for PLA material. 

The parts were sliced using CURA using the slice settings below.

  • PLA filament 220c extruder
  • 0.2 layer height
  • 10% gyroid infill
  • 60mm/s print speed
  • 60c heated bed

Lipo Backpack with Switch

The slide switch is wired to the ItsyBitsy Lipo backpack with two wired connections.

Wire for Switch

Using the 10-wire ribbon cable, cut a piece for the switch. A length of 48mm (1.89in) is suffice. Peel apart the ribbon cable for a 2-wire piece of wire. Using wire strippers, remove a bit of insulation from the tips. Tin the tips by adding a bit of solder. This will help to prevent the strands of wire from fraying.

Switch Wire

The 2-wire cable piece is connected to the middle pin and either the far left or right pin. Third helping hands can assist by soldering the switch in place while soldering.

Cut Trace

The pins on the Trinket/ItsyBitsy Lipo Backpack need to be cut in order to enable on/off switch functionality. Use diagonal flush snips to cut the trace circled in red. Use the mounting hole as an anchor. 

Solder Switch to Lipo Backpack

Connect the wires from the slide switch to the two pins on the Lipo backpack by soldering them in place. Third helping hands can help keep the switch in place while soldering.

Wired Switch

Double check the wires and ensure the solder joints are solid. 

NeoPixel Strip Length

Remove the mini skinny NeoPixel strip from the reel. For this project, a strip of 44 LEDs (or a length of 305mm / 12in) is needed to cover the outside diameter of the acrylic disk.

Cut NeoPixel Strip

Individually count the LEDs on the strip so there are 44. Double check the number of pixels is correct. Cut the NeoPixel strip in between the solder pads. Remove the pre-soldered wires from the beginning of the strip by cutting it off with wire cutters. 

NeoPixel Wire

A 3-wire ribbon cable is wired to the first pixel on the strip. The wire length measures to 120mm (4.72in). Measure and cut a piece of cable from the 10-wire ribbon cable.

Wire Tinning

Using wire strippers, remove a bit of insulation from the tips of each wire. Tin the exposed wires by adding a bit of solder. This will help to prevent the strands of wire from fraying. A set of third helping hands can help keep the wire in place while soldering.

Wire Strip

Tin the solder pads on the first NeoPixel by adding a bit of solder. Attach the 3-wire ribbon cable to the first NeoPixel. Double check the wire is connecting to the Data In (DI), Ground (G) and Voltage (+) pads. Third helping hands can help keep the strip in place while soldering.

Wired Strip

Double check the solder joints are solid and the connections are made on the first NeoPixel.

Wires for Lipo Backpack

The Lipo Backpack is connected to the ItsyBitsy with 3-wired connections. Using the 10-wire ribbon cable, cut a piece so it's 48mm (1.89in) in length. Peel apart the ribbon cable for a 3-wire piece of cable. Using wire strippers, remove a bit of insulation from the tips. Tin the tips by adding a bit of solder. This will help to prevent the strands of wire from fraying.

Wiring Lipo Backpack

Solder the 3-wire cable to the BAT, G and USB pins on the Lipo Backpack.

Connect Lipo Backpack to ItsyBitsy

The Lipo Backpack is connected to the ItsyBitsy.

Solder Wires to ItsyBitsy

Make the following connections to connect the Lipo Backpack to the ItsyBitsy. 

  • BAT from Lipo Backpack to BAT on ItsyBitsy
  • Ground from Lipo Backpack to Ground on ItsyBitsy
  • 5V from Lipo Backpack to USB on ItsyBitsy

Wired ItsyBitsy and Lipo Backpack

Double check the wiring and ensure the solder joints are solid.

Test Lipo Backpack and Battery

Plug the 500mAh battery into the battery port on the Lipo Backpack. Use the slide switch to power on the circuit.

Wiring the NeoPixel Strip to the ItsyBitsy

The NeoPixel strip is now ready to be connected to the ItsyBitsy.

Solder Wires to the ItsyBitsy

The 3-wires from the strip are soldered to the pins on the bottom of the ItsyBitsy. This allows the single ground pin to be shared across the strip and Lipo backpack. Solder the following connections:

  • Ground(-) from Strip to Ground on ItsyBitsy
  • Data Out(DO) from Strip to 5! on ItsyBitsy
  • Voltage+ from Strip to Vhi on ItsyBitsy

Testing NeoPixel Strip

Test out the the strip by turning on the circuit using the slide switch. 

Acrylic Disc

The acrylic discs come in different diameters and thickness. The enclosure was designed for a specific size.

  • 4in Diameter (101.6mm)
  • 1/8in Thick (3.17mm)

Mirror Film

This one-way mirror film comes in a roll in different sizes. It comes with a box cutter and a squeegee tool for applying the film. I used the following roll size:

  • 12in x  24ft

Cut Roll of Film

Start by laying out a sheet from the roll onto a cutting mat. I used a T-square ruler to guide the blade while cutting a sheet from the roll.

Take extreme caution when using a sharp tool!

Trim Pieces of Film

I placed the acrylic disc over the sheet to gauge how large the piece needs to be. You'll want to add a bit of extra space around the edges so the acrylic has total coverage.

Pieces of Film

I suggest cutting out several pieces. You'll want to have extra pieces in case one of them gets messed up while applying.

Serving Tray and Gloves

I suggest using a serving tray to catch the soapy water so your work surface doesn't get wet. Gloves will help to prevent getting smudges and fingerprints on the acrylic or film.

Peel Corners with Tape

The film has a protective backing that needs to be removed. Adding pieces of tape to the corners can help you peel apart the two layers.

Peel Acrylic Backings

These acrylic discs have backings on both sides so you’ll need to remove those as well.

Wet Acrylic

The roll of film has instructions for applying the film to windows (acrylic in our case). The directions say to use soapy water. I filled an empty spray bottle with 16oz of water and 6 drops of liquid hand soap. Spray the acrylic disc so the surface is has been fully wet.

Wet Film

The sticky side of the film also needs to be wet so spray it down and made sure to get total coverage. The trick is to use lots of soapy water so the two surfaces can adhere smoothly.

Place Film onto Acrylic

Place the film over the acrylic and try to get it in the center. Lay the film on top and press down. You can shift it into place if you need to.

Squeegee Wet Film

I used the squeegee that came with the film and rinsed out all of the water and air bubbles.

Soak Up Water

The serving tray should catch most of the water. I made sure to use plenty of paper towels to soak it all up.

Squeegee Film Dry

Squeegee the film until all of the soapy water has either been wiped away or dried out. You'll want to start from the center and wipe out towards to the edges.

Dry Acrylic Film

Once the application looks good, make sure to let the film dry several  minutes before trimming the excess. The edges take a bit of time to fully dry.

Trim Excess Film

I flipped it over and used a box cutter to trim along the edge on the outside. You’ll want to be super careful not to scratch up the surface while doing this.

The acrylic disc only needs one side of the mirrored film.

Rinse and Repeat!

This took me several times to get right, so it takes a bit of effort to get a nice finish. With some practice and patience, we were able to get these two pieces.

If things don't look as good as you'd like, you can always peel off the film and try again!

Install Strip into Ring

The 3D printed ring will help the NeoPixel strip stay in place. The strip of NeoPixels is fitted inside the ring and wraps around with the LEDs facing inwards.

Slit for Wiring

The wiring is fitted through a slit so it doesn’t get kinked when installing the acrylic.

Hot Glue Strip to Ring

Dabs of hot glue can help attach the strip of NeoPixels to the ring. This keeps the strip nicely secured so it stays in place.

Installed Strip

Double check the strip of NeoPixels is nice and flush with the 3D printed ring. If you're using a different strip of NeoPixels, your LED count will be different.

Test Strip

Make sure to test out the strip of NeoPixels to ensure everything is still working properly.

Clean Acrylic

It’s a good idea to wipe down the acrylic before installing them into the case. You can use a micro fiber cloth or wet wipes for glasses. Paper towel with alcohol works OK too (careful not to get fibers on the acrylic).

Install Acrylic Top

Grab one of the acrylic discs and begin to fit it into the top cover with the mirrored side facing inwards.

Install Ring to Top

The ring of NeoPixels can then be fitted inside the top cover. Make sure the wire is lined up and going through with the slit. Push the 3D printed ring all the way down so it's flush up against the acrylic disc.

Install Bottom Acrylic

Place the second piece of acrylic on top of the 3D printed ring. Press down so it's flush. Double check and make sure the wiring from the NeoPixel strip isn't being kinked.

Test Mirror Strip

With the two acrylic discs now in place, it's a good idea to power on the circuit to test out the effect. If there's any smudges, fingerprints or dust, you should be able to see it right away. If the effect doesn't look as expected, try flipping the acrylic discs.

Pass Circuit Through Frame

Grab the 3d printed frame and start to pass the electronics through. The side with the lip should be facing the acrylic disc.

Snap Fit Frame to Top

These two parts snap fits together and have pretty tight tolerances. Make sure the frame is lined up properly with the top cover. Reference the photo for the correct placement.

Check Wiring

Double check to make sure the wiring from the strip of NeoPixels is passing through the slits across the top cover and frame.

Install ItsyBitsy

The ItsyBitsy can then be snap fitted into the bottom cover. Tabs on the side will keep it in place.

Install Lipo Backpack

The Lipo backpack also press fits and the slide switch is installed into a little holder.

Install Switch

Insert the body of the switch at an angle and firmly press down to snap fit it into place.

Connect Battery

With the parts in place the battery can then be connected and tacked down with double-sticky tape or mounting tack.

Install Bottom Cover

The bottom cover can now be snap fitted into the frame with the openings lined up. Firmly press the two parts together to snap fit them shut.

Installed Bottom

The bottom cover should clamp into the frame. Make sure the port holes are properly lined up.

Test Build

Turn it on and try it out!  My final build has a few tiny scratches and small air bubbles, but overall a decent finish. 

This guide was first published on Jan 21, 2020. It was last updated on Apr 16, 2024.