FOSSHAPE is a unique nonwoven fabric, comprised of a low melt synthetic polyester fiber that when exposed to varying degrees of heat (200 degree F range) and pressure it changes in stiffness and texture.
This means you can sculpt whatever shape you desire, hit it with a heat gun or steamer, and it will stay that way. Just Like Magic.
If you've never worked with fosshape before, start by cutting a few small scraps and play around with them. This material can shrink up to 1/3 of its size as it stiffens, so it's a great idea to make something small and get a feel for how much heat is needed, and how much shrinkage wants to happen, before diving into a larger project.
It's always easy to make the Fosshape stiffer with more heat, but if you overheat it there's no going back to soft-and-flexible. So do some experimenting first and save yourself some possible future heartache!
Much more information can be found in the Wonderflex site's FAQ.
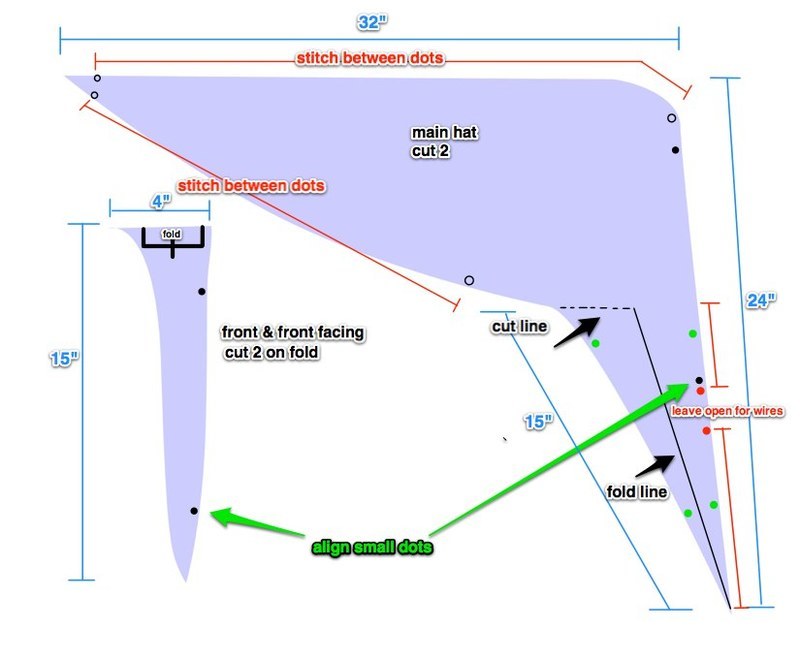
Adjust the sizes as desired. This pattern doesn't need to be exact -- different proportions will make your hat your own, so play with the pattern to get the hat you want.
Sketch out the pattern at full size on a piece of butcher paper or wrapping paper and cut it out.
Fold your Fosshape in half so you have two layers and pin your pattern to the Fosshape. Be sure the top edge of the front piece is on the fold, so you'll end up with one double-long piece when it's cut.
Cut out two of the main hat pattern pieces, and two of the front pieces on the fold.


For the HAT pieces, stitch the top and bottom edge together between the circles.
For the FRONT piece, stitch the pointy edges together. Trim all seams close to stitching and grade out extra fabric at the point.
Turn both pieces right-side out.


Pin one of the rough edges of the FRONT piece to the front edge of the HAT piece, matching centers. Stitch.
Fold the facing piece over the seam and pin it in place. Don't stitch this yet! We're leaving it open so we can get the lights inside.


At the front of the hat, cut along the cut lines and fold along the fold lines.
Stitch as shown, leaving 1.5" opening for wires (be sure the Flora fits through) and leaving the top edge open as a pocket.


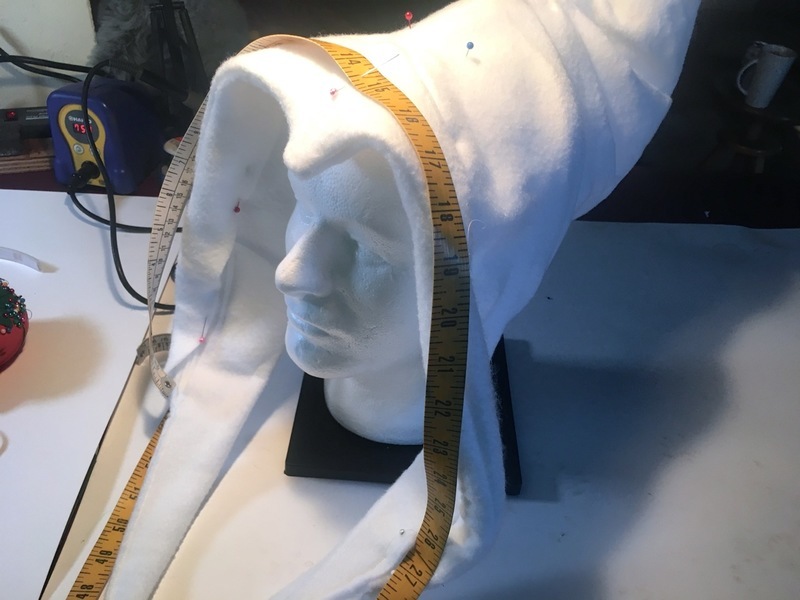
Place your hat on your wig head and pin it down. (Don't worry, it won't hurt her)
Begin to shape your hat by making pleats along the top seam. Play with the number and depth of the pleats until you get the shape you want.
If needed, temporarily stuff some fiberfill or extra fabric inside to help the hat hold its shape during heating.


Once you have your desired shape, pin down any side pleats or areas that might shift.
With a clothing steamer or heat gun, heat the fabric. Only heat the areas you want to get stiff. Stay away from the dangly wings in front. Go easy here -- you can always make it stiffer but once you lose the softness it's gone forever.
Remove all the pins except those holding the front facing in place. Try your hat on and bounce around a bit, and make any needed adjustments.
Once you're happy with the fit, get out your measuring tape and measure the front edge and the tail from the crown of your head to the tip. This measurement will tell you exactly how many LEDs to use in each spot.
Add a few more inches to the tail measurement to allow for 4-5 LEDs poking through into the dangling ball.