


Start by measuring the design element you'd like to recreate in EL panel-- this All Star logo disc is ~48.48mm in diameter.
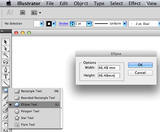
We chose to make a circle with vector graphics software, but you could also draw one with a compass.
We chose to make a circle with vector graphics software, but you could also draw one with a compass.


Cut out the circle.
Find the phosphor side of the EL panel-- it has a plastic overlay you should leave in place.Trace the circle onto the plastic overlay with marker near where the panel's wires connect.
Find the phosphor side of the EL panel-- it has a plastic overlay you should leave in place.Trace the circle onto the plastic overlay with marker near where the panel's wires connect.


Cut out the circle with sharp scissors and then peel away the plastic overlay.
Sometimes the edge of cut EL panel can give you a little electric shock when you touch it-- you can optionally seal the edge with clear nail polish or the craft glue you'll use in a later step. This will also help make the shoe mod more durable.
Sometimes the edge of cut EL panel can give you a little electric shock when you touch it-- you can optionally seal the edge with clear nail polish or the craft glue you'll use in a later step. This will also help make the shoe mod more durable.


Cut a star from a piece of black sticky vinyl. At first we tried matching the actual size of the star on the shoe, but the design looked unbalanced without the text so we made the star bigger.
You can use the star tool in Illustrator-- while holding down the mouse button you can use the up and down arrow keys to change the number of points in the star, and also hold down the 'alt' key for a star with parallel lines.
Remove the vinyl's backing and stick the star to the phosphor side of the EL panel. Pay attention to the wire connector on your EL panel-- it should face up toward the top of the shoe when you stick the star.
Plug in your inverter and test that your EL panel lights up.


Apply a thin even coat of E6000 craft glue to the shoe's round logo.
Carefully place the EL panel on the glue and pinch to the shoe for 1 minute for good adhesion before allowing to fully dry for 24 hours. You can use clothespins as tiny clamps.
Skip to the "Inverter & Battery" page to complete your modded shoes.
Carefully place the EL panel on the glue and pinch to the shoe for 1 minute for good adhesion before allowing to fully dry for 24 hours. You can use clothespins as tiny clamps.
Skip to the "Inverter & Battery" page to complete your modded shoes.


