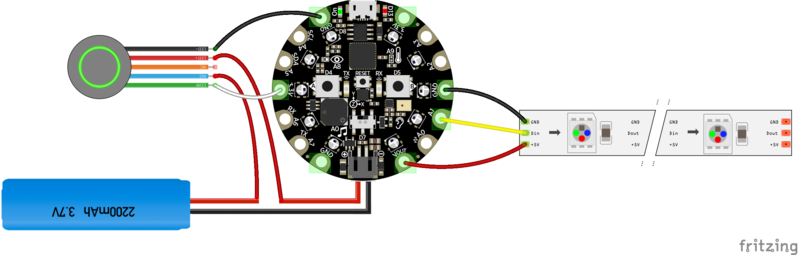
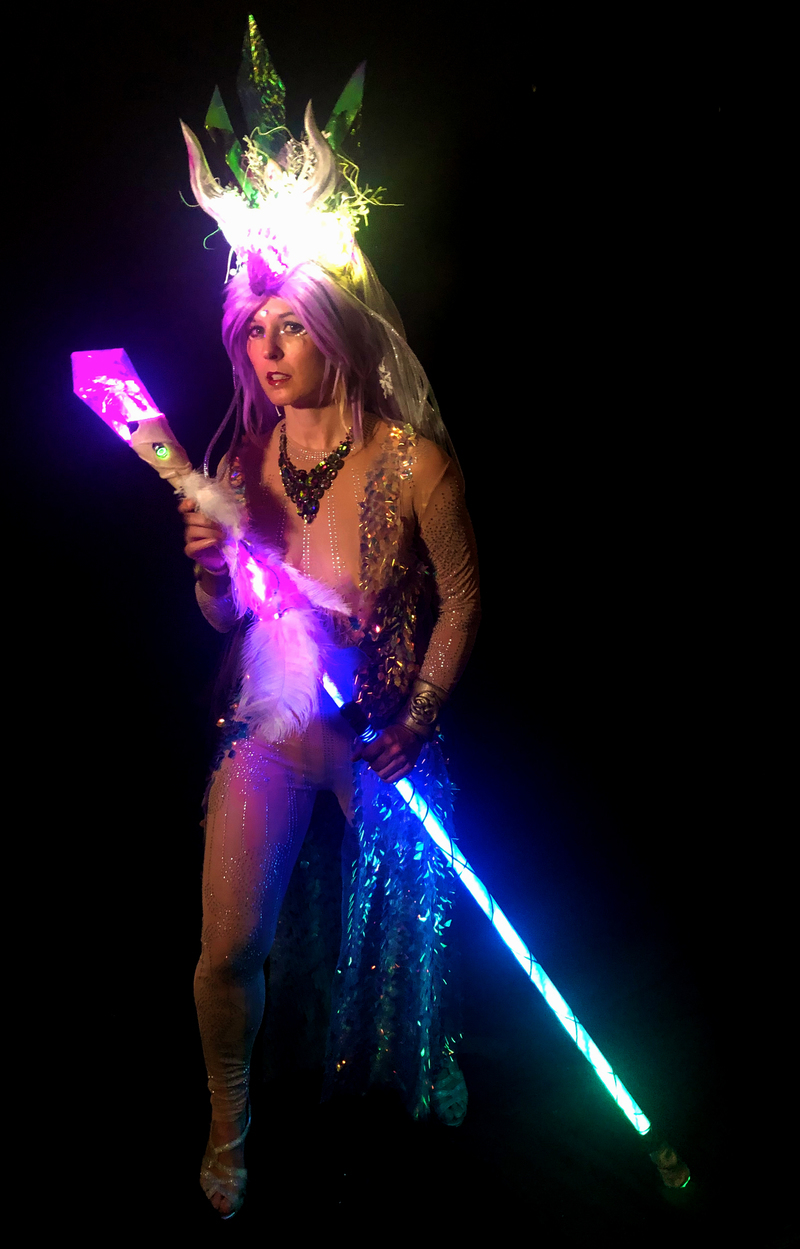
Complete your Cosplay with a gorgeous glowing crystal-topped magical Wizard staff. Use the Circuit Playground Express' onboard sensors to program magic spells into your staff and control the lighting effects with your gestures: shake, spin, tilt, or swing the staff to trigger your custom light animations.

A Wizard staff should be as unique as the Wizard who wields it. The more care and thought you put into the creation of your magic staff, the more it will bring your character to life. We've included sample code in Microsoft MakeCode so you can customize your staff's animations to suit your character.

This project requires some fairly easy soldering and a good bit of creative crafting. I didn't use any fancy tools like 3d printers or lasers or even regular power tools for this project, though I did use a laminating machine for the crystal gem. For the rest, I kept it fairly simple with pre-cut plastic tubes and oven-bake polymer clay. 

1 x Circuit Playground Express
Circuit Playground Express MIcrocontroller
2 x NeoPixels
Skinny NeoPixels at 60/m
1 x 3-pin Connector
3-pin JST connector
1 x 2-pin Connector
2-pin JST connector
1 x On/Off Switch
Glowing On/Off Switch
1 x Battery
2200mAh Cylindrical Battery
1 x JST Extension Cable
Battery Extension Cable
1 x Battery Charger
USB Battery Charger
1 x USB cable
Micro USB Cable

Additional Parts Needed

  • 1" x 5-6' polycarbonate tube (main staff)
  • 1/2" x 5-6' polycarbonate or acrylic tube (fits inside the main staff and holds the LEDs)
  • Bottom end cap for the 1' tube
  • Iridescent Cellophane & Laminating pouches for the Crystal (or buy pre-cut crystals here)
  • Polymer Clay
  • Cardboard paper towel tube
  • Gaffer's tape and aluminum tape, or similar
  • Feather maribou boa
  • Spool of leather cord
  • Feathers, jewels, and other fancy bits

Tools Needed

  • Soldering iron & accessories
  • Hot glue gun
  • Oven for baking the polymer clay
  • Laminating machine
  • Vinyl cutter (optional)
  • Heat gun (optional)

NeoPixel Strand

  • VOUT --> +5V
  • A1 --> DIN
  • GND --> GND

On/Off Switch

Looking at the switch from the side, with the pins curving away from you (like a smile!):

  • Leftmost pin --> 3.3V
  • Second pin --> Battery cable red wire
  • Third pin NOT USED
  • Fourth pin --> Battery cable red wire
  • Fifth pin --> GND

An easy way for non-coders or beginner coders to get up and running with NeoPixels and Circuit Playground is by using Microsoft's MakeCode editor. You can drag and drop blocks of code and experiment with colors and brightness until you get the look you want. It's also easy to tap into the Circuit Playground's onboard sensors to code animations that trigger when you shake or tilt the staff -- essential for an interactive cosplay prop.

Head to https://makecode.adafruit.com/ to get started.

My code starts the staff with a "power-up" animation, lighting the staff in a gradient that starts from the bottom and accelerates until the crystal at the top is lit. The crystal then stays lit with a purple flame-like flicker.

I've added a mode that makes a bright lightning effect when the staff is shaken or tapped hard on the ground, and another mode that plays a pretty rainbow animation when the staff is tilted sideways. It's easy to customize the modes and triggers so your staff behaves the way you want.

Click the button below to access the code, and customize it to your heart's content.

On Start Block

The on start block is where you set up your pixels. Anything in this block will happen once, when the Circuit Playground Express is first powered on. Since we soldered our connector to A1, we'll tell the Circuit Playground to set up a strip on A1 with 90 pixels (you can change this to reflect the number you actually have).  You can also set your preferred brightness here.  Note that set strip brightness will refer to the NeoPixels in the handle of the staff, and set brightness will refer to the NeoPixels on the face of the Circuit Playground Express.

Functions

Functions are a way of storing a chunk of code so you can refer to it when the Circuit Playground's inputs are triggered. Functions are a bit like the chorus of a song - you can write something that repeats again and again without having to re-code it every time. I've created two functions called powerUp and gemFlicker

ThepowerUp function causes the lights in the staff to accelerate up the handle using a pretty color gradient. You can mess around with the variables to change the speed and color. The acceleration is accomplished using a delay variable that changes a little bit each time, starting with 150ms and decreasing by 5ms with each pixel that comes on. 

The gemFlicker function causes the lights in the crystal to flicker randomly between my chosen colors, for an intricate candle-flame type effect. You can change the hue pick random 100 to 240 values to change your color palette. I'm varying both the hue (color), the value (intensity) and the brightness of the pixels randomly. This effect makes me very happy.

Forever Block

Whatever you put in this block will run over and over, forever. Since I want my crystal to be constantly flickering (unless another effect is being triggered), I put my gemFlicker function into the forever loop to keep the crystal going constantly.

On Tilt Left Block

When I tilt the staff to the left, this code will run a rainbow animation for about 8 seconds, then repeat the powerUp function to restore the staff to "normal" mode. There are lots of different triggers under the INPUT tab -- play with them to pick the ones that suit your character.

On Shake Block

When I shake the staff (or pound it gently on the ground), this block will trigger some code that makes the staff go a bit crazy. It's running both a rainbow animation and a twinkle animation at the same time, and it looks like a whirling rainbow thunderstorm. This mode makes me wish I'd added sound effects! Instead I have to just make a crashy thunder sound with my mouth whenever I trigger this mode.  Pchhewewwwww!!

First we'll wire up the Circuit Playground, NeoPIxels and power switch. Then we'll create the crystal gem and the setting for it, and then we'll assemble the staff.

My staff is around 6 feet long so it's a bit unwieldy, and so I found it easiest to use JST connectors between the top assembly and the pixels inside the staff so I can work on each piece separately.

Wire the Circuit Playground Express

Get out your 2-pin and 3-pin connectors. The 2-pin will connect to the LED on the power switch and the 3-pin will connect to the NeoPixels.

Solder the female side of the 3-pin connector to VBAT, A1, and GND on the Circuit Playground. (You might be tempted to use A0 but don't! That's the speaker pin and you'll get weird noises if you use that one.) 

Solder the female 2-pin connector to 3.3V and GND on the other side.

Wire the Power Switch

Unscrew the hex nut and remove it. Line up the switch so the five pins swoop along the bottom of the switch (like a smile!). The one on the left is what we'll call pin 1. We'll be soldering to pins 1, 2, 4 and 5 and leaving pin 3 alone.

Cut your JST extension cable's red wire ONLY, right about in the middle of the cable. Slip on some heat shrink. Solder one cut side to pin 2 and one to pin 4. It doesn't matter which side goes to which pin, they're interchangeable in this case.

Solder a white wire to pin 1 and a black wire to pin 5. Cover all the pins with heat shrink so the wires don't touch each other and accidentally short your circuit. These pins will power the switch's onboard LED so it glows when the power is turned on.

Plug the connector into your Circuit Playground for a minute and make double-sure of which wire is which. Solder the black wire from the switch to the connector wire that goes to G on the Circuit Playground, and the white wire to the side that goes to 3.3V.

Wire the NeoPixel Strip

Find the IN end of your NeoPixel strip. If needed, cut the 2-pin connector off the strip and trim the extra black wire.

Let's use the same trick of plugging the male side of our 3-pin JST  connector in to the Circuit Playground before we solder, so we can be 100% sure of which wire connects to which pad. Splice the 3-pin connector to your NeoPixel strip so the black wire connects to G, the white wire connects to IN, and the red wire connects to VBAT

Trim your NeoPixel strip to the right length. Mine has 90 pixels (1.5 meters). I made the strip a few inches shorter than the full length of my staff, since I want a little room near the top for the battery inside the tube. 

Seal the bottom end of your NeoPixel strip where you trimmed it using hot glue. Then, slide the whole strip inside your smaller 1/2" acrylic tube -- it should fit comfortably, and the tube will keep the NeoPixel strip perfectly straight and centered in the middle of your staff.

Create the Gem

It's time to make your crystal gem! The gem is made from laminated cellophane gift wrap. You can cut it out by hand or use a vinyl cutter. Here is a full tutorial on how the gems are designed and made, so you can customize your own. You'll want to be sure it's large enough that the Circuit Playground board fits neatly inside the base of the gem.

If you're in a hurry or don't have a cutting machine, you can buy a pre-made crystal gem here.

The gems in the tutorial linked above are perfectly symmetrical. For this project I wanted a slightly asymmetrical gem, so it looks a little more rugged and "natural". The video tutorial in the Crystal Gems project will show you how to customize your gem using Fusion360 and Slicer. Or, you can download the files below to get the exact same gem I'm using.

Print them out and trace the pattern onto your laminated cellophane sheets, or upload the images to your vinyl cutter. I had the best success using the "stencil film" custom setting on my Cricut vinyl cutter.

Sizing: My gem's side panels are 4 1/2" tall when fully assembled. If you customize yours, it's a good idea to print it out on regular paper and assemble before making the final one, so you can be sure the Circuit Playground will fit neatly in the base.

Assemble the Gem Setting

The transition between the staff and the crystal gem is a cone shape made of a cardboard tube. The bottom of the cone should fit as snugly as possible onto the top of the staff, and the top of the cone should line up with the bottom crease on the crystal. I made the cone from two toilet paper tubes taped together with aluminum tape, and covered with translucent polymer clay.

Be sure your gem fits neatly in the top of the cone. My cone has a bit of a point on one side to help hold the crystal in place, while leaving the USB port on the Circuit Playground accessible on the other side. I covered the entire cone in a layer of aluminum tape.

Decide where you want the on/off switch and cut a hole in the cardboard that's the right size. Remember that the switch is pretty tall, so be sure you've got enough space inside the cone for the body of the switch and all the wires.

Test fit all your components before you decorate the cone. First thread the wires coming from the switch through the hole from the outside. Plug the 2-pin JST connector and the battery connector from the switch into the Circuit Playground. The 3-pin connector (for the NeoPixel strip) and the male end of the battery connector should reach comfortably out the bottom of your cone.

Roll out enough clay to cover the cone. Be careful not to make it too thin, or the clay might crack after it's done baking. Add some details until your crystal setting looks the way you want. Be sure to leave the hole for the switch uncovered. Resist the urge to extend the clay beyond the cardboard's edge -- it is pretty brittle and any exensions will likely break off.

Follow the manufacturer's directions on your polymer clay and bake it so that it hardens. For the Sculpey brand clay I'm using, I baked at 275 degrees for 15 minutes.

Assemble the electronics inside the cone, securing the switch with the hex nut you removed earlier so it stays in place. Be sure the male side of the battery connector and the 3-pin connector going to the NeoPixels reach out the bottom of the cone.

Use a small pair of scissors to cut the bottom point out of the gem, leaving flaps all around (don't cut all the way to the crease). Slip the Circuit Playground in place, with all the wires coming out the bottom, and use hot glue to glue the tabs to the bottom of the Circuit Playground.

If you want to be able to update the programming, use a utility knife to cut a small hole in the gem so the USB port is accessible. I found it helpful to be able to update the code after the staff is assembled, so I can tweak brightness and mode triggers while using the staff.

Use hot glue to secure the gem inside the setting.

Make the Staff Tube

To diffuse the NeoPixel strip inside the main part of the staff, I used a white marabou feather boa. I spiraled the feathers around the 1/2" tube containing the NeoPixel strip, then slid the whole thing into the large outer 1" tube. The feathers keep the inner tube centered and do a pretty good job of diffusing the light. 

I wrapped a piece of gaffer's tape around the top edge of the staff, to give the crystal setting cone a nice tight fit.

The NeoPixel connector should stick out of the tube by a couple inches. The cylindrical battery fits inside the top of the tube as well, right alongside the connector.

I added a few more feathers and a leather cord for decoration.

I wanted a bit more diffusion, and also to take the shine down on the plastic, so I used a piece of 80 grit sandpaper to sand the tube all along the outside. The sanding combined with the feathers makes an absolutely beautiful diffusion.

Plug the connectors from the crystal assembly into the battery and NeoPixel strip. Slide the crystal assembly onto the top of the staff. You may need to add some more tape or padding inside the crystal assembly so it doesn't wobble. You want it secure, but removable -- you'll need to take the head off in order to charge the battery.

Finishing

I made a second cone-style assembly for the bottom of the staff using the same cardboard, aluminum tape and polymer clay method. Slide the cone onto the bottom of the staff and cap the staff with an end cap to hold the bottom cone safely in place. 

Decorate the staff with feathers, leather cords, bones, runes, or whatever other magical design elements your character requires.

This guide was first published on Sep 15, 2019. It was last updated on Mar 08, 2024.