Build the Code Yourself
Here's a step-by-step guide to how I created this code, tested, and debugged it. Follow along for a fun ride through MakeCode Land!


Go to MakeCode.com and choose the Circuit Playground Express. Click New Project, and give your project a name. I called mine "Game Clock".
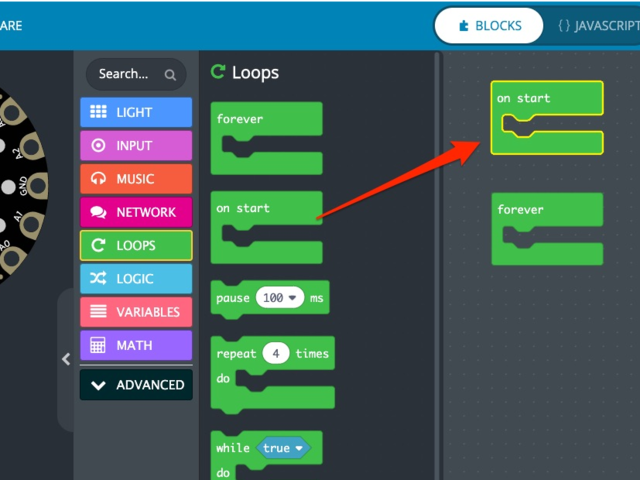
You'll see an emulator on the left, some tabs in the middle, and some open workspace on the right. Drag an instance of on start from the LOOPS tab into your workspace. Anything inside this block will run just once, when the Circuit Playground boots up. Anything inside the FOREVER loop (which is probably already on your workspace) will run over and over, forever -- so that's where the bulk of our code will go.

Next, we'll set up our variables. These will allow us to set up things like duration and color choices right at the top, so if we want to change them later we don't have to hunt through all our code.
We're also adding a few variables we'll use for our timer: timer, index, and counter, and one called timerRunning so we can stop and start the timer. I'll talk more about what these all do later on.
Click the VARIABLES tab and create all the variables shown, then drag an instance of set <variable> to 0 into the on start loop for each one.
How Do I Know What Variables I Need?
Good question. When I first wrote this code, I started with just one variable called timer and made the rest as I discovered they were needed. You can always add more variables. These are the ones I ended up with after a bunch of experimentation. It's really hard to break anything in MakeCode so, please, feel empowered to experiment and try stuff -- that's the very best way to learn.

The cool thing about using variables is that now we can set them to whatever we'd like, and refer to them throughout the code. I can just ask for color1 at any point, and if I change color1 later on, it will automatically change everywhere. Nifty!
Choose a couple colors for color1 and color2. You can find a color block in the LIGHT tab. Also, let's set our timer to 15 seconds for the moment, just for testing purposes.
Create the Light-Up Counter
We want our lights to come on one at a time when the timer is running, to count off the seconds. For this, we'll need a conditional statement. This is a bit of code that says: "If the timer has been started, Then (do these things)".

Click the LOGIC tab and drag the top if/then statement into your FOREVER loop. Then, drag a comparison block to replace the true. Drag your timerRunning variable into the first space, and change the second space to 1. Now, whatever we put inside will only happen if timerRunning is set to 1.
(So, to stop it happening later on, we'd just need to set timerRunning to 0).


Now click the LIGHT tab and choose set pixel color at 0 to red and drag that into your conditional if/then block.
Now go up to your on start block and change timerRunning to 1. Check your emulator. Look! The first pixel (at position 0) has lit up in red! It's working. Muahahaha...
For now, let's leave timerRunning at 1 so we can test our code on the emulator. Later, we'll set it back to 0 in on start, and use the buttons to change it back to 1 to start the timer.


Now, let's assign it a color and see if we can make it count off the seconds.
Replace the 0 with your index variable (from the VARIABLES tab), and change the red to your color1 variable. Then, drag an instance of change index by 1 right underneath the set pixel color block.
Then, drag an instance of pause 100 ms from the LOOPS tab, and change it to 1 second (1000ms).
Check your emulator. The lights are counting up, one per second. Hooray!
What is happening here?
The FOREVER loop runs over and over, forever. So whatever's inside this block is running over and over (as long as timerRunning = 1 as we specified in the last step).
Every time it runs, the index variable is increased by 1, thanks to change index by 1. By adding the pause loop and setting it to 1 second, we've got our index variable counting up by 1 each second, and lighting up the next light in the series each time it does that.
Create "Time is Up" Code
Now, let's tell it to count up until it reaches the number we chose for the timer variable, and figure out what we want it to do when the timer limit is reached.

Drag another conditional if/then statement into your FOREVER loop. Make sure it's placed as shown: inside the if timerRunning block but below the code you just wrote for lighting up the lights.
Add another comparison block, and set it up as shown so it reads if index = timer then...
Anything we put in this block will now run if the count for the index variable reaches the number we chose for timer.

If the timer count is reached, it means that player lost the game! I want a sad sound to play, and the lights to all blink on and off in that player's color. Drag play sound ba ding until done into this conditional block and choose your favorite "you lost" sound. Then, add set all pixels to black, pause, set all pixels to red, pause below that to make the lights blink on and off.
Test it with the emulator by letting the timer run for 15 seconds.
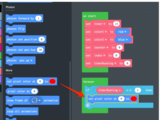
It's looking good, but when the timer runs out I'd like it better if the lights blink three times instead of just once. We can tweak this by adding a repeat 3 times block around our blink code. This is found in the LOOPS tab.

It's working! The sound plays at 15 seconds and the lights all blink on and off. We're getting closer!
However, we've run into a bit of a bug. Our timer is set to 15 seconds, but there are only 10 lights on the Circuit Playground. So the last 5 seconds of the timer doesn't appear to do anything.
It'd be better if all the lights went off after 10, and started counting up from 1 again, wouldn't it?
We can rearrange our code a bit to make this work.
We need a variable that can count up to 10, then be reset to 0, then count up again. But we can't use the index variable -- we need that one to be able to count up to whatever the timer variable is set to. If we keep resetting index to 0, we'd never reach 15.
Let's use our counter variable instead.
We can think of counter as indicating which of the 10 lights is being lit, and index as counting off seconds.

Drag another conditional loop into your FOREVER loop, placed as shown. Add a comparison block, and make it read if counter = 10 then. Anything inside this block will happen only if the counter variable reaches 10.
Add set all pixels to black to turn all the LEDs off, and then add a set counter to 0 block to reset counter to 0 so we can count up a second time (or a third time, for a 30 second timer, etc).
You'll also need to change the set pixel color at index block to read set pixel color at counter, and add change counter by 1 so it counts up along with index.

Test it again on the emulator. It works great... once. But we want it to reset itself so we're ready to play again.
Drag set index to 0 into the bottom of your if index = timer conditional block, to reset the index count to 0 after the sound and lights play, so the timer is ready for the next round.

Lastly, I want the timer to stop running when the time runs out, and wait for a button press. So I've added set timerRunning to 0 at the end of this bock.
Let's move on and set up the button triggers.
Adding Inputs
We want to trigger the timer by pressing a button or touching a capacitive touch code. For now let's start with pressing button A.
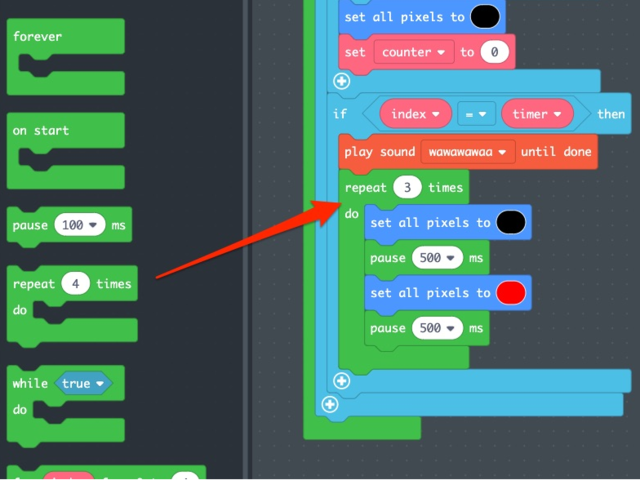
All the sensors and buttons can be reached from the INPUT tab. Drag on button a click into your workspace. Anything we put in this block will trigger whenever we press button A on the face of the Circuit Playground.
Take a minute and look through all the different inputs. There are so many ways to trigger your lights! Maybe come back and play with this more later.

First, let's assign timerRunning to this button instead of having it run on startup. Change the set timerRunning block in on start back to 0, and add set timerRunning to 1 to your button input block.
Now your timer will wait until someone presses a button to begin running.

Let's make a few more things happen when we press the button. We'll reset our index variable (so it starts counting from 0 seconds again), and also reset our counter variable (so it starts lighting pixel #0 again). We'll also set all pixels to black so we're starting from a dark canvas each time.
Changeable Colors
Next we want to add in our color1 and color2 variables, so we can easily customize colors for each player.
We'll want to make one more variable for this: I added a new variable and called it whichColor. That way we can specify as many color variables as we want, and use whichColor to quickly pick from the list.

whichColor is our friend because we can set it with the button press and then call it in our FOREVER loop, and whichever color was set by the button will automatically populate to our LEDs.
Add a set whichColor to color1 block into your button A input loop. Then, change all the calls for a color in your FOREVER loop to call whichColor.
Test it again on your emulator. See if changing your color1 variable from red to another color in your on start loop actually changes the color on the LEDs. Try changing your timer length as well. This is a great time to hunt down and squish any bugs you find.
Granted, this does seem like a super complicated way to choose a color. However, since we did it this way, the next few steps become incredibly easy. Drumroll please... it's time to add more players!

Let's set up button B to be player two. You can simply select your button A block, and copy/paste it onto your workspace. Change the dropdown to read button B, and change your color to color2, and voila! We've created a second timer. Test it out on the emulator to be sure you like how it works.

I added a sound to each of these blocks as well, to give a little more user feedback when the timer starts for each player.

Add more timers if you like! I added two more, and hooked them up to touch pad A2 and A5. Now the timers will reset whenever someone touches either of those copper pads on the Circuit Playground -- and it's fun to hook up alligator clips to capacitive touch pads and turn everyday objects into buttons. More about that on the Assembly page. For now, just make as many timers as you want!
Notice I also added a color3 and color4 variable for these two players. Remember to also add those to the on start block so you can define what colors you'd like them to be.
Adding a NeoPixel Strip
If you're hungry for even more lights, you can clip a NeoPixel strip onto your Circuit Playground with alligator clips, and get the strip to light up along with the timer as well. Here's how:

Start by telling the Circuit Playground that we have a NeoPixel strip on pin A1. This block is under the NEOPIXEL tab (you may need to click the LIGHT tab to see this one).
Anything in the NEOPIXEL tab will apply to the NeoPixel strip you've attached, whereas anything in the LIGHT tab applies to the lights on the face of the Circuit Playground.
Drag set strip to create strip on A1 with 30 pixels into your on start loop. If your strip has more than 30 pixels, change this block to reflect the number you have.
Now we'll set up another counter variable (let's call it stripCounter) and repeat some of the steps above to make the code apply to the NeoPixel strip. Basically the only difference is that we're dragging blocks from the NEOPIXEL tab (that say set strip..) instead of the LIGHT tab (that say set pixel..).
Here's a screenshot of how my code looks once I've added all the calls to stripCounter.

More Ideas
Take a look at the code you just wrote. It's complicated! Congratulations. It's doing a whole lot of things. From here, there are so many ways to tweak and customize the code. Some fun ideas:
- Try triggering the timer with a loud sound or a shake of the Circuit Playground instead of a button.
- See if you can get the colors to light up in a rainbow instead of a solid color.
- Try adding a five-second warning beep before the timer finishes.
- See if you can light up multiple NeoPixel strips, one for each timer.
Have fun playing!


