

46
Beginner
Skill guide
Overview
The small 5mm size of these tin-plated brass snaps means they fit
perfectly on Flora's pads! Snaps make a great connector for wearables--
solder one side to the board and sew the other to your project with
conductive thread. Easily disconnect your Flora for use in multiple projects, or remove it prior to machine washing.
New to FLORA? Check out these other guides:
New to FLORA? Check out these other guides:
- Getting Started with FLORA
- Flora RGB Smart Pixels
- Flora Wearable GPS
- Flora Pixel Brooch
-
Flora TV-B-Gone
Page last edited December 09, 2012
Text editor powered by tinymce.
Tools & supplies


First gather your tools and supplies! You will need teeny tiny 5mm snaps, a Flora main board, conductive thread, and a needle.
You'll also need some clear nail polish or fray check.
You'll also need some clear nail polish or fray check.


Soldering iron
Any entry level 'all-in-one' soldering iron that you might find at your local hardware store should work. As with most things in life, you get what you pay for.
Upgrading to a higher end soldering iron setup, like the Hakko FX-888 that we stock in our store, will make soldering fun and easy.
Do not use a "ColdHeat" soldering iron! They are not suitable for delicate electronics work and can damage the Flora (see here).
Click here to buy our entry level adjustable 30W 110V soldering iron.
Click here to upgrade to a Genuine Hakko FX-888 adjustable temperature soldering iron.
Learn how to solder with tons of tutorials!

Solder
You will want rosin core, 60/40 solder. Good solder is a good thing. Bad solder leads to bridging and cold solder joints which can be tough to find.
Click here to buy a spool of leaded solder (recommended for beginners).
Click here to buy a spool of lead-free solder.
You will want rosin core, 60/40 solder. Good solder is a good thing. Bad solder leads to bridging and cold solder joints which can be tough to find.
Click here to buy a spool of leaded solder (recommended for beginners).
Click here to buy a spool of lead-free solder.


Multimeter
You will need a good quality basic multimeter that can measure voltage and continuity.
Click here to buy a basic multimeter.
Click here to buy a top of the line multimeter.
Click here to buy a pocket multimeter.
Don't forget to learn how to use your multimeter too!
You will need a good quality basic multimeter that can measure voltage and continuity.
Click here to buy a basic multimeter.
Click here to buy a top of the line multimeter.
Click here to buy a pocket multimeter.
Don't forget to learn how to use your multimeter too!


A Panavise is useful, but not strictly necessary.
Page last edited December 09, 2012
Text editor powered by tinymce.
Tin the pads

Use your hot soldering iron to heat up one of the metal pads on the back of the Flora. Apply a small amount of solder to the pad. This is called tinning.

Spread the solder around the metal pad with the tip of your soldering iron. The solder will form the connection between the Flora and the snap.
Page last edited December 09, 2012
Text editor powered by tinymce.
Solder snap stud

The stem-like half of the snap is called the stud. The flat metal surface on this part makes it ideal for soldering to a flat pad on a circuit board. Align one stud to the pad you just tinned, and heat the post through until the pad's solder becomes molten again.
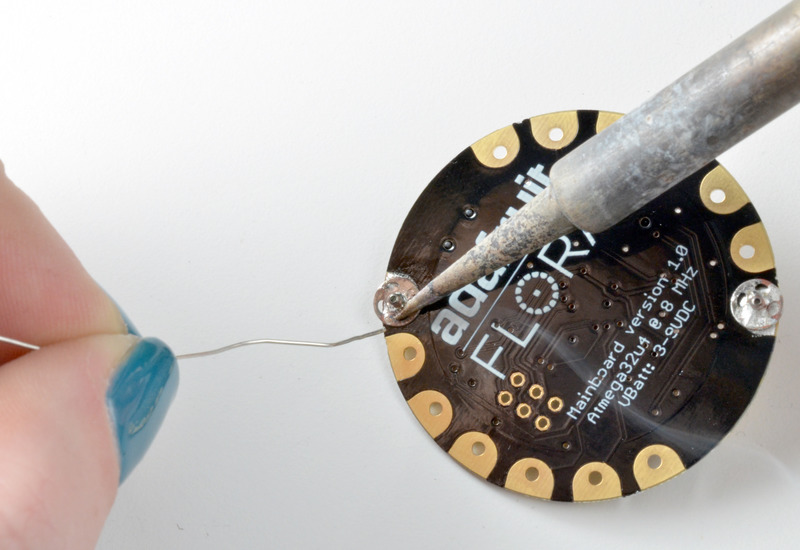
While the solder is molten, apply another small amount of solder. It should stick to the stud and wick into/around one or more of its needle holes.

You may need to shift the stud around with your soldering iron to get it into position before allowing the joint to cool. Now the solder is mechanically connecting the stud to the board as well as electrically connecting the corresponding pin on the Flora.
Some discoloration may occur as the snap's tin plating shifts with the application of heat and solder. It may reveal its brassy core!
Some discoloration may occur as the snap's tin plating shifts with the application of heat and solder. It may reveal its brassy core!
Page last edited December 09, 2012
Text editor powered by tinymce.
Add more snaps

Repeat the tinning and soldering process for whichever pads you need access to on the Flora for your project.
If your circuit design only uses pads on one edge of the board, solder studs to one or more pads directly across the circular board to serve as anchors (these will act as mechanical connectors only). Three areas of contact around the circle is even better. Or just solder a stud to every pad for maximum future-compatibility!
If your circuit design only uses pads on one edge of the board, solder studs to one or more pads directly across the circular board to serve as anchors (these will act as mechanical connectors only). Three areas of contact around the circle is even better. Or just solder a stud to every pad for maximum future-compatibility!

Try to space the studs evenly while leaving as much clearance between snaps as possible.
Page last edited December 09, 2012
Text editor powered by tinymce.
Snap adjustments

When cool, snap on the socket sides of the snap to check your spacing. If any of the snaps touch each other, you'll need to heat them up again for realignment to prevent a short circuit.

Do all the sockets sit flat? A few in this photo are crooked because solder is clogging the works. If this happens to you, just reheat the solder on the post and try to get it to flow towards the board, into the crevices and away from the stem. If there's just too much solder on the snap, try wicking some away with copper braid.

Test the strength of the solder joints by popping the sockets on and off. Once you are satisfied with the placement and strength of the snaps, remove the sockets for placement on your textile.
Page last edited December 09, 2012
Text editor powered by tinymce.
Sew on sockets

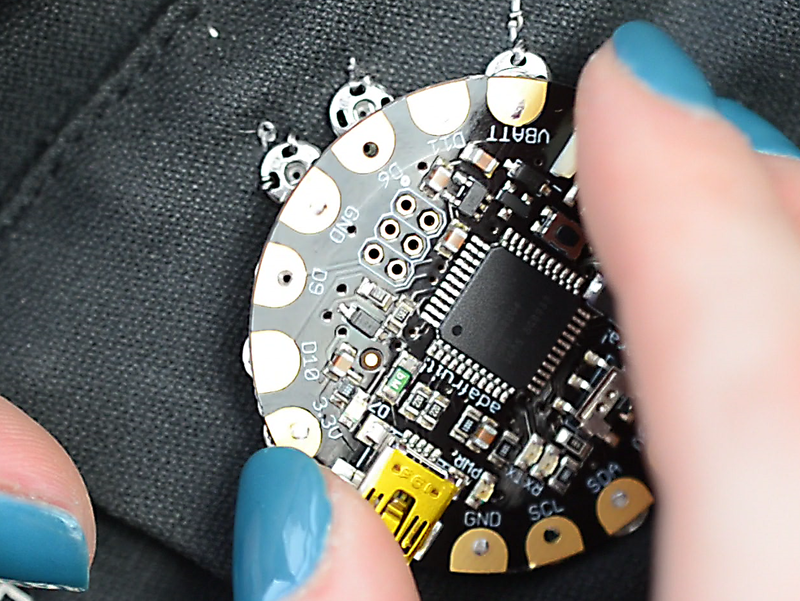
Press your snappy Flora against the garment firmly and wiggle the board so the studs make small impressions on the fabric.

These markings show where to sew the corresponding sockets.

Sew the sockets onto the garment with conductive thread. Stitch the threads to their corresponding components of the circuit. Use nail polish or fray check to seal the knots before trimming the loose end very close-- stray threads cause shorts!

The Flora will be connected most securely if it has supporting sockets at various spots around the circular board. If your circuit doesn't use pads on all sides of the Flora, you can sew sockets with plain thread in strategic spots, as seen in the upper right of this photo.

Snap your Flora into position! Try connecting and disconnecting it a few times to test the solder joints again.
Page last edited December 09, 2012
Text editor powered by tinymce.
Use it!

Test your circuit for shorts with your multimeter before powering up your project! Now you can disconnect your Flora as needed to use it in different projects or to machine wash your garment.
Page last edited December 09, 2012
Text editor powered by tinymce.


