In addition to the toaster oven, there are three main components that comprise the EZ Make Oven:
- Adafruit PyPortal - This is the main controller for the EZ Make Oven. It makes an excellent controller for this project since it features a nice graphics touch screen and a speaker to generate beep notifications. It also includes the needed ports to connect the next two items.

- Adafruit MCP9600 Thermocouple Amplifier and "K" Type Thermocouple - The MCP9600 connects to the PyPortal via the I2C port located on the PyPortal. The EZ Make Oven code uses the MCP9600 to monitor the temperature inside the oven. The "K" type thermocouple connects to the MCP9600 and the end is placed inside the oven in the center near the PCB.

- Controllable Four Outlet Power Relay Module - This appears to be a normal power strip but it can actually control the toaster oven temperature using the PyPortal to turn the power on and off as needed to match the solder temperature profile. It uses 1 of the 2 digital pin ports on the PyPortal.

More about how these components work together is described below.
The Adafruit MCP9600 Thermocouple Amplifier and "K" Type Thermocouple
The MCP9600 is one of the few (if not only) I2C compatible thermocouple amplifier (at this writing at least). With recent CircuitPython support it is a key component to this project.
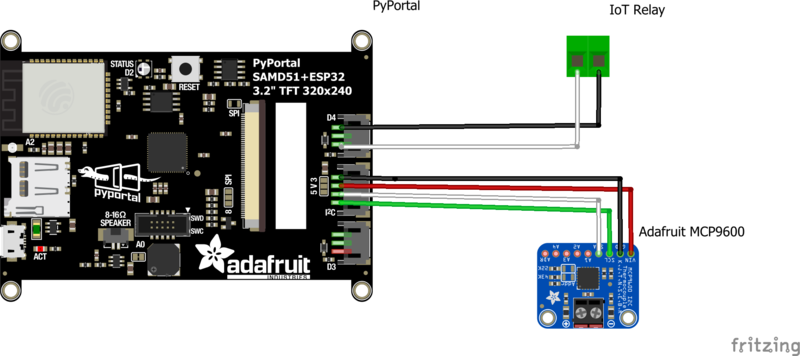
Light soldering is needed to add header pins to the MCP9600 module. There is a learning guide available for it. After soldering the header pins, the module can be connected to the PyPortal via a breadboard using a male I2C STEMMA cable, or it can be connected directly with no breadboard needed using a female I2C STEMMA cable. Both cable types are available in the Adafruit store. The cables should be connected as follows:
- Black - Ground
- Red - VIN
- White - SDA
- Green - SCL
A thermocouple needs to be attached to the MCP9600. This is a cable with a temperature sensor at one end and two wires at the other end. The MCP9600 supports several thermocouple types. The default type is "K", which we use for this project. Adafruit sells two types of "K" thermocouples that are 1 meter in length, one with a stainless steel tip and one without. Either will work fine for this project. The two wire end of the thermocouple is connected to the MCP9600. The wire with the yellow casing is connected to the "+" connector. If you can't tell and wire it wrong, don't worry. You can easily tell if it is wired wrong when you test the oven when it is all connected. If the temperature reading goes down when the oven turns on, then the wires are backwards and need to be swapped. The thermocouple should be placed in the center of the oven at or near where the PCB will be located. You can fish the thermocouple wire through the door hinge to prevent crimping the wire when the door is closed.


Controllable Four Outlet Power Relay Module
The Controllable Four Outlet Power Relay Module from Data Loggers puts the "EZ" in the EZ Make Oven. It allows the PyPortal to turn the power on and off for an outlet using one of the PyPortal's digital pins. Other reflow oven kits require dismantling the toaster oven and rewiring it to the controller, requiring additional parts and some high voltage wiring. With the EZ Make Oven, you simply plug the toaster oven into the appropriate outlet and then plug the device into a wall outlet. It is that easy! It also has an "always on" outlet where the PyPortal can be plugged into it as well.
There are two digital pin connectors on the PyPortal: D3 and D4. The project code uses D4 (the top connector) and is connected to the power relay module via a JST 3-pin to male header cable. Only two of the wires are needed, the middle red cable stays disconnected. The white cable is connected to the left and the black cable is connected to the right of the digital pin connector of the module.


