
Prepare the DotStar Matrix
Cut the mounting tabs off the DotStar matrix and carefully sand down with coarse grit sandpaper to smooth the edges. Test if it press fits into the pendant frame you chose before sanding down any further -- you don't want it too loose.


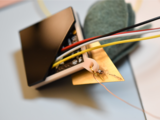
Solder wires
The length of the wires will depend on the diameter of your head since they'll need to be long enough to fit your head through. 20cm should be a good starting point, adjust as needed.
Tin the pads for all 4 contacts first, and then tin the exposed wires as well before soldering together. Make sure to cut any leads sticking out after.
It will help to use a different color wire for each pad, so that you can easily identify which wire is which later.

Make sure that the wires are flat
Double check that the wires are soldered as flat as possible against the PCB so that it will fit nicely within the pendant frame.


Attach matrix to the frame
Using either the 3d printed frame or the laser cut frame, push the wired matrix to the frame, it should just press fit in.
You want the wires to be oriented as shown -- if the top hole is "north", the wires should be "southeast" of the hole. This orientation will ensure that the back cover will protect the wires AND it is the orientation that the code animations are setup for.

Glue the top cover to the frame
Using super glue or any other appropriate glue, secure the black LED front cover so that it's aligned with the frame and covers the LED matrix entirely.
Tip: using the "gel" kind for super glue will allow you to have significantly more seconds to align the cover to the frame before the glue dries.


Solder a wire to the brass shape
This brass shape will be used as a capacitive touch button. You can use the same wires as the ones used for the matrix, but that will add a bit of bulk to the necklace, so here I've opted to use some thin enameled copper wire instead.
Make sure that you're using a heat resistant silicone surface when soldering the wire to brass like this since the brass piece will get really hot. Check continuity with a multimeter to make sure that the solder joint is good.

Secure the brass shape onto the cover
Use some glue or double sided tape, and adjust to your desired position. Pause to admire the beauty that you have created so far :)


Secure the wires and use embroidery floss for support
Optionally attach a jump ring through the hole, then use a small zip tie to secure the wires together at the top of the pendant.
Then, tie a piece of embroidery floss either directly through the pendant hole or through the jump ring if you attached one. This will help give the necklace some support, and will allow you to braid the wires together.
The length of the resulting 2 halves of the embroidery thread should be slightly longer than the rest of the wires to account for the braiding in the next step.


Braid the wires together to form a necklace chain
Separate the wires and the embroidery floss into two groups. Each group should have either 3 or 4 wires + floss each. Braid each group together to form the necklace chain.
After braiding, secure the end with a simple knot of the embroidery floss. This will be a good time to double check that the braided necklace chain will be long enough such that your head fits through.
At this point, you'll have something that looks like the picture below. Pause here to admire your handy work! :)


Solder the necklace chain wires to the USB microB plug
Now that you have double checked that the length of the wires is enough to fit your head through (you did, right?), you can proceed to soldering the ends to the microB plug. First, insert the wires through the two connector pieces as shown. Then, refer to the circuit diagram in the previous page to solder the proper wires. Use the different wire colors to guide you through this step.
Note that the circuit diagram refers to both sides of the microB plug (the 2-pad and 3-pad side)

Optional: Wrap the necklace chain with gold embroidery floss
This step is optional because it takes a long time to do, but the result is quite satisfying! It helps if you wrap the embroidery floss around something cylindrical so that you can more easily maneuver the floss around the braided wires.

Now, you're ready to tackle the next part: the ItsyBitsy wiring with the LiPo battery!


