


Motor Assembly
First, we'll need to extend the wire lengths for both motors. We can add to the existing wires and use heat shrink or or cut new pieces of wires. We used silicone wire to make it easier to flex around parts.
Motor wire length for Left motor is 280mm and the Right motor is 240mm. Differences in the left and right are to account for the position of the terminals on the Circkit
Motor housing
Each motor is then housed inside the Motor Cap and Motor Case parts. Follow the picture on the side to reference how each parts press fit into each other.


Check Prop
Insert the prop into the motor shaft and turn it to ensure the prop spins without any friction or wobbles.
To keep the propeller in place, we'll use a M2x5mm long screw for each propeller.
First, we'll want to create the threads on the propeller before we mount it on the shaft.
Carefully fasten the screw into the propeller hole and then install on the motor shaft.

Motor Frames
Align the mount holes on the Motor Cap to the screws holes on the Noodle Holder part as shown in the picture.
Use four M2x8mm long screws to secure each motor to the mounts on the Noodle Holder part.


Bottom insert
The bottom part for the Crickit case is modular, so we can swap this part out if need. For this build we used the Crickit Tripod Mount part.
First we'll align the tabs on the sides of the lid to the cavities inside the case.
Press fit one side and then use a flat tool like a spludger to pry the other side into place as shown in the animated gif.
Attach screw
Next we went ahead and installed the 3/8" to 1/4" Adapter Screw to mount on the Crickit Tripod Mount part. Position the screw over the mount and use a flat head screw driver or the ends of tweezers to fasten the adapter into place.
Add Lid
Align the wire opening on the Lid to the power barrel on the Crickit. Insert the lid at an angle and then apply force on the opposite side to snap fit the lid on to the case.


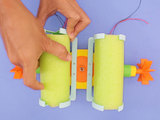
Noodles
We used a simple pool noodle to help keep the case afloat. The cheaper dollar store noodles have a 60mm diameter, but you can easy modify the sketch to fit a different size noodle.
Press the noodle inside one end of the holder part and then mark and cut to size. We used a cardboard box cutter to divide up noodle.

Connect motor frames
Now we can align both Noodle Holder assemblies on the bottom of the Crickit case.
Use two M2x5mm for each Noodle Holder.
Insert wires
Next, we'll need to thread the four motor cables through the opening of the lid. Carefully pass each one through.
Remove the lid and continue to pull wires until each can reach the Drive or Motor terminals on the Crickit.


Wire Joints
The 5v terminal will connect both of the motor power cables. To avoid soldering, we used a 2-pin wire joint to build a y-cable. One end will connect to the 5v terminal. The other side will connect both of the motor power cables.


Connect motors
Now we can connect all of the motor wires to each terminal. Start by making sure the terminals are unscrewed. Insert each wire into the terminal at an angle. Use tweezers and bend the ends of the wire to make fitting them into the terminals easier.
Tuck wire joint
After each wire is connected, we'll need to tuck the wire joint to one side of the case and then reattach the lid.

Mount battery case
The waterproof battery case mounts to the top of the lid with two M2x5mm screws. First, create the threads by fastening a screw into each mounting hole.
Threaded Insert
The lid is thick enough to insert metal threaded inserts. You can enlarge the mounting holes and then use the tip of a soldering iron to help press the insert into the mounting holes.
Next, align the battery case and fasten both screws into the lid.


DC seal
The power barrel is protected by Ninjaflex seal around it. We can insert three of the cornerd into the port opening and then use force to press fit the fourth into the case.
Now we can go ahead and insert the battery barrel into Crickit.


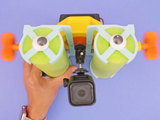
Camera Parts
The last thing is to attach the camera parts. First we use a 1/4 to 1/4 screw adapter to connect a swivel ball head.
Rotate the ball head to the opposite side of the case (opposite of the barrel port) to help balance the case. And finally we can screw a gopro case using a knuckle to tripod adapter.
While the enclosure can shield the components from water, we don’t recommend ducking it under water. Although we did find that a couple of accidental dips in the water showed the enclosure was able to keep the boards dry.
And that its, a simple customized camera water bot! Lots of uses in using a raspberry pi to detect things in the water, clean up and more!


