
About Doxygen
Doxygen is a somewhat ancient but popular method for creating documentation for C and C++ project (it also supports other languages but its great at C/C++). What's great about Doxygen is that the documentation lives with the source code in the same file so you are less likely to get out of sync
From doxygen.org's website:
Generate documentation from source codeDoxygen is the de facto standard tool for generating documentation from annotated C++ sources, but it also supports other popular programming languages such as C, Objective-C, C#, PHP, Java, Python, IDL (Corba, Microsoft, and UNO/OpenOffice flavors), Fortran, VHDL, Tcl, and to some extent D.Doxygen can help you in three ways:Doxygen is developed under Mac OS X and Linux, but is set-up to be highly portable. As a result, it runs on most other Unix flavors as well. Furthermore, executables for Windows are available.
- It can generate an on-line documentation browser (in HTML) and/or an off-line reference manual (in
) from a set of documented source files. There is also support for generating output in RTF (MS-Word), PostScript, hyperlinked PDF, compressed HTML, and Unix man pages. The documentation is extracted directly from the sources, which makes it much easier to keep the documentation consistent with the source code.
- You can configure doxygen to extract the code structure from undocumented source files. This is very useful to quickly find your way in large source distributions. Doxygen can also visualize the relations between the various elements by means of include dependency graphs, inheritance diagrams, and collaboration diagrams, which are all generated automatically.
- You can also use doxygen for creating normal documentation (as I did for the doxygen user manual and web-site).
Doxygen runs on the source code itself, and create HTML output that we can then point people to when they want detailed information about the library.
To keep our lives easier, instead of running Doxygen every commit, we'll use Travis CI to keep the documentation up to date. Every commit on GitHub will trigger TravisCI to call Doxygen on the source code, verify that documentation exists for each function, and will refresh the website pages.
However, to get started, we'll want to run Doxygen locally so we can make sure our files are in good shape before committing them (otherwise we'll have to run Travis over and over until we get it right, which takes a lot longer than fixing it all locally)
Step 1) Install Doxygen
Doxygen runs in the command line, and is available for Mac, Win and Linux. On Mac/Linux we suggest using brew or apt-get or whatever package manager you have
For Windows, visit the downloads page and scroll down to download the installer, then run it to install. Or if you have something like MSYS2, use the package manager.
In this guide we'll be using version 1.8.13 - if its something much older you may get errors

Step 2) Grab our Doxyfile
Doxygen needs a 'setup' file called Doxyfile. There's two ways to go about this step.
If you are not going to be using our Travis CI auto-doxy-runner or if you have needs for a custom Doxyfile you should run doxygen -g from within the library folder, which will create a Doxyfile. Then edit it to your hearts desire and commit it to your GitHub repo

However, if you are planning to use TravisCI to auto-generate Doxygen and you don't have any big changes you want to make to our setup we recommend using our default Doxyfile, and not committing it. Our TravisCI will automatically grab the Doxyfile for you, which means we can update it from time to time as doxygen updates and changes the config file. This is what we'll assume you're doing and continue as-is!
In which case, download or wget our example Doxyfile from https://raw.githubusercontent.com/adafruit/travis-ci-arduino/master/Doxyfile.default, place it in the base of the library, and rename it Doxyfile


It's normal to get a massive number of complaints. Now it's time to document and get those complaints down to zero!
- Read the Doxygen Manual! Its detailed and very informative
- Check out our Doxygen tips page, which is basically my cheat-sheet since I often forget the @ tags and formatting
- Look online or at other Doxygen'd code for inspiration
OK its a little annoying to do but eventually you'll get to zero output from Doxygen. Actually, because my compiled doxygen binary didn't come with CLANG support, I do get two warnings, but you can ignore these.

Preview Documentation
OK now you can look in the folder and you'll see that in addition to the Doxyfile, you also have a sqlite3.db and an html folder.

Don't commit these to your git repo! Instead, open up the html folder and double-click the index.html

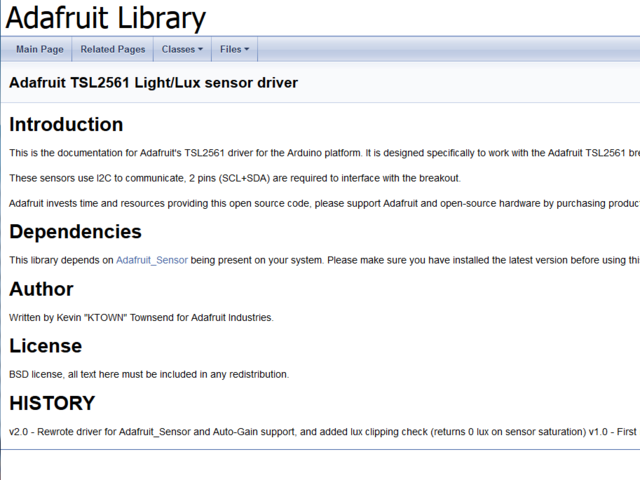
You will now be able to browse the documentation. You can see the nice front page you set up in the .cpp file
Click the Classes button

And you can locate your object, click on that...

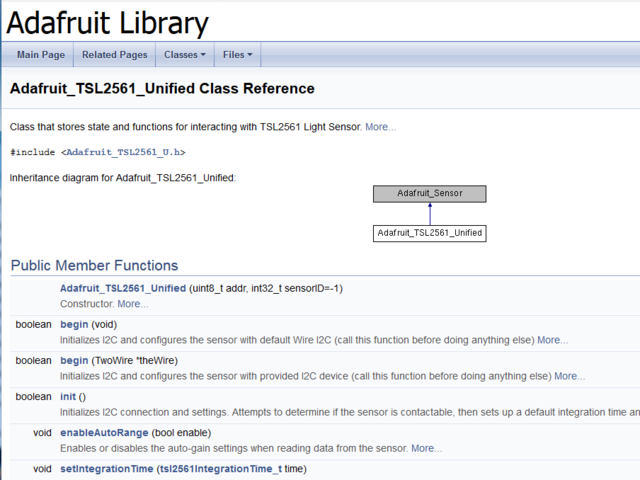
Now you can see the details of your class documentation! Check it over for typos, corrections, or other stuff you want to add. Re-run doxygen as desired until you get it to a good spot


OK you are ready for the next, amazing step...automation!


