Few instruments inspire greatness like the trombone. Whether it's a swinging big band tune or a two-step ska jam, the trombone can be heard sliding into glory. This explains why the internet has embraced the rhythm game Trombone Champ. The game adapts the classic concepts of music games' past for the brass icon.

In this project, you'll build a custom 3D printed trombone controller for the game. An Adafruit QT Py RP2040 running CircuitPython code conducts an arcade button and NeoSlider to melodiously play through the game's unique controls.

The 3D printed trombone's slide is attached to the NeoSlider's shaft like a giant potentiometer knob. The potentiometer moves the mouse cursor up and down the screen, affecting the game's pitch like a real trombone.

An arcade button takes care of the toots in the game, sending a space bar command every time its pressed. For those long, sustained notes you can hold down the arcade button without having to worry about your embouchure.

Prerequisite Guides

Parts

Video of hand holding a QT Py PCB in their hand. An LED glows rainbow colors.
What a cutie pie! Or is it... a QT Py? This diminutive dev board comes with one of our new favorite chip, the RP2040. It's been made famous in the new
$9.95
In Stock
Long rectangular breakout board with a slide potentiometer changing colors as a hand moves up and down.
Our family of I2C-friendly user interface elements grows by one with this new product that makes it plug-n-play-easy to add a 75mm long slide potentiometer to any microcontroller or...
$9.95
In Stock
Video of 30mm translucent clear LED arcade button flashing on and off.
A button is a button, and a switch is a switch, but these translucent arcade buttons are in a class of their own. Particularly because they have LEDs built right...
$2.50
In Stock
Angled shot of STEMMA QT / Qwiic JST SH 4-pin Cable.
This 4-wire cable is a little over 100mm / 4" long and fitted with JST-SH female 4-pin connectors on both ends. Compared with the chunkier JST-PH these are 1mm pitch instead of...
Out of Stock
Silicone Cover Stranded-Core Wire - 30AWG in Various Colors laid out beside each other.
Silicone-sheathing wire is super-flexible and soft, and its also strong! Able to handle up to 200°C and up to 600V, it will do when PVC covered wire wimps out. We like this wire...
Out of Stock
Angled shot of a pink/purple woven USB cable plugged into a laptop port and a small dev board.
This cable is not only super-fashionable, with a woven pink and purple Blinka-like pattern, it's also made for USB C for our modernized breakout boards, Feathers and more. 
$3.95
In Stock
1 x M2.5 Thread Screws
Black Nylon Machine Screw and Stand-off Set

The Trombone Champ Controller may be assembled with 3D printed parts, described below. The parts print with no supports, however you may want to use a brim since most of the parts have thin walls.

The STL files can be downloaded directly here.

Since a trombone has an intricate looped shape, the model is comprised of seven .STL files. Each part has tabs that connect with M2.5 screws. It can be helpful to think of the trombone in two parts: the main horn loop and the slide loop.

Main Horn Loop Parts

  • mainHorn_v0
  • hornBend_v1
  • arcadeMount_v1
  • hornElectronics_v1

Slide Loop Parts

  • potSlide_v0
  • slideBend_v0
  • innerSlide_v1

The main horn loop has a mounting hole for the arcade button, cutouts for the QT Py's STEMMA QT and USB ports and mounts for the NeoSlider.

The slide loop attaches to the NeoSlider's slide pot and inserts into the main horn loop to mimic a trombone's slide.

Other Materials

If you don't want to 3D print the trombone, you could use cardboard tubes or PVC pipe to construct a similar shape.

Arcade Button

  • Button GND to Button LED GND
  • Button GND to board GND
  • Button LED anode to board A0
  • Button input to board A1

NeoSlider (Connected with a STEMMA QT cable)

  • STEMMA SCL to board STEMMA SCL
  • STEMMA SDA to board STEMMA SDA
  • STEMMA VIN to board STEMMA 3V
  • STEMMA GND to board STEMMA GND

CircuitPython is a derivative of MicroPython designed to simplify experimentation and education on low-cost microcontrollers. It makes it easier than ever to get prototyping by requiring no upfront desktop software downloads. Simply copy and edit files on the CIRCUITPY drive to iterate.

CircuitPython Quickstart

Follow this step-by-step to quickly get CircuitPython running on your board.

Click the link above to download the latest CircuitPython UF2 file.

Save it wherever is convenient for you.

To enter the bootloader, hold down the BOOT/BOOTSEL button (highlighted in red above), and while continuing to hold it (don't let go!), press and release the reset button (highlighted in blue above). Continue to hold the BOOT/BOOTSEL button until the RPI-RP2 drive appears!

If the drive does not appear, release all the buttons, and then repeat the process above.

You can also start with your board unplugged from USB, press and hold the BOOTSEL button (highlighted in red above), continue to hold it while plugging it into USB, and wait for the drive to appear before releasing the button.

A lot of people end up using charge-only USB cables and it is very frustrating! Make sure you have a USB cable you know is good for data sync.

You will see a new disk drive appear called RPI-RP2.


Drag the adafruit_circuitpython_etc.uf2 file to RPI-RP2.

The RPI-RP2 drive will disappear and a new disk drive called CIRCUITPY will appear.

That's it, you're done! :)

Safe Mode

You want to edit your code.py or modify the files on your CIRCUITPY drive, but find that you can't. Perhaps your board has gotten into a state where CIRCUITPY is read-only. You may have turned off the CIRCUITPY drive altogether. Whatever the reason, safe mode can help.

Safe mode in CircuitPython does not run any user code on startup, and disables auto-reload. This means a few things. First, safe mode bypasses any code in boot.py (where you can set CIRCUITPY read-only or turn it off completely). Second, it does not run the code in code.py. And finally, it does not automatically soft-reload when data is written to the CIRCUITPY drive.

Therefore, whatever you may have done to put your board in a non-interactive state, safe mode gives you the opportunity to correct it without losing all of the data on the CIRCUITPY drive.

Entering Safe Mode

To enter safe mode when using CircuitPython, plug in your board or hit reset (highlighted in red above). Immediately after the board starts up or resets, it waits 1000ms. On some boards, the onboard status LED (highlighted in green above) will blink yellow during that time. If you press reset during that 1000ms, the board will start up in safe mode. It can be difficult to react to the yellow LED, so you may want to think of it simply as a slow double click of the reset button. (Remember, a fast double click of reset enters the bootloader.)

In Safe Mode

If you successfully enter safe mode on CircuitPython, the LED will intermittently blink yellow three times.

If you connect to the serial console, you'll find the following message.

Auto-reload is off.
Running in safe mode! Not running saved code.

CircuitPython is in safe mode because you pressed the reset button during boot. Press again to exit safe mode.

Press any key to enter the REPL. Use CTRL-D to reload.

You can now edit the contents of the CIRCUITPY drive. Remember, your code will not run until you press the reset button, or unplug and plug in your board, to get out of safe mode.

Flash Resetting UF2

If your board ever gets into a really weird state and doesn't even show up as a disk drive when installing CircuitPython, try loading this 'nuke' UF2 which will do a 'deep clean' on your Flash Memory. You will lose all the files on the board, but at least you'll be able to revive it! After loading this UF2, follow the steps above to re-install CircuitPython.

Once you've finished setting up your QT Py RP2040 with CircuitPython, you can access the code and necessary libraries by downloading the Project Bundle.

To do this, click on the Download Project Bundle button in the window below. It will download as a zipped folder.

# SPDX-FileCopyrightText: 2022 Liz Clark for Adafruit Industries
# SPDX-License-Identifier: MIT

import time
import board
from digitalio import DigitalInOut, Direction, Pull
from adafruit_debouncer import Debouncer
import usb_hid
from adafruit_hid.keyboard import Keyboard
from adafruit_hid.keycode import Keycode
from adafruit_hid.mouse import Mouse
from rainbowio import colorwheel
from adafruit_seesaw.seesaw import Seesaw
from adafruit_seesaw.analoginput import AnalogInput
from adafruit_seesaw import neopixel

# LED for button
led = DigitalInOut(board.A0)
led.direction = Direction.OUTPUT

#  button setup
key_pin = DigitalInOut(board.A1)
key_pin.direction = Direction.INPUT
key_pin.pull = Pull.UP
switch = Debouncer(key_pin)

# button to toot in the game (can be any key or a mouse click)
key_pressed = Keycode.SPACE

# keyboard object
time.sleep(1)  # Sleep for a bit to avoid a race condition on some systems
keyboard = Keyboard(usb_hid.devices)

#  mouse object
mouse = Mouse(usb_hid.devices)

# NeoSlider Setup
neoslider = Seesaw(board.STEMMA_I2C(), 0x30)
pot = AnalogInput(neoslider, 18)
pixels = neopixel.NeoPixel(neoslider, 14, 4, pixel_order=neopixel.GRB)

#  scale pot value to rainbow colors
def potentiometer_to_color(value):
    return value / 1023 * 255

#  last value of the potentiometer
last_value = 0
#  difference between last_value and current value
diff = 0
#  mouse movement sensitivity
#  increase value for faster movement, decrease for slower
mouse_sensitivity = 8

while True:
	#  read the slide pot's value (range of 0 to 1023)
    y = pot.value
	#  debouncer update
    switch.update()
    # colorwheel for neoslider neopixels
    pixels.fill(colorwheel(potentiometer_to_color(pot.value)))
	#  if button released
    if switch.rose:
		#  turn off button LED
        led.value = False
		#  release all keyboard keys
        keyboard.release_all()
	#  if button pressed
    if switch.fell:
		#  turn on button LED
        led.value = True
		#  press the space bar
        keyboard.press(key_pressed)
	#  if the current value of the pot is different from the last value
    if y != last_value:
		#  if the last value was bigger
        if last_value > y:
			#  find the difference
            diff = abs(last_value - y)
			#  divide by 10
            diff = diff / 10
			#  move cursor negative for range of difference
            for i in range(diff):
                mouse.move(y=-(mouse_sensitivity))
		#  if last value was smaller
        if last_value < y:
			#  find the difference
            diff = abs(last_value - y)
			#  divide by 10
            diff = diff / 10
			#  move cursor positive for range of difference
            for i in range(diff):
                mouse.move(y=mouse_sensitivity)
		#  reset last value
        last_value = y
	#  if value is 0
    if y == 0:
		#  slight movement
        mouse.move(y=-2)
	#  if value is 1023
    if y == 1023:
		#  slight movement
        mouse.move(y=2)

Upload the Code and Libraries to the QT Py RP2040

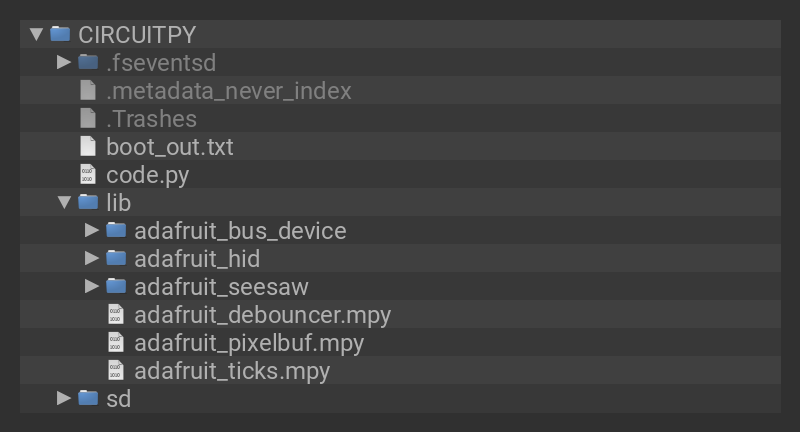
After downloading the Project Bundle, plug your QT Py RP2040 into the computer's USB port with a known good USB data+power cable. You should see a new flash drive appear in the computer's File Explorer or Finder (depending on your operating system) called CIRCUITPY. Unzip the folder and copy the following items to the QT Py RP2040's CIRCUITPY drive. 

  • lib folder
  • code.py

Your QT Py RP2040 CIRCUITPY drive should look like this after copying the lib folder and the code.py file.

CIRCUITPY

How the CircuitPython Code Works

First, the arcade button and its LED are set up as an input and an output, respectively. The arcade button's pin is passed to Debouncer() to utilize the adafruit_debouncer library. Then, keyboard and mouse objects are set up with the usb_hid libraries. Finally, the neoslider is set up to work over I2C.

# LED for button
led = DigitalInOut(board.A0)
led.direction = Direction.OUTPUT

#  button setup
key_pin = DigitalInOut(board.A1)
key_pin.direction = Direction.INPUT
key_pin.pull = Pull.UP
switch = Debouncer(key_pin)
# button to toot in the game (can be any key or a mouse click)
key_pressed = Keycode.SPACE

# keyboard object
time.sleep(1)  # Sleep for a bit to avoid a race condition on some systems
keyboard = Keyboard(usb_hid.devices)

#  mouse object
mouse = Mouse(usb_hid.devices)

# NeoSlider Setup
neoslider = Seesaw(board.STEMMA_I2C(), 0x30)
pot = AnalogInput(neoslider, 18)
pixels = neopixel.NeoPixel(neoslider, 14, 4, pixel_order=neopixel.GRB)

Rainbows and Variables

A function from the NeoSlider example code, potentiometer_to_color(), is created to map the potentiometer's values to color values. This has the NeoSlider's NeoPixels display a rainbow swirl effect when the slider is used.

Three variables are created before the loop. last_value will track the last read value from the potentiometer. diff will track the difference between the current reading from the potentiometer and last_value.

mouse_sensitivity is used for the cursor movement. You can adjust this value to move the cursor faster or slower depending on your trombone slide preferences.

#  scale pot value to rainbow colors
def potentiometer_to_color(value):
    return value / 1023 * 255

#  last value of the potentiometer
last_value = 0
#  difference between last_value and current value
diff = 0
#  mouse movement sensitivity
#  increase value for faster movement, decrease for slower
mouse_sensitivity = 8

Reading Inputs

In the loop, y reads the value of the potentiometer. switch.update() reads the arcade button's state. pixels.fill() changes the color of the NeoSlider's NeoPixels to the mapped color of the rainbow depending on the potentiometer's value.

#  read the slide pot's value (range of 0 to 1023)
    y = pot.value
	#  debouncer update
    switch.update()
    # colorwheel for neoslider neopixels
    pixels.fill(colorwheel(potentiometer_to_color(pot.value)))

The Toot

To toot the trombone in the game, you need to press any key on the keyboard or click the mouse. This project uses the arcade button to do this.

If the arcade button is pressed, the arcade button's LED lights up and a space bar keycode is pressed. The keycode will be active the entire time that the arcade button is held down. When the arcade button is released, the LED is turned off and the space bar keycode is released.

#  if button released
    if switch.rose:
		#  turn off button LED
        led.value = False
		#  release all keyboard keys
        keyboard.release_all()
	#  if button pressed
    if switch.fell:
		#  turn on button LED
        led.value = True
		#  press the space bar
        keyboard.press(key_pressed)

The Slide

The game changes the pitch of the trombone, imitating a trombone's slide, by moving the mouse cursor up and down on the screen. The NeoSlider is used to achieve this.

The current value of the potentiometer is compared to the last value. If the values don't match, then the cursor will move. If the last value was larger, then the cursor moves in a negative value. If the last value was smaller, then the cursor moves in a positive value.

diff is used to scale the cursor movement depending on the difference between the current potentiometer reading and the previous reading.

If the value of the potentiometer does not change, then the cursor does not move. This is important for the trombone playing in the game.

#  if the current value of the pot is different from the last value
    if y != last_value:
		#  if the last value was bigger
        if last_value > y:
			#  find the difference
            diff = abs(last_value - y)
			#  divide by 10
            diff = diff / 10
			#  move cursor negative for range of difference
            for i in range(diff):
                mouse.move(y=-(mouse_sensitivity))
		#  if last value was smaller
        if last_value < y:
			#  find the difference
            diff = abs(last_value - y)
			#  divide by 10
            diff = diff / 10
			#  move cursor positive for range of difference
            for i in range(diff):
                mouse.move(y=mouse_sensitivity)
		#  reset last value
        last_value = y
	#  if value is 0
    if y == 0:
		#  slight movement
        mouse.move(y=-2)
	#  if value is 1023
    if y == 1023:
		#  slight movement
        mouse.move(y=2)

Ground Connections

Solder a wire between the arcade button's two GND legs to connect them together. One leg is for the button and the other is for the button's LED.

Solder a wire from one of the button's GND legs to the QT Py's GND pin.

Arcade Button LED

Solder a wire to the button's LED's anode.

Solder the LED anode's wire to the QT Py's pin A0.

Arcade Button Input

Solder a wire to the button's input leg.

Solder the button's input wire to the QT Py's pin A1.

That completes the soldering for this project!

Main Horn Loop

Attach the main horn piece to the main horn bend with M2.5 screws and nuts.

Run the QT Py and the arcade button wires through the arcade button mount and the main horn bend.

Mount the arcade button mount to the main horn bend with M2.5 screws and nuts. Insert the arcade button into the mounting hole.

Plug a STEMMA QT cable into the QT Py's STEMMA port. Then, insert the QT Py vertically into the horn electronics piece. Line up the QT Py's USB port and STEMMA cable with the holes.

Mount the horn electronics piece to the main horn loop with M2.5 screws and nuts.

Slide Loop

Attach the slide bend to the inner slide piece with M2.5 screws and nuts.

Attach the potentiometer slide to the slide bend with M2.5 screws and nuts. The potentiometer slide should have its potentiometer mounting hole facing the inside of the assembly.

Plug the other end of the STEMMA QT cable into the NeoSlider's bottom STEMMA port. The front logo should be oriented right-side up in the top left-hand corner with the STEMMA QT cable coming out the opposite side of the board.

Insert the NeoSlider's knob into the mounting hole on the slide loop. Mount the NeoSlider to the mounting holes on the horn electronics piece. The holes are undersized, so M2.5 screws should attach without needing any nuts.

That completes the assembly!

Plug your QT Py into your computer via USB. Then, launch Trombone Champ and pick out your favorite song to play with your newly assembled trombone controller.

To toot, press the arcade button to send a space bar key press. The arcade button's built-in LED will light-up every time its pressed.

Slide the NeoSlider up and down to change the pitch of the trombone in the game. The 3D printed trombone's slide moves much like a real trombone for the full brass section experience minus the spit valve.

Going Further

This project could be adapted as a MIDI controller or other more traditional musical application. You could also use it as inspiration for other custom game controllers or change up the components, code or housing to better suit your needs.

This guide was first published on Sep 30, 2022. It was last updated on Sep 30, 2022.