Install Jetson Nano Developer Kit on your Jetson Nano
We decided to try getting Blinka running in the Jetson Nano Developer Kit because that's the recommended installation available for the Jetson Nano. Other distros could be made to work but you'd probably need to figure out how to detect the platform. Using other operating systems and CircuitPython is your call, we cannot provide support for that.
Due to the size of the Dev Kit Image, you will need at least a minimum of a 16GB SD card.
Download and install the latest Jetson Nano Developer Kit, for example we're using https://developer.nvidia.com/embedded/learn/get-started-jetson-nano-devkit#write
There's some documentation to get started at https://developer.nvidia.com/embedded/learn/get-started-jetson-nano-devkit


After you burn the image to the SD card, you'll need to install it into the Nano. The card slot is located on the underside of the large heatsink.

Connect a monitor (HDMI or DisplayPort), USB mouse, and keyboard to continue. An End User License Agreement will need to be accepted before you can continue.
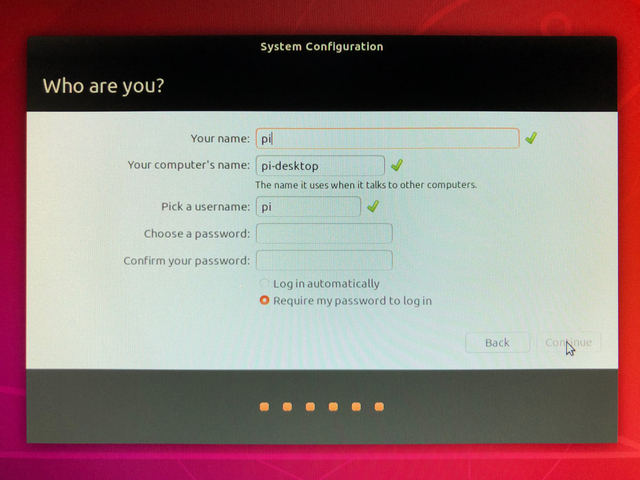
As you go through the configuration wizard, take note of the fields your name and your computer's name. These will be your username and hostname for connecting by SSH.
Once you have completed the wizard, you can either continue using that, connect a serial console cable, or log in through SSH. We've found the easiest way to connect is through a console cable, wired to the J44 connector and then on your computer, use a serial monitor at 115200 baud.
You can also connect via SSH using either the command prompt on a Mac or Linux computer or using a terminal program such as PuTTY on Windows. In either case, you will need your username and hostname from earlier in the setup wizard.
You may need to reboot the Jetson Nano after completing the wizard before the device will show up on your network.

Connect the RX, TX and ground wires of the console cable like so:


Once powered correctly and with the right SD card you should get a command prompt as the username you selected in the configuration wizard. You may need to press enter if it appears to stop.
Log in to get to a shell. In this guide, we will be using the user pi just to keep things consistent with other guides. Change the commands to use whatever username you ended up using.

Set your Python install to Python 3 Default
There's a few ways to do this, we recommend something like this:
sudo apt install -y python3 git python3-pip
sudo update-alternatives --install /usr/bin/python python $(which python2) 1
sudo update-alternatives --install /usr/bin/python python $(which python3) 2
sudo update-alternatives --config python
Install Python 3.8 and Make Default
You can install Python 3.8, but it won't be the default Python. However, you can do something like above:
sudo apt install -y python3.8
sudo update-alternatives --install /usr/bin/python3 python3 /usr/bin/python3.6 1
sudo update-alternatives --install /usr/bin/python3 python3 /usr/bin/python3.8 2
sudo update-alternatives --config python3
Now run python --version and it should show some version of Python 3.8:

Update Your Board and Python
Run the standard updates:
sudo apt update
sudo apt upgrade
and
sudo pip3 install --upgrade setuptools
Update all your Python 3 packages with
pip3 freeze - local | grep -v '^\-e' | cut -d = -f 1 | xargs -n1 pip3 install -U
and
sudo bash
pip3 freeze - local | grep -v '^\-e' | cut -d = -f 1 | xargs -n1 pip3 install -U
Nano (no relationship to the board), which is very handy for quickly editing python scripts, isn't installed by default. So let's add that:
sudo apt install nano
Enable UART, I2C and SPI
A vast number of our CircuitPython drivers use UART, I2C and SPI for interfacing, so you'll want to get those enabled.
I2C and UART are enabled by default, so you don't need to take any additional steps.
To enable SPI, you will need to run the Jetson-IO utility. Be sure your terminal window is expanded first, or it may not display the full utility:
sudo /opt/nvidia/jetson-io/jetson-io.py


Finally select Save pin changes and then Save and reboot to reconfigure pins. This will create a config file and reboot the Jetson Nano.
After the Nano boots up again, verify you have the I2C devices with the command ls /dev/i2c* /dev/spi*
You should see at least one I2C device and one SPI device


You can test to see what I2C addresses are connected by running sudo i2cdetect -r -y 0(on pins 27/28) or sudo i2cdetect -r -y 1 (on pins 3/5)
In this case I do have a sensor on the 'standard' i2c port i2c-1 under address 0x77
The UART Serial Console on the Jetson Nano is connected to /dev/ttyS0. The UART GPIO Serial Port is connected to /dev/ttyTHS1.
In order to use the Jetson GPIO Library, the correct user permissions/groups must be set first. Start by creating a new gpio user group.
sudo groupadd -f -r gpiosudo usermod -a -G gpio pi
Clone the Repo and copy the rules
cd ~git clone https://github.com/NVIDIA/jetson-gpio.gitsudo cp ~/jetson-gpio/lib/python/Jetson/GPIO/99-gpio.rules /etc/udev/rules.d
Now reboot so that the new rules take place.
Install Python Libraries
Now you're ready to install all the Python support.
Next, run the following command to install adafruit_blinka:
pip3 install adafruit-blinka

The computer will install a few different libraries such as Adafruit-PureIO (our ioctl-only i2c library), Jetson.GPIO (for handling GPIO), Adafruit-PlatformDetect (for detecting your board) and of course adafruit-blinka.
That's pretty much it! You're now ready to test.
Create a new file called blinkatest.py with nano or your favorite text editor and put the following in:
import board
import digitalio
import busio

print("Hello blinka!")

# Try to great a Digital input
pin = digitalio.DigitalInOut(board.D4)
print("Digital IO ok!")

# Try to create an I2C device
i2c = busio.I2C(board.SCL, board.SDA)
print("I2C 1 ok!")
i2c = busio.I2C(board.SCL_1, board.SDA_1)
print("I2C 2 ok!")

print("done!")
Save it and run at the command line with
python3 blinkatest.py
You should see the following, indicating digital i/o, I2C and SPI all worked


