First, set up CircuitPython on the CLUE following the instructions on this page.
Libraries
Next, install the libraries needed. This guide page will show you where to download them.
You'll need the following libraries for this project:
- adafruit_bitmap_font
- adafruit_ble
- adafruit_ble_eddystone
- adafruit_bus_device
- adafruit_display_shapes
- adafruit_display_text
- adafruit_pybadger
- adafruit_register
- adafruit_lis3mdl.mpy
- adafruit_lsm6ds.mpy
- adafruit_miniqr.mpy
- neopixel.mpy
Text Editor
Adafruit recommends using the Mu editor for using your CircuitPython code with the Feather boards. You can get more info in this guide.
Alternatively, you can use any text editor that saves files.
Image Files and Code.py
This project uses a couple of .bmp image files -- you can get them by downloading the Project Zip link in the embed below. Unzip the downloaded zip archive and then drag the two image files to your CLUE board's CIRCIUTPY drive.
Copy the code shown below, paste it into Mu. Save the code from Mu to the CLUE's CIRCUITPY drive as code.py
# SPDX-FileCopyrightText: 2020 John Park for Adafruit Industries
#
# SPDX-License-Identifier: MIT

"""
Eddystone Beacon for CLUE
This example broadcasts our Mac Address as our Eddystone ID and a link to a URL of your choice.
Hold the A button to display QR code, use B button to pick URL from the list.
"""

import time
from adafruit_pybadger import pybadger
import adafruit_ble
from adafruit_ble_eddystone import uid, url

radio = adafruit_ble.BLERadio()

# Reuse the BLE address as our Eddystone instance id.
eddystone_uid = uid.EddystoneUID(radio.address_bytes)

# List of URLs to broadcast here:
ad_url = [("https://circuitpython.org", "CirPy"),
          ("https://adafru.it/discord","DISCORD"),
          ("https://forums.adafruit.com", "Forums"),
          ("https://learn.adafruit.com", "Learn")
         ]
pick = 0  # use to increment url choices

pybadger.play_tone(1600, 0.25)
pybadger.show_business_card(image_name="cluebeacon.bmp")

while True:
    pybadger.auto_dim_display(delay=3, movement_threshold=4)
    eddystone_url = url.EddystoneURL(ad_url[pick][0])

    if pybadger.button.a and not pybadger.button.b:  # Press button A to show QR code
        pybadger.play_tone(1200, 0.1)
        pybadger.brightness = 1
        pybadger.show_qr_code(data=ad_url[pick][0])  # Tests QR code
        time.sleep(0.1)  # Debounce

    elif pybadger.button.b and not pybadger.button.a:  # iterate through urls to broadcast
        pybadger.play_tone(1600, 0.2)
        pick = (pick + 1) % len(ad_url)
        pybadger.brightness = 1
        pybadger.show_business_card(image_name="bg.bmp", name_string=ad_url[pick][1], name_scale=5,
                                    email_string_one="", email_string_two=ad_url[pick][0])
        time.sleep(0.1)

    elif pybadger.button.a and pybadger.button.b:
        pybadger.play_tone(1000, 0.2)
        pybadger.brightness = 1
        pybadger.show_business_card(image_name="cluebeacon.bmp")
        time.sleep(0.1)

    # Alternate between advertising our ID and our URL.
    radio.start_advertising(eddystone_uid)
    time.sleep(0.5)
    radio.stop_advertising()

    radio.start_advertising(eddystone_url)
    time.sleep(0.5)
    radio.stop_advertising()

    time.sleep(1)
How It Works
Like the simple example before, we will import libraries for time, ble, and eddystone support. We will also import the adafruit_pybadger library which makes it convenient to use the buttons, speaker, and screen on the CLUE.
import time
from adafruit_pybadger import pybadger
import adafruit_ble
from adafruit_ble_eddystone import uid, url
Setup
We'll set up the radio and eddystone_uid as before, but this time instead of a single URL, we'll create a list of few to pick through.
This is a list of tuples, which each entry containing both a URL and a "nice name".
The pick variable will be used to select a URL from the list when the B button is pressed.
radio = adafruit_ble.BLERadio()

# Reuse the BLE address as our Eddystone instance id.
eddystone_uid = uid.EddystoneUID(radio.address_bytes)

# List of URLs to broadcast here:
ad_url = [("https://circuitpython.org", "CirPy"),
          ("https://adafru.it/discord","DISCORD"),
          ("https://forums.adafruit.com", "Forums"),
          ("https://learn.adafruit.com", "Learn")
         ]
pick = 0  # use to increment url choices
We'll use the pybadger.play_tone() command to beep the on-board speaker, and the pybadger.show_business_card() command to display a .bmp image.
pybadger.play_tone(1600, 0.25)
pybadger.show_business_card(image_name="cluebeacon.bmp")
Main Loop
In the main loop of the program we will set the display to auto dim after three seconds, and set the movement threshold so you can shake it a little to wake up the CLUE and undim it.
The eddystone_url is set to the first one in the list.
pybadger.auto_dim_display(delay=3, movement_threshold=4)
eddystone_url = url.EddystoneURL(ad_url[pick][0])
Buttons
When the A button is pressed by itself, the pybadger.show_qr_code() command is run, displaying the automatically generated QR code image for the currently selected URL.
if pybadger.button.a and not pybadger.button.b:  # Press button A to show QR code
        pybadger.play_tone(1200, 0.1)
        pybadger.brightness = 1
        pybadger.show_qr_code(data=ad_url[pick][0])  # Tests QR code
        time.sleep(0.1)  # Debounce
When the B button is pressed, the next URL in the list is selected, and this info is displayed on the screen using the pybadger.show_business_card() command.
elif pybadger.button.b and not pybadger.button.a:  # iterate through urls to broadcast
        pybadger.play_tone(1600, 0.2)
        pick = (pick + 1) % len(ad_url)
        pybadger.brightness = 1
        pybadger.show_business_card(image_name="bg.bmp", name_string=ad_url[pick][1], name_scale=5,
                                    email_string_one="", email_string_two=ad_url[pick][0])
        time.sleep(0.1)
When both A and B buttons are pressed at the same time, the display returns to the initial screen image.
elif pybadger.button.a and pybadger.button.b:
        pybadger.play_tone(1000, 0.2)
        pybadger.brightness = 1
        pybadger.show_business_card(image_name="cluebeacon.bmp")
        time.sleep(0.1)
Beacon Advertising
Finally, we have the beacon advertising code, just as with the simple example. The beacon UID is advertised, then the URL is, and this repeats every second.
# Alternate between advertising our ID and our URL.
    radio.start_advertising(eddystone_uid)
    time.sleep(0.5)
    radio.stop_advertising()

    radio.start_advertising(eddystone_url)
    time.sleep(0.5)
    radio.stop_advertising()

    time.sleep(1)
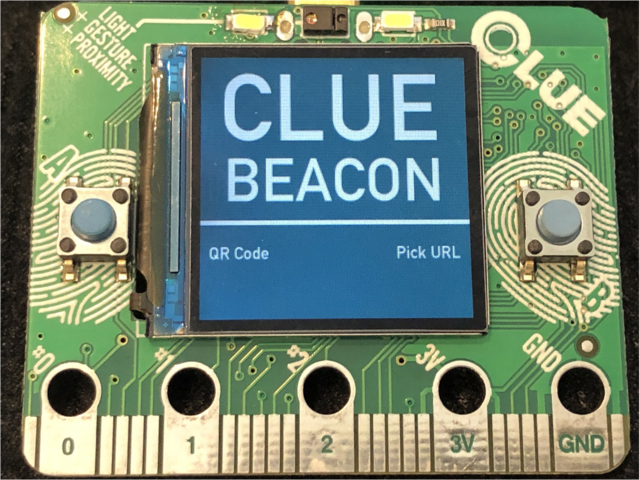

Pick Beacon Advertisment
Press the B button to pick a URL from your list. There is a small beep when the button press is recognized -- you may need to hold it for a second first.


QR Code
Press the A button to go to QR code mode. This is great for any users without a BLE beacon app who want to use their camera to scan the URL instead.

You can press the B button to switch to the other URLs which will change the beacon advertisements almost instantly.
|
|
|