
The first order of business is to make the tambourine-like paddle that supports the Circuit Playground Express and battery pack. Almost any sturdy material will work. In this case, we'll be using two layers of corrugated cardboard, laminated for strength and to make the paddle thicker and easier to hold. The microcontroller board and battery pack will be attached with cable ties and a square of gaffer's tape.
Attach the Template and Cut the First Layer


Since we'll be laminating this with another sheet of cardboard, place this piece with printing or blemishes up -- if you don't want the printing to show later.
Use a glue stick to temporarily attach the template to a piece of cardboard. After cutting, the template will be removed, so don't use too much glue; just a few dots will do.
After the glue sets for a few minutes, cut out the template using scissors or a sharp craft knife. A metal ruler can be used to keep the cut lines straight.


Peel the paper template off of the cut shape. We'll attach the cut cardboard to the remaining sheet using permanent adhesive.
In this case, E6000 was used to stick the layers together. If that's too aromatic for you, use wood glue or gel-type superglue. Be sure to get the adhesive close to the cut edges to avoid fraying and separation after the layers are laminated.
Lay the sticky side of the cut shape onto the remaining cardboard sheet and press down firmly.
After the adhesive sets, trace the cut shape with scissors or a craft knife to trim off the excess and finish the paddle.
At this point, you can decorate your Blues Playground instrument any way you like. Colored duct tape, felt-tipped markers, crayons, poster paint, or spray paint work well. Be creative!


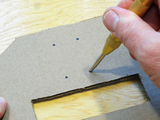
Place the CircuitPlayground Express (CPX) in the center of the top section of the paddle. Using a pencil, mark four mounting spots. Place the top two dots at the 3.3v and GND holes nearest the USB connector. For the bottom two holes, mark the GND and VOUT holes nearest the battery connector.
Using an awl or center punch, poke the cardboard at the dots to make the mounting holes. We'll be using some cable ties to attach the CPX to the paddle soon.

If you're planning on playing the Blues Playground through a guitar amplifier, now's a good time to add signal connectors to the CPX. We'll use alligator clips to connect to a guitar cable, so two screws will make that easier.
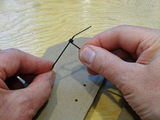
Before attaching the CPX to the paddle, insert and tighten two M3 screws and hex nuts through the ~A0 and nearby GND holes, threads facing upwards.


Place the CPX over the paddle's four mounting holes. Thread a cable tie through one of the top holes.
Flip the paddle over and chain a second cable tie to the first to extend the length to accommodate the battery pack. Don't slide it on too far, just enough for the ratchet section of the second to engage with the first.
Poke the end of the second cable tie through the lower mounting hole and pull it through the front of the paddle. Repeat the process for the other two mounting holes.
Using wire cutters, cut the ratchet ends of the two unused cable ties. Slip the ratchet ends onto the exposed ends of the cable ties as shown. As before, just slide them on until the ratchet engages. We'll tighten these after the battery pack is in place.


Put the batteries into the holder and slide the cover closed. Place the battery holder on the back side of the paddle as shown. Check to see that the on-off switch is easily accessible.
Tighten the top two cable ties somewhat by sliding the ratchets down to approximately the height of the battery pack (as shown in the first photo).
Flip the paddle over and slide the two ratchets pieces to tighten. Finger tight is good enough to hold everything in place.nstall the batteries then slip into the opening on the back of the paddle.
Trim off the excess cable tie lengths from the front and the back of the paddle.
Place a square of gaffer's tape onto the battery pack and over the cable ties to secure for playing the instrument.
Finally, plug the battery pack cable into the CPX battery connector. The cable can be passed through the paddle's hand hole. Once the CircuitPython code is loaded, we'll be ready to play the blues!


