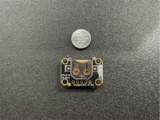


Insert the CR1220 battery into the PCF8523 with the positive side facing out. and attach a STEMMA cable to the RTC.


Solder the stacking headers onto the Feather RP2040, then solder the normal headers onto the FeatherWing Proto. After this you can remove the FeatherWing proto board from the RP2040.


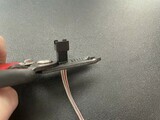
Take the JST PH 3-pin Plug and cut off the alligator clips on the end. Then strip and tin the wires. If you want to, you can add little bits of heat-shrink to the wire to make it look neater, but this isn't necessary.


Solder the leads that you just tinned onto the FeatherWing Proto. Solder the red wire to 3V, the black wire to GND, and the white wire to A0. Connect the JST wire to the STEMMA speaker.

Cut, strip, and tin 3 equal lengths of different colored wire. Here I'm using the red wire for power, the black wire for ground, and the yellow wire for data. Solder the red wire to the pad marked +, the black wire to the pad marked -, and the yellow wire to the pad marked with an arrow pointing towards the LED.


Solder the red wire to 3V, the black wire to GND, and the yellow wire to A1.
Before doing this you may want to put some heat-shrink around the 3 wires to make them a bit neater.