It's easy to use the TCA9548A with Python or CircuitPython, and the Adafruit_CircuitPython_TCA9548A module. This module allows you to easily write Python code that allows you to multiplex up to 8 STEMMA boards with the TCA9548A I2C multiplexer. You can use this multiplexer with any CircuitPython microcontroller board or with a computer that has GPIO and Python thanks to Adafruit_Blinka, our CircuitPython-for-Python compatibility library.
If you're curious why you'd need an I2C multiplexer, be sure to check out this guide that goes in depth on working with multiple copies of the same I2C device, which most likely have the same I2C address.
CircuitPython Microcontroller Wiring
First, wire up a TCA9548A to your board exactly as shown below. Here's an example of wiring a Feather M4 to the TCA9548A with I2C using one of the handy STEMMA QT connectors. Then, plug two TSL2591 STEMMA boards into the TCA9548A via STEMMA plug 0 and STEMMA plug 1:

- Board 3V to mux VIN (red wire)
- Board GND to mux GND (black wire)
- Board SCL to mux SCL (yellow wire)
- Board SDA to mux SDA (blue wire)
- TSL2591 1 SDA to mux SD0
- TSL2591 1 SCL to mux SC0
- TSL2591 1 VIN to mux VIN
- TSL2591 1 GND to mux GND
- TSL2591 2 SDA to mux SD1
- TSL2591 2 SDA to mux SC1
- TSL2591 2 VIN to mux VIN
- TSL2591 2 GND to mux GND
You can also use standard 0.100" pitch headers to wire it up on a breadboard:

- Board 3V to mux VIN (red wire)
- Board GND to mux GND (black wire)
- Board SCL to mux SCL (yellow wire)
- Board SDA to mux SDA (blue wire)
- TSL2591 1 SDA to mux SD0
- TSL2591 1 SCL to mux SC0
- TSL2591 1 VIN to mux VIN
- TSL2591 1 GND to mux GND
- TSL2591 2 SDA to mux SD1
- TSL2591 2 SDA to mux SC1
- TSL2591 2 VIN to mux VIN
- TSL2591 2 GND to mux GND
Python Computer Wiring
Since there's dozens of Linux computers/boards you can use, below shows wiring for Raspberry Pi. For other platforms, please visit the guide for CircuitPython on Linux to see whether your platform is supported.
Here's the Raspberry Pi wired to the I2C multiplexer using I2C and a STEMMA QT connector:

- Pi 3V to mux VIN (red wire)
- Pi GND to mux GND (black wire)
- Pi SCL to mux SCL (yellow wire)
- Pi SDA to mux SDA (blue wire)
- TSL2591 1 SDA to mux SD0
- TSL2591 1 SCL to mux SC0
- TSL2591 1 VIN to mux VIN
- TSL2591 1 GND to mux GND
- TSL2591 2 SDA to mux SD1
- TSL2591 2 SDA to mux SC1
- TSL2591 2 VIN to mux VIN
- TSL2591 2 GND to mux GND
Finally here is an example of how to wire up a Raspberry Pi to the I2C multiplexer using a solderless breadboard:

- Pi 3V to mux VIN (red wire)
- Pi GND to mux GND (black wire)
- Pi SCL to mux SCL (yellow wire)
- Pi SDA to mux SDA (blue wire)
- TSL2591 1 SDA to mux SD0
- TSL2591 1 SCL to mux SC0
- TSL2591 1 VIN to mux VIN
- TSL2591 1 GND to mux GND
- TSL2591 2 SDA to mux SD1
- TSL2591 2 SDA to mux SC1
- TSL2591 2 VIN to mux VIN
- TSL2591 2 GND to mux GND
Python Installation of TCA9548A Library
You'll need to install the Adafruit_Blinka library that provides the CircuitPython support in Python. This may also require enabling I2C on your platform and verifying you are running Python 3. Since each platform is a little different, and Linux changes often, please visit the CircuitPython on Linux guide to get your computer ready!
Once that's done, from your command line run the following command:
sudo pip3 install adafruit-circuitpython-tca9548a
If your default Python is version 3, you may need to run pip instead. Make sure you aren't trying to use CircuitPython on Python 2.x, it isn't supported!
CircuitPython Usage
To use with CircuitPython, you need to first install the TCA9548A library, and its dependencies, into the lib folder on your CIRCUITPY drive. Then you need to update code.py with the example script.
Thankfully, we can do this in one go. In the example below, click the Download Project Bundle button below to download the necessary libraries and the code.py file in a zip file. Extract the contents of the zip file, and copy the entire lib folder and the code.py file to your CIRCUITPY drive.
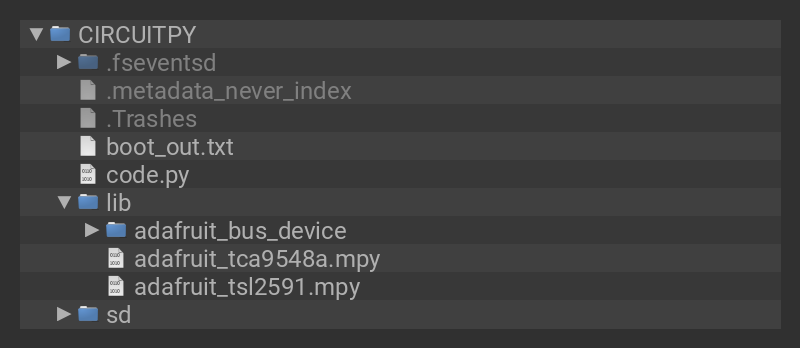
Your CIRCUITPY/lib folder should contain the following folders and file:
- adafruit_bus_device/
- adafruit_tca9548a.mpy
- adafruit_tsl2591.mpy
Python Usage
Once you have the library pip3 installed on your computer, copy or download the following example to your computer, and run the following, replacing code.py with whatever you named the file:
python3 code.py
# SPDX-FileCopyrightText: 2021 Carter Nelson for Adafruit Industries
# SPDX-License-Identifier: MIT

# This example shows using TCA9548A to perform a simple scan for connected devices
import board
import adafruit_tca9548a

# Create I2C bus as normal
i2c = board.I2C()  # uses board.SCL and board.SDA
# i2c = board.STEMMA_I2C()  # For using the built-in STEMMA QT connector on a microcontroller

# Create the TCA9548A object and give it the I2C bus
tca = adafruit_tca9548a.TCA9548A(i2c)

for channel in range(8):
    if tca[channel].try_lock():
        print("Channel {}:".format(channel), end="")
        addresses = tca[channel].scan()
        print([hex(address) for address in addresses if address != 0x70])
        tca[channel].unlock()
If running CircuitPython: Once everything is saved to the CIRCUITPY drive, connect to the serial console to see the data printed out!
If running Python: The console output will appear wherever you are running Python.

In this simple test for the TCA9548A, an I2C scan is performed for all eight of its ports. If any devices are connected, then the I2C address will be printed to the REPL next to the channel number. If no device is connected, then the port will print with empty brackets ([]).
# SPDX-FileCopyrightText: 2021 ladyada for Adafruit Industries
# SPDX-License-Identifier: MIT

# This example shows using two TSL2491 light sensors attached to TCA9548A channels 0 and 1.
# Use with other I2C sensors would be similar.
import time
import board
import adafruit_tsl2591
import adafruit_tca9548a

# Create I2C bus as normal
i2c = board.I2C()  # uses board.SCL and board.SDA
# i2c = board.STEMMA_I2C()  # For using the built-in STEMMA QT connector on a microcontroller

# Create the TCA9548A object and give it the I2C bus
tca = adafruit_tca9548a.TCA9548A(i2c)

# For each sensor, create it using the TCA9548A channel instead of the I2C object
tsl1 = adafruit_tsl2591.TSL2591(tca[0])
tsl2 = adafruit_tsl2591.TSL2591(tca[1])

# After initial setup, can just use sensors as normal.
while True:
    print(tsl1.lux, tsl2.lux)
    time.sleep(0.1)
In the multi-sensor example, the TCA9548A is used as an I2C multiplexer with two TSL2591 light sensors. When the connected sensors are instantiated over I2C, the I2C pins declared are the ports from 0 and 1 on the TCA9548A.
In the example, the first TSL2591 light sensor, instantiated as tsl1, is plugged into port 0 (tca[0]) and the second TSL2591 light sensor, instantiated as tsl2, is plugged into port 1 (tca[1]).
# Create the TCA9548A object and give it the I2C bus
tca = adafruit_tca9548a.TCA9548A(i2c)

# For each sensor, create it using the TCA9548A channel instead of the I2C object
tsl1 = adafruit_tsl2591.TSL2591(tca[0])
tsl2 = adafruit_tsl2591.TSL2591(tca[1])
In the loop, the readings from the two light sensors are printed to the REPL every 0.1 seconds.
while True:
    print(tsl1.lux, tsl2.lux)
    time.sleep(0.1)


