
CircuitPython and Python
It's easy to use the RV-8803 with Python or CircuitPython, and the Adafruit_CircuitPython_RV8803 module. This module allows you to easily write Python code to read data from the sensor.
You can use this driver with any CircuitPython microcontroller board or with a computer that has GPIO and Python thanks to Adafruit_Blinka, our CircuitPython-for-Python compatibility library.
CircuitPython Microcontroller Wiring
First wire up a RV-8803 to your board exactly as shown below. Here's an example of wiring a Feather RP2040 to the RTC with I2C using one of the handy STEMMA QT connectors:
- Board STEMMA 3V to RTC VIN (red wire)
- Board STEMMA GND to RTC GND (black wire)
- Board STEMMA SCL to RTC SCL (yellow wire)
- Board STEMMA SDA to RTC SDA (blue wire)
The following is the RV-8803 wired to a Feather RP2040 using a solderless breadboard:
- Board 3V to RTC VIN (red wire)
- Board GND to RTC GND (black wire)
- Board SCL to RTC SCL (yellow wire)
- Board SDA to RTC SDA (blue wire)
Python Computer Wiring
Since there are dozens of Linux computers/boards you can use, we will show wiring for Raspberry Pi. For other platforms, please visit the guide for CircuitPython on Linux to see whether your platform is supported.
Here's the Raspberry Pi wired with I2C using the STEMMA connector:

- Pi 3V to RTC VIN (red wire)
- Pi GND to RTC GND (black wire)
- Pi SCL to RTC SCL (yellow wire)
- Pi SDA to RTC SDA (blue wire)
Here's the Raspberry Pi wired with I2C using a solderless breadboard:

- Pi 3V to RTC VIN (red wire)
- Pi GND to RTC GND (black wire)
- Pi SCL to RTC SCL (yellow wire)
- Pi SDA to RTC SDA (blue wire)
Python Installation of the RV-8803 Library
You'll need to install the Adafruit_Blinka library that provides the CircuitPython support in Python. This may also require enabling I2C on your platform and verifying you are running Python 3. Since each platform is a little different, and Linux changes often, please visit the CircuitPython on Linux guide to get your computer ready!
Once that's done, from your command line run the following command:
pip3 install adafruit-circuitpython-rv8803
If your default Python is version 3 you may need to run 'pip' instead. Just make sure you aren't trying to use CircuitPython on Python 2.x, it isn't supported!
CircuitPython Usage
To use with CircuitPython, you need to first install the Adafruit_CircuitPython_RV8803 library, and its dependencies, into the lib folder on your CIRCUITPY drive. Then you need to update code.py with the example script.
Thankfully, we can do this in one go. In the example below, click the Download Project Bundle button below to download the necessary libraries and the code.py file in a zip file. Extract the contents of the zip file, and copy the entire lib folder and the code.py file to your CIRCUITPY drive.
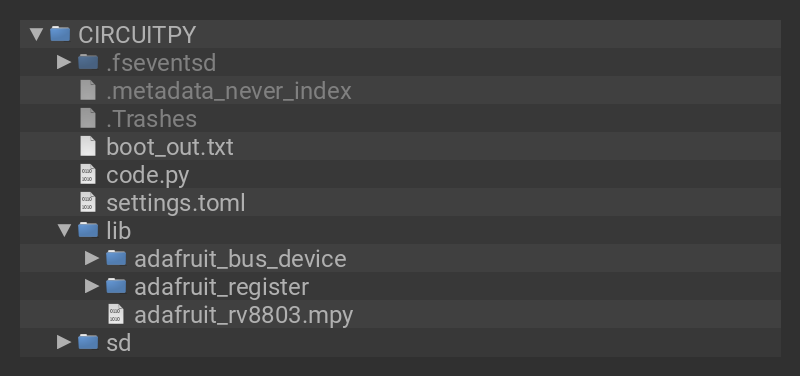
Your CIRCUITPY/lib folder should contain the following folders and file:
- adafruit_bus_device/
- adafruit_register/
- adafruit_rv8803.mpy
Python Usage
Once you have the library pip3 installed on your computer, copy or download the following example to your computer, and run the following, replacing code.py with whatever you named the file:
python3 code.py
Example Code
If running CircuitPython: Once everything is saved to the CIRCUITPY drive, connect to the serial console to see the data printed out!
If running Python: The console output will appear wherever you are running Python.
# SPDX-FileCopyrightText: Copyright (c) 2026 Liz Clark for Adafruit Industries
#
# SPDX-License-Identifier: MIT

import time

import board

import adafruit_rv8803

i2c = board.I2C()  # uses board.SCL and board.SDA
# i2c = board.STEMMA_I2C()  # For using the built-in STEMMA QT connector on a microcontroller
rtc = adafruit_rv8803.RV8803(i2c)

# Lookup table for names of days (nicer printing).
days = ("Monday", "Tuesday", "Wednesday", "Thursday", "Friday", "Saturday", "Sunday")


if False:  # change to True if you want to set the time!
    #                     year, mon, date, hour, min, sec, wday, yday, isdst
    t = time.struct_time((2026, 10, 29, 11, 27, 0, 3, -1, -1))
    # you must set year, mon, date, hour, min, sec and weekday
    # yearday is not supported, isdst can be set but we don't do anything with it at this time
    print("Setting time to:", t)  # uncomment for debugging
    rtc.datetime = t
    print()

# Main loop:
while True:
    t = rtc.datetime
    # print(t)     # uncomment for debugging
    print(f"The date is {days[int(t.tm_wday)]} {t.tm_mday}/{t.tm_mon}/{t.tm_year}")
    print(f"The time is {t.tm_hour}:{t.tm_min:02}:{t.tm_sec:02}")
    time.sleep(1)  # wait a second
In the main loop the date and time from the RTC are printed to the serial monitor every second.

Set the Clock
Before the loop, you can change if False: to if True: to reset the date and time stored on the RTC. After running it once, set it back to False so that the RTC won't continually reset itself.
if False:  # change to True if you want to set the time!
    #                     year, mon, date, hour, min, sec, wday, yday, isdst
    t = time.struct_time((2026, 10, 29, 11, 27, 0, 3, -1, -1))
    # you must set year, mon, date, hour, min, sec and weekday
    # yearday is not supported, isdst can be set but we don't do anything with it at this time
    print("Setting time to:", t)  # uncomment for debugging
    rtc.datetime = t
    print()
Page last edited November 09, 2026


