It's easy to use the PiCowbell CAN Bus with CircuitPython and the Adafruit_CircuitPython_MCP2515 module. This module allows you to easily write Python code that lets you utilize the MCP2515 CAN bus controller.
CircuitPython Usage
To use with CircuitPython, you need to first install the MCP2515 library, and its dependencies, into the lib folder onto your CIRCUITPY drive. Then you need to update code.py with the example script.
Thankfully, we can do this in one go. In the example below, click the Download Project Bundle button below to download the necessary libraries and the code.py file in a zip file.
Connect your Feather board to your computer via a known good data+power USB cable. The board should show up in your File Explorer/Finder (depending on your operating system) as a flash drive named CIRCUITPY.
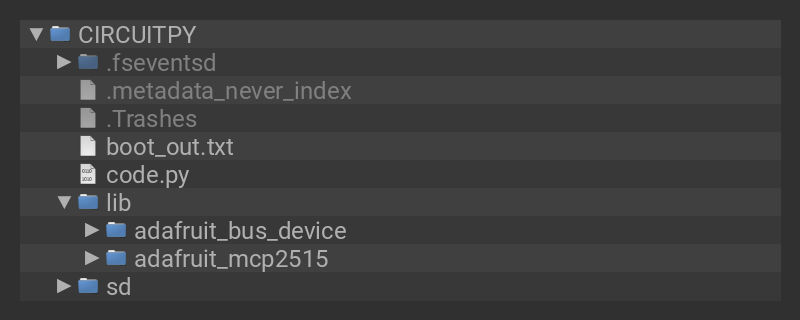
Extract the contents of the zip file, and copy the entire lib folder and the code.py file to your CIRCUITPY drive.
Your CIRCUITPY/lib folder should contain the following folders:
- adafruit_bus_device/
- adafruit_mcp2515/

Simple Test Example
Once everything is saved to the CIRCUITPY drive, connect to the serial console to see the messages printed out!
# SPDX-FileCopyrightText: Copyright (c) 2020 Bryan Siepert for Adafruit Industries
#
# SPDX-License-Identifier: MIT
'''Simple Test for the PiCowbell CAN Bus with Raspberry Pi Pico'''

from time import sleep
import board
import busio
from digitalio import DigitalInOut
from adafruit_mcp2515.canio import Message, RemoteTransmissionRequest
from adafruit_mcp2515 import MCP2515 as CAN


cs = DigitalInOut(board.GP20)
cs.switch_to_output()
spi = busio.SPI(board.GP18, board.GP19, board.GP16)

can_bus = CAN(
    spi, cs, loopback=True, silent=True
)  # use loopback to test without another device
while True:
    with can_bus.listen(timeout=1.0) as listener:

        message = Message(id=0x1234ABCD, data=b"adafruit", extended=True)
        send_success = can_bus.send(message)
        print("Send success:", send_success)
        message_count = listener.in_waiting()
        print(message_count, "messages available")
        for _i in range(message_count):
            msg = listener.receive()
            print("Message from ", hex(msg.id))
            if isinstance(msg, Message):
                print("message data:", msg.data)
            if isinstance(msg, RemoteTransmissionRequest):
                print("RTR length:", msg.length)
    sleep(1)
In the code, the instantiation of can_bus sets loopback and silent to True. This allows you to test the CAN Bus messaging without another CAN device.
can_bus = CAN(
    spi, cs, loopback=True, silent=True
)  # use loopback to test without another device
In the REPL, you'll see the byte array message be sent successfully every second.
Testing with Two CAN Bus PiCowbells
You can test with two CAN Bus PiCowbells by preparing two Raspberry Pi Pico boards with two CAN Bus PiCowbells. Prepare two Raspberry Pi Pico boards with two PiCowbell CAN Bus boards using your preferred header method described in the Assembly pages.
Once you have two Pico boards connected to CAN Bus PiCowbells, you can connect the CAN signals:
- PiCowbell A CANH terminal block to PiCowbell B CANH terminal block (blue wire)
- PiCowbell A - (ground) terminal block to PiCowbell B - (ground) terminal block (black wire)
- PiCowbell A CANL terminal block to PiCowbell B CANL terminal block (yellow wire)
Upload the Project Bundle to both CIRCUITPY drives. In the code, change the can_bus instantiation on both Pico boards to have loopback and silent be False.
can_bus = CAN(
    spi, cs, loopback=False, silent=False
)  # use loopback to test without another device
When you run the code on both Pico boards, you can check each serial monitor window and see messages being exchanged between the two boards.


