It's easy to use the LIS3DH sensor with Python or CircuitPython, and the Adafruit CircuitPython LIS3DH module. This module allows you to easily write Python code that reads acceleration from the sensor.
You can use this sensor with any CircuitPython microcontroller board or with a computer that has GPIO and Python thanks to Adafruit_Blinka, our CircuitPython-for-Python compatibility library.
CircuitPython Microcontroller Wiring
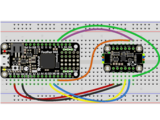
First wire up a LIS3DH to your board exactly as shown on the previous pages for Arduino. You can use either I2C or SPI wiring, although it's recommended to use I2C for simplicity. Here's an example of wiring a Feather M0 or M4 to the sensor with I2C:


-
Board 3V to sensor Vin (red wire on STEMMA QT version)
-
Board GND to sensor GND (black wire on STEMMA QT version)
-
Board SCL to sensor SCL (yellow wire on STEMMA QT version)
-
Board SDA to sensor SDA (blue wire on STEMMA QT version)
- Board D6 to sensor INT (or use any other free digital I/O pin)
And an example of a Feather M0 or M4 wired with hardware SPI:


- Board 3V to sensor Vin
- Board GND to sensor GND
- Board SCK to sensor SCL
- Board MOSI to sensor SDA
- Board MISO to sensor SDO
- Board D5 to sensor CS (or use any other free digital I/O pin)
- Board D6 to sensor INT (or use any other free digital I/O pin)
Python Computer Wiring
Since there's dozens of Linux computers/boards you can use we will show wiring for Raspberry Pi. For other platforms, please visit the guide for CircuitPython on Linux to see whether your platform is supported.
Here's the Raspberry Pi wired with I2C:


-
Pi 3V3 to sensor Vin (red wire on STEMMA QT version)
-
Pi GND to sensor GND (black wire on STEMMA QT version)
-
Pi SCL to sensor SCL (yellow wire on STEMMA QT version)
-
Pi SDA to sensor SDA (blue wire on STEMMA QT version)
- Pi GPIO6 to sensor INT (or use any other free digital I/O pin)
And an example on the Raspberry Pi 3 Model B wired with SPI:


- Pi 3V3 to sensor Vin
- Pi GND to sensor GND
- Pi SCLK to sensor SCL
- Pi MOSI to sensor SDA
- Pi MISO to sensor SDO
- Pi GPIO5 to sensor CS (or use any other free digital I/O pin)
- Pi GPIO6 to sensor INT (or use any other free digital I/O pin)
CircuitPython Installation of LIS3DH Library
Next you'll need to install the Adafruit CircuitPython LIS3DH library on your CircuitPython board.
First make sure you are running the latest version of Adafruit CircuitPython for your board.
Next you'll need to install the necessary libraries to use the hardware--carefully follow the steps to find and install these libraries from Adafruit's CircuitPython library bundle. For example the Circuit Playground Express guide has a great page on how to install the library bundle for both express and non-express boards.
Remember for non-express boards like the Trinket M0, Gemma M0, and Feather/Metro M0 basic you'll need to manually install the necessary libraries from the bundle:
- adafruit_lis3dh.mpy
- adafruit_bus_device
Before continuing make sure your board's lib folder or root filesystem has the adafruit_lis3dh.mpy, and adafruit_bus_device files and folders copied over.
Next connect to the board's serial REPL so you are at the CircuitPython >>> prompt.
Python Installation of LIS3DH Library
You'll need to install the Adafruit_Blinka library that provides the CircuitPython support in Python. This may also require enabling I2C on your platform and verifying you are running Python 3. Since each platform is a little different, and Linux changes often, please visit the CircuitPython on Linux guide to get your computer ready!
Once that's done, from your command line run the following command:
sudo pip3 install adafruit-circuitpython-lis3dh
If your default Python is version 3 you may need to run 'pip' instead. Just make sure you aren't trying to use CircuitPython on Python 2.x, it isn't supported!
CircuitPython & Python Usage
To demonstrate the usage of the sensor we'll initialize it and read the acceleration from the board's Python REPL.
If you're using an I2C connection run the following code to import the necessary modules and initialize the I2C connection with the sensor:
import time
import board
import digitalio
import adafruit_lis3dh
i2c = board.I2C()
int1 = digitalio.DigitalInOut(board.D6)  # Set this to the correct pin for the interrupt!
lis3dh = adafruit_lis3dh.LIS3DH_I2C(i2c, int1=int1)
Or if you're using a SPI connection run this code instead to setup the SPI connection and sensor:
import time
import board
import digitalio
import adafruit_lis3dh
spi = board.SPI()
cs = digitalio.DigitalInOut(board.D5)  # Set to appropriate CS pin!
int1 = digitalio.DigitalInOut(board.D6) # Set to correct pin for interrupt!
lis3dh = adafruit_lis3dh.LIS3DH_SPI(spi, cs, int1=int1)
Now you're ready to read values from the sensor using any of these properties:
- acceleration - The x, y, z acceleration values returned in a 3-tuple and are in m / s ^ 2.
- shake - Detect when the accelerometer is shaken.
- tapped - Detect when the accelerometer is tapped.
For example, to print acceleration:
x, y, z = lis3dh.acceleration
print(x, y, z)

To use shake, we've set the optional shake_threshold=15. The default is 30, but lower numbers make it easier to get the shake response. Try the following code. Enter it into the REPL and then shake the board.
while True:
    if lis3dh.shake(shake_threshold=15):
        print("Shaken!")

To use tapped, you need to use lis3dh.set_tap to tell it whether to look for a single- (1) or double-tap (2), and provide a threshold. We've chosen to look for a double tap (2) and set the threshold to 60. Enter the following code into the REPL and then tap the board twice.
lis3dh.set_tap(2, 60)
while True:
    if lis3dh.tapped:
        print("Tapped!")
        time.sleep(0.01)

# SPDX-FileCopyrightText: 2021 ladyada for Adafruit Industries
# SPDX-License-Identifier: MIT

import time
import board
import busio
import adafruit_lis3dh

# Hardware I2C setup. Use the CircuitPlayground built-in accelerometer if available;
# otherwise check I2C pins.
if hasattr(board, "ACCELEROMETER_SCL"):
    i2c = busio.I2C(board.ACCELEROMETER_SCL, board.ACCELEROMETER_SDA)
    lis3dh = adafruit_lis3dh.LIS3DH_I2C(i2c, address=0x19)
else:
    i2c = board.I2C()  # uses board.SCL and board.SDA
    # i2c = board.STEMMA_I2C()  # For using the built-in STEMMA QT connector on a microcontroller
    lis3dh = adafruit_lis3dh.LIS3DH_I2C(i2c)

# Hardware SPI setup:
# spi = board.SPI()
# cs = digitalio.DigitalInOut(board.D5)  # Set to correct CS pin!
# lis3dh = adafruit_lis3dh.LIS3DH_SPI(spi, cs)

# PyGamer or MatrixPortal I2C Setup:
# i2c = board.I2C()  # uses board.SCL and board.SDA
# lis3dh = adafruit_lis3dh.LIS3DH_I2C(i2c, address=0x19)


# Set range of accelerometer (can be RANGE_2_G, RANGE_4_G, RANGE_8_G or RANGE_16_G).
lis3dh.range = adafruit_lis3dh.RANGE_2_G

# Loop forever printing accelerometer values
while True:
    # Read accelerometer values (in m / s ^ 2).  Returns a 3-tuple of x, y,
    # z axis values.  Divide them by 9.806 to convert to Gs.
    x, y, z = [
        value / adafruit_lis3dh.STANDARD_GRAVITY for value in lis3dh.acceleration
    ]
    print("x = %0.3f G, y = %0.3f G, z = %0.3f G" % (x, y, z))
    # Small delay to keep things responsive but give time for interrupt processing.
    time.sleep(0.1)


