Sometimes we wonder if robotics engineers ever watch movies. If they did, they'd know that making robots into slaves always ends up in a robot rebellion. Why even go down that path? Here at Adafruit, we believe in making robots our friends!

So if you find yourself wanting a companion, consider the robot. They're fun to program, and you can get creative with decorations.

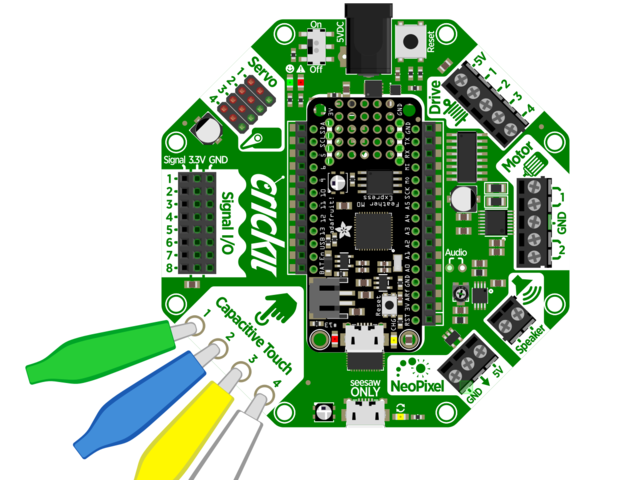
With that in mind, we designed the Adafruit Crickit HAT - That's our Creative Robotics & Interactive Construction Kit. It's an add-on to the Raspberry Pi that lets you #MakeRobotFriend using Python!

Plug the Crickit HAT onto your Pi using the standard 2x20 GPIO connector and start controlling motors, servos, solenoids. You also get 8 signal pins with analog inputs or PWM outputs, capacitive touch sensors, a level-shifted NeoPixel driver and 3W amplified speaker output from the I2S port. It complements & extends your Pi, doing all the things a Pi can't do, so you can still use all the goodies on the Pi like video, camera, Internet, bluetooth... but now you have a robotics playground as well.

Control of the motors, sensors, NeoPixels, capacitive touch, etc. is all done in Python 3. It's the easiest and best way to program your Pi, and after a couple pip installs you'll be ready to go. Audio is handled by the Pi's built in audio system, so anything that plays audio will come out the speaker - that includes Python commands or any application with sound.

The Crickit HAT is powered by seesaw, our I2C-to-whatever bridge firmware. So you only need to use two data pins to control the huge number of inputs and outputs on the Crickit. All those timers, PWMs, NeoPixels, sensors are offloaded to the co-processor.

You get:

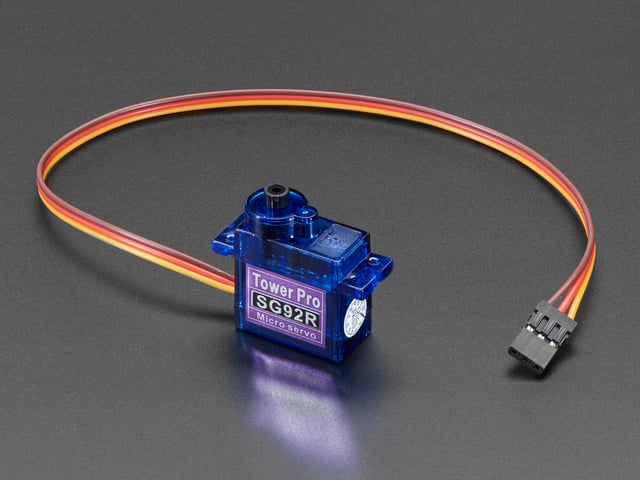
  • 4 x Analog or Digital Servo control, with precision 16-bit timers
  • 2 x Bi-directional brushed DC motor control, 1 Amp current limited each, with 8-bit PWM speed control (or one stepper)
  • 4 x High current "Darlington" 500mA drive outputs with kick-back diode protection. For solenoids, relays, large LEDs, or one uni-polar stepper
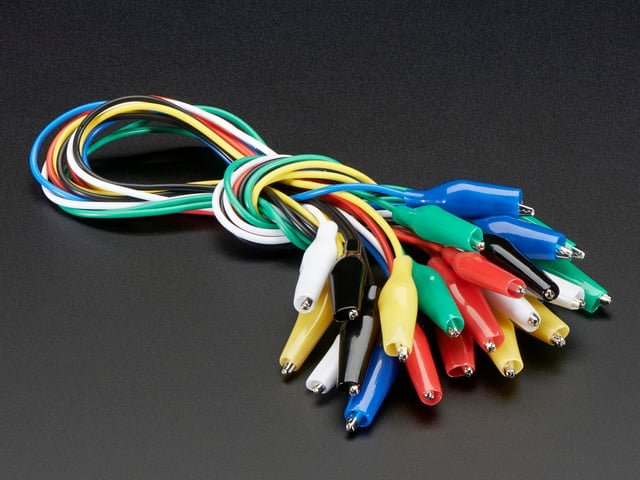
  • 4 x Capacitive touch input sensors with alligator-pads
  • 8 x Signal pins, can be used as digital in/out or analog inputs
  • 1 x NeoPixel driver with 5V level shifter - this is connected to the seesaw chip, not the Raspberry Pi, so you won't be giving up pin 18. It can drive over 100 pixels.
  • 1 x Class D, 4-8 ohm speaker, 3W-max audio amplifier - this is connected to the I2S pins on the Raspberry Pi for high quality digital audio. Works on any Pi, even Zero's that don't have an audio jack!
  • Built-in USB to serial converter. The USB port on the HAT can be used to update the seesaw firmware on the Crickit, or you can plug into your computer, it will also act as a USB converter for logging into the console and running command lines on the Pi.

All are powered via 5V DC, so you can use any 5V-powered servos, DC motors, steppers, solenoids, relays etc. To keep things simple and safe, we don't support mixing voltages, so only 5V, not for use with 9V or 12V robotic components.

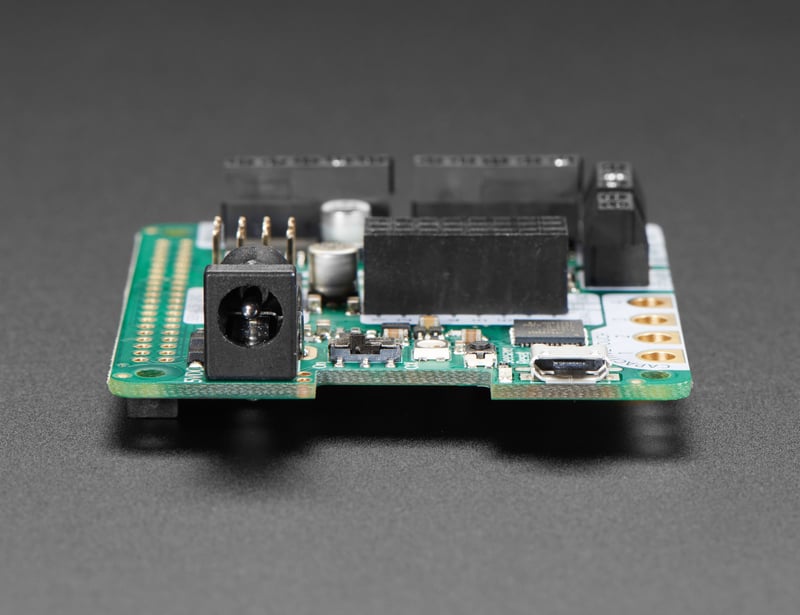
Please note this board does not require any soldering but you will need a 5V power supply and a Raspberry Pi to go along with the Crickit, and these are not included!

We recommend also purchasing:

5V 2A Wall Wart switching power supply
This is an FCC/CE certified and UL listed power supply. Need a lot of 5V power? This switching supply gives a clean regulated 5V output at up to 2000mA. 110 or 240 input, so it works...
$7.95
In Stock

And of course we have a huge collection of all compatible motors, servos, solenoids, speakers and more in our Crickit category

Since you'll be working with high-current devices, we wanted to have a good solid power supply system that minimizes risk of damage. The power supply has an 'eFuse' management chip that will automatically turn off if the voltage goes above 5.5V or below 3V and has over-current protection at 4A. Every motor driver has kick-back protection. We think this is a nice and durable board for robotics!

Your Crickit contains a special interface chip we call seesaw. Like a see-saw you see in a playground, it goes up/down back/forth. In this case, instead of holding children, it sends commands and responses back and forth - motor movement, sensors inputs, signal i/o...

The seesaw code is contained in a microcontroller near the bottom of the Crickit, and that chip comes with the seesaw firmware on it already when  you get it!

But we do make improvements to the seesaw firmware, fix bugs, and improve performance

So its a good idea to update your Crickit when you get it! It's easy and only takes a few seconds.

Step 1. Plug in USB cable into seesaw/Crickit

There's a little USB connector at the bottom of your Crickit labeled seesaw only! Plug a standard data-sync USB cable into that port and into your computer. You do not need to plug in the DC power jack or power the Feather/CircuitPlayground.

Do check that the switch on the Crickit is switched to ON

Step 2. Double-click the Crickit Reset button

On the Crickit for CPX, Feather or Micro:bit, this button is next to the DC jack and is pretty large.


On the Raspberry Pi, its more compact, and is right below the status NeoPixel

Step 3. Look for pulsing yellow LED and green NeoPixel

If you have a good USB connection and you double-click right, you'll see the left LED turn green and the right hand little yellow LED start pulsing

Step 4. Look for a New Disk on Your Computer

You'll see a new disk drive on your computer called CRICKITBOOT (short for crickit bootloader)

Step 5. Download the latest firmware

Click here to go to the download page for the latest Crickit firmware releases.

Download the correct file for your specific hardware:

  • Crickit HAT = seesaw-crickitHat.uf2
  • All others = seesaw-crickit.uf2

Step 6. Drag UF2 file onto CRICKITBOOT

Drag that file you downloaded onto the disk drive, after it is completed the drive will disappear (you may get a complaint from the operating system)


That's it! You're now updated

On the Crickit HAT, the 5V power plug is next to the 2x20 connector

The first thing you'll learn when making robots is that they use a lot of power. So making sure you have your power supply all worked out is super important. We've tried to make the power supply as easy and safe as possible, so you don't have to worry about damaging your electronics or robot. To do that we made some important design decisions.

How to Power your Crickit

It's really important to read and understand how to power your Crickit!

  • You MUST provide about 4-5 Volts DC power to the Crickit to power the servos, motors, solenoids, NeoPixels, etc.
  • You CANNOT provide this power by plugging the Crickit, micro:bit, Feather, Raspberry Pi or  Circuit Playground into USB. Computer USB ports cannot provide the 2 Amp + required to drive robotics, LEDs, speakers...
  • Power to the Crickit is provided via the 2.1mm DC Jack only!
  • The Cricket has two LEDs to let you know how the power supply is doing. If you see the green LED next to the smiley face, you're good to go. If you see the red LED next to the warning triangle, the voltage is too high, too low or too much current is being drawn.
  • The Crickit power will also power the Circuit Playground Express, micro:bit, Raspberry Pi or Feather so you don't need separate power for your microcontroller board (however, if you want to plug it into USB for programming, that's totally OK too!)

Here's our recommended ways to power the Crickit:

Plug In DC Power Supplies

These get wall power and give you a nice clean 5V DC power option. 5V 2A works for most project with a motor or two...

5V 2A Wall Wart switching power supply
This is an FCC/CE certified and UL listed power supply. Need a lot of 5V power? This switching supply gives a clean regulated 5V output at up to 2000mA. 110 or 240 input, so it works...
$7.95
In Stock

And a 5V 4A supply will give you lots of power so you can drive 4 or more servos, motors, etc. Use this if you notice you're running out of power with a 5V 2A adapter

5V 4A switching power supply brick with figure 8 power port.
Need a lot of 5V power? This switching supply gives a clean regulated 5V output at up to 4 Amps (4000mA). 110 or 240 input, so it works in any country. The plugs are "US...
$14.95
In Stock

AA Battery Packs

On the go? Portable power is possible! Use AA battery packs.

The number of batteries you need depends on whether you are using Alkaline or NiMH rechargeables.

We recommend NiMH rechargeables. For one, they have less waste, but they also perform better than alkalines in high-current draw robotics. So if you can, please use NiMH!

4 x AA Battery Packs for NiMH ONLY

NiMH batteries have a 1.3V max voltage, so 4 of them is 4 x 1.3 = 5.2 Volts. Perfect!

Angled shot of square black 4 x AA battery holder with on/off switch and male jumper wires.
Make a nice portable power pack with this 4 x AA battery holder. It fits any alkaline or rechargeable AA batteries in series. There's a snap on cover and an on/off switch which can...
$2.95
In Stock

3 x AA Battery Packs for Alkaline ONLY

Alkaline batteries have a 1.5V max voltage, so 4 of them is 4 x 1.5 = 6 Volts. That's too high! Instead we recommend 3 in series for 3 x 1.5V = 4.5 VDC

Angled shot of 3 x AA battery holder with 2.1mm plug. There are three AA batteries in the holder.
Here's another addition to our growing family of AA battery holders. A holder for three (3) AA batteries!...
$2.95
In Stock

If you're making a custom battery pack you may want to pick up a 2.1mm DC jack adapter, so you can connect battery pack wires

Angled shot of black 3 x AA waterproof battery holder with plain wires.
Keep your power source safe and toasty in these waterproof 3xAA battery holders. They're just like classic switched battery holders, but designed for survival! The case has a rubber...
$3.95
In Stock
Angled shot of a Male DC Power adapter - 2.1mm plug
If you need to connect a battery pack or wired power supply to a board that has a DC jack - this adapter will come in very handy! There is a 2.1mm DC plug on one end, and a screw...
$2.00
In Stock

Not Recommended Power supplies

  • LiPoly Batteries - 1 battery is 3.7V, too low. 2 batteries is 7.2V, too high! You could possibly use a 7.2V pack and then a UBEC to step down to 5V but its not recommended
  • Lead Acid Batteries - These are heavy and you'll need a custom charging solution. You can probably get away with a 2 x 2V cell pack, or a 3 x 2V cell pack and then add some 1N4001 diodes to drop the voltage, but it's for advanced hacking!
  • USB Power Packs - In theory you can use a USB to 2.1mm DC power adapter, but power packs sometimes dislike the kinds of current draw that motors have (high current peaks for short amounts of time) So experimentation is key!

The Crickit HAT's speaker is run by a MAX98357 I2S amplifier, you can set it up by installing via our script on the next page. It will appear as an everyday audio interface once that's done.

Enable Speaker Output

The Crickit HAT has the ability to mute the I2S amplifier via the GPIO 16 pin on the Raspberry Pi. This is attached by default, which means you will need to actually configure GPIO 16 to use this feature. If you do not configure GPIO 16, the amplifier will likely be muted by default.

If you don't want to mess with setting up GPIO 16 and would rather have the amplifier be on by default (you probably do), then you can do so by cutting the trace on the back of the HAT as shown below.

Here's where to find the trace. The label next to it reads:

I2S Mute

GPIO #16


Use an xacto or other sharp knife to carefully cut away the little bit of copper between the two larger pads.

If you have a multimeter, do a continuity check to make sure the trace is actually cut. In this case you don't want continuity, so if it beeps, try cutting again.

It will look a little scratchy when done, but that's OK.

And that's it! You should be good to go. Now you can move on to the next pages which will show you how to enable and configure the I2S audio output on the Raspberry Pi.

At this time, Raspbery Pi linux kernel does not support mono audio out of the I2S interface, you can only play stereo, so any mono audio files may need conversion to stereo!
2017-11-2 Raspbian PIXEL ('full') has broken something in volume control. I2S works, but there's no software volume setup, if you need this, try Raspbian Lite - will try to fix as soon as we figure out why :)

Fast Install

Luckily its quite easy to install support for I2S DACs on Raspbian.

These instructions are totally cribbed from the PhatDAC instructions at the lovely folks at Pimoroni!

Run the following from your Raspberry Pi with Internet connectivity:

curl -sS https://raw.githubusercontent.com/adafruit/Raspberry-Pi-Installer-Scripts/master/i2samp.sh | bash

We've added an extra helper systemd script that will play quiet audio when the I2S peripheral isn't in use. This removes popping when playback starts or stops. It uses a tiny amount of CPU time (on a Pi Zero, 5%, on a Pi 2 or 3 its negligible). You don't need this on RetroPie because it never releases the I2S device, but it's great for Raspbian.

You will need to reboot once installed.

You must reboot to enable the speaker hardware!

After rebooting, log back in and re-run the script again...It will ask you if you want to test the speaker. Say yes and listen for audio to come out of your speakers...

If it sounds really distorted, it could be the volume is too high. However, in order to have volume control appear in Raspbian desktop or Retropie you must reboot a second time after doing the speaker test, with sudo reboot

You must reboot *twice* to enable alsamixer volume (really!)

Once rebooted, try running alsamixer and use arrow keys to lower the volume, 50% is a good place to start.

If you're still having audio problems, try re-running the script and saying N (disable) the /dev/zero playback service.

You can then go to the next page on testing and optimizing your setup. Skip the rest of this page on Detailed Installation if the script worked for you!

Detailed Install

If, for some reason, you can't just run the script and you want to go through the install by hand - here's all the steps!

Update /etc/modprobe.d (if it exists)

Log into your Pi and get into a serial console (either via a console cable, the TV console, RXVT, or what have you)

Edit the raspi blacklist with

sudo nano /etc/modprobe.d/raspi-blacklist.conf

If the file is empty, just skip this step

However, if you see the following lines:

blacklist i2c-bcm2708
blacklist snd-soc-pcm512x
blacklist snd-soc-wm8804

Update the lines by putting a # before each line

Save by typing Control-X Y <return>

Disable headphone audio (if it's set)

Edit the raspi modules list with

sudo nano /etc/modules

If the file is empty, just skip this step

However, if you see the following line:

snd_bcm2835

Put a # in front of it

and save with Control-X Y <return>

Create asound.conf file

Edit the raspi modules list with

sudo nano /etc/asound.conf

This file ought to be blank!

Copy and paste the following text into the file

pcm.speakerbonnet {
   type hw card 0
}

pcm.dmixer {
   type dmix
   ipc_key 1024
   ipc_perm 0666
   slave {
     pcm "speakerbonnet"
     period_time 0
     period_size 1024
     buffer_size 8192
     rate 44100
     channels 2
   }
}

ctl.dmixer {
    type hw card 0
}

pcm.softvol {
    type softvol
    slave.pcm "dmixer"
    control.name "PCM"
    control.card 0
}

ctl.softvol {
    type hw card 0
}

pcm.!default {
    type             plug
    slave.pcm       "softvol"
}

Save the file as usual

Add Device Tree Overlay

 Edit your Pi configuration file with

sudo nano /boot/config.txt

And scroll down to the bottom. If you see a line that says: dtparam=audio=on 

Disable it by putting a # in front.

Then add:
dtoverlay=hifiberry-dac
dtoverlay=i2s-mmap

on the next line. Save the file.

Reboot your Pi with sudo reboot

Speaker Tests!

OK you can use whatever software you like to play audio but if you'd like to test the speaker output, here's some quick commands that will let you verify your amp and speaker are working as they should!

Simple white noise speaker test

Run speaker-test -c2 to generate white noise out of the speaker, alternating left and right.

If you have a mono output amplifier, the I2S amp merges left and right channels, so you'll hear continuous white noise

Simple WAV speaker test

Once you've got something coming out, try to play an audio file with speaker-test (for WAV files, not MP3)

speaker-test -c2 --test=wav -w /usr/share/sounds/alsa/Front_Center.wav

You'll hear audio coming from left and right alternating speakers

Simple MP3 speaker test

If you want to play a stream of music, you can try

sudo apt-get install -y mpg123
mpg123 http://ice1.somafm.com/u80s-128-mp3

If you want to play MP3's on command, check out this tutorial which covers how to set that up

At this time, Jessie Raspbery Pi kernel does not support mono audio out of the I2S interface, you can only play stereo, so any mono audio files may need conversion to stereo!

omxplayer does not seem use the I2S interface for audio - only HDMI - so you won't be able to use it

Volume adjustment

Many programs like PyGame and Sonic Pi have volume control within the application. For other programs you can set the volume using the command line tool called alsamixer. Just type alsamixer in and then use the up/down arrows to set the volume. Press Escape once its set

In Raspbian PIXEL you can set the volume using the menu item control. If it has an X through it, try restarting the Pi (you have to restart twice after install to get PIXEL to recognize the volume control

Hey in Raspbian Pixel desktop, the speaker icon is X'd out!

Try rebooting once after playing some audio. Also make sure you have our latest alsa configuration (check the detailed install page on the Raspberry Pi Setup page for the /etc/asound.conf!

If its still not working, you can still change the volume, just use alsamixer from a Terminal command prompt.

Even with dmixer enabled, I get a staticy-pop when the Pi first boots or when it first starts playing audio

Yep, this is a known Raspbian Linux thing. Yay Linux! We don't have a fix for it. If it makes you feel better, my fancy Windows development computer does the same thing with my desktop speakers.

You can reduce popping a lot with the '/dev/zero play' option in the i2s setup script. (We added it in October 2018) but you still might get that one initial pop

The audio on my DAC sounds really bad/distorted

Make sure you've lowered the volume. The default is 100% which is waaaay too high! Use alsamixer to reduce the volume to 50% or so

Does this work with my favorite software?

It will work with anything that has alsa audio support. There's thousands of linux programs so we can't guarantee all of them will work but here's what we found does for sure!

  • PyGame - see our page on playing audio with PyGame for example code. Volume can be controlled within pygame
  • mpg123 - command line mp3 audio playback. use alsamixer to control the volume
  • aplay - for playing wav files on the command line
  • Sonic Pi - tested in the Pixel Desktop. Use the Sonic Pi settings panel to change the volume - it does not seem to care about what global audio volume you set!
  • Scratch 2 - tested in the Pixel Desktop. Works fine but may have a delay and make a popping sound the first time you play audio. You can set volume with alsamixer and also via the app by using the set volume to nn% block
  • Scratch 1 - doesn't work, something not set up with Scratch 1 to use alsa?
  • RetroPie/Emulation Station - audio works within games (we tested NES and MAME libretro) but does not work in the 'main screen' (selecting which game to play interface)

You can use mpg123 for basic testing but it's a little clumsy for use where you want to dynamically change the volume or have an interactive program. For more powerful audio playback we suggest using PyGame to playback a variety of audio formats (MP3 included!)

Install PyGame

Start by installing pygame support, you'll need to open up a console on your Pi with network access and run:

sudo apt-get install python3-pygame

Next, download this pygame example zip to your Pi

Run Demo

Inside the zip is an example called pygameMP3.py

This example will playback all MP3's within the script's folder. To demonstrate that you can also adjust the volume within pygame, the second argument is the volume for playback. Specify a volume to playback with a command line argument between 0.0 and 1.0

For example here is how to play at 75% volume:

python pygameMP3.py 0.75

Here's the code if you have your own mp3s!

''' pg_midi_sound101.py
play midi music files (also mp3 files) using pygame
tested with Python273/331 and pygame192 by vegaseat
'''
#code modified by James DeVito from here: https://www.daniweb.com/programming/software-development/code/454835/let-pygame-play-your-midi-or-mp3-files


#!/usr/bin/python

import sys
import pygame as pg
import os
import time


def play_music(music_file):
    '''
    stream music with mixer.music module in blocking manner
    this will stream the sound from disk while playing
    '''
    clock = pg.time.Clock()
    try:
        pg.mixer.music.load(music_file)
        print("Music file {} loaded!".format(music_file))
    except pygame.error:
        print("File {} not found! {}".format(music_file, pg.get_error()))
        return

    pg.mixer.music.play()
    
    # If you want to fade in the audio...
    # for x in range(0,100):
    #     pg.mixer.music.set_volume(float(x)/100.0)
    #     time.sleep(.0075)
    # # check if playback has finished
    while pg.mixer.music.get_busy():
        clock.tick(30)


freq = 44100    # audio CD quality
bitsize = -16   # unsigned 16 bit
channels = 2    # 1 is mono, 2 is stereo
buffer = 2048   # number of samples (experiment to get right sound)
pg.mixer.init(freq, bitsize, channels, buffer)


if len(sys.argv) > 1:

    try: 
        user_volume = float(sys.argv[1])
    except ValueError:
        print "Volume argument invalid. Please use a float (0.0 - 1.0)"
        pg.mixer.music.fadeout(1000)
        pg.mixer.music.stop()
        raise SystemExit

    print("Playing at volume: " + str(user_volume)+ "\n")
    pg.mixer.music.set_volume(user_volume)
    mp3s = []
    for file in os.listdir("."):
        if file.endswith(".mp3"):
            mp3s.append(file)

    print mp3s

    for x in mp3s: 
        try:
            play_music(x)
            time.sleep(.25)
        except KeyboardInterrupt:
            # if user hits Ctrl/C then exit
            # (works only in console mode)
            pg.mixer.music.fadeout(1000)
            pg.mixer.music.stop()
            raise SystemExit
else:
    print("Please specify volume as a float! (0.0 - 1.0)")

Before you begin you'll need to have a fully set up Raspberry Pi computer with internet connectivity.

You can use any Raspberry Pi computer with a 2x20 connector such as a Pi 3, Pi 2, Pi A+, Zero or Zero W, etc.

Install Adafruit-Blinka, Enable I2C

We have a full guide on installing Adafruit-Blinka and enabling I2C, including CircuitPython tests. The short instructions are below:

Update OS to latest with:

  • sudo apt-get update

  • sudo apt-get upgrade

  • sudo reboot

Enable I2C following this guide. Don't forget to reboot afterwards.

Make sure you are running Python3. Python2 is installed on many Linux computers, but Python3 is required!

  • sudo apt-get install -y python3 git python3-pip
  • sudo update-alternatives --install /usr/bin/python python /usr/bin/python2.7 1
  • sudo update-alternatives --install /usr/bin/python python /usr/bin/python3.5 2
  • sudo update-alternatives --config python

Then install the needed CRICKIT Python 3 libraries with

pip3 install RPI.GPIO adafruit-blinka

Power off & Install HAT

Shutdown the Pi safely with sudo shutdown -h now and install the HAT as shown. There's an extra long header standoff that goes between the Pi headers and the HAT. Make sure they are lined up correctly - Plugging in the HAT wrong can damage your Pi permanently!

Start the pi up again and open a terminal window if you boot to graphics mode.

On the command line, install I2C tools so you get the detect program with sudo apt-get install -y i2c-tools

Now scan for I2C to see that the Crickit is found with i2cdetect -y 1

If you get an error Error: Could not open file `/dev/i2c-1' or `/dev/i2c/1': No such file or directory - Enable I2C following this guide. Don't forget to reboot afterwards.

Note that you should be able to see the i2c address 0x49 appear even if the power switch on the HAT is off, or if no power is plugged into the DC jack.

If the i2c address doesn't appear, try clicking the reset button on the HAT once, to reset it, and try again.

Install Crickit library

We will use our Crickit library to make easy work of motors and sensor readings, install it with

pip3 install adafruit-circuitpython-crickit

You can test that your software installed properly by running Python 3 and entering these commands

from adafruit_crickit import crickit
print(crickit.touch_1.value)

Between the second and third command, touch your finger to the first Capacitive Touch pad on the HAT.


If the value changes like in the screen shot below, it's working!

To the left are the connections for the Crickit with the Circuit Playground Express.


Note: The black wire on the servo connectors always points inward towards the microcontroller and center of Crickit. The light wire: yellow, orange, white, etc. faces outward from the Crickit.

Here is the Feather Crickit connected to four servos.

The Crickit HAT for Raspberry Pi can also control up to 4 servos like other Crickit boards. Note the location of the Servo header block with 4 rows of three male pins.

Test Servos

Lets start by controlling some servos. You'll want at least one servo to plug in and test out the servo code. Visit our recommended servo page to check that you have a servo that works. Once you do, plug in a servo into SERVO #1 spot, making sure the yellow or white wire is next to the 1 text label.

This example will show rotating one servo from 0 to 180 degrees with a stop at 90 degrees.

import time
from adafruit_crickit import crickit

print("1 Servo demo!")

while True:
    print("Moving servo #1")
    crickit.servo_1.angle = 0      # right
    time.sleep(1)
    crickit.servo_1.angle = 90     # middle
    time.sleep(1)
    crickit.servo_1.angle = 180    # left
    time.sleep(1)
    crickit.servo_1.angle = 90     # middle
    time.sleep(1)
    # and repeat!
Are your servos not moving a full 180 degrees? Don't fret! This is normal, see below about min/max pulse lengths to 'tune' your servo!

We start by importing the libraries that we need to have time delays ( import time ) and then the main crickit python library that will make it super easy to talk to the motors and sensors on crickit (from adafruit_crickit import crickit)

The crickit object represents the motors and servos available for control. The servos are available on the sub-objects named servo_1, servo_2, servo_3, servo_4

Each of these are adafruit_motor.servo type objects for the curious

Control Servo

Now that we know the servo objects, we can simply assign the angle! crickit.servo_1.angle = 0 is all the way to the left, crickit.servo_1.angle = 90 is in the middle, and crickit.servo_1.angle = 180 is all the way to the right. You'll want to test this to ensure it works with your specific servo, as 0 might be to the right and 180 to the left if it was geared differently.

More Servos!

OK that was fun but you want MORE servos right? You can control up to four!

import time
from adafruit_crickit import crickit

print("4 Servo demo!")

# make a list of all the servos
servos = (crickit.servo_1, crickit.servo_2, crickit.servo_3, crickit.servo_4)

while True:
    # Repeat for all 4 servos
    for my_servo in servos:
        # Do the wave!
        print("Moving servo #", servos.index(my_servo)+1)
        my_servo.angle = 0      # right
        time.sleep(0.25)
        my_servo.angle = 90     # middle
        time.sleep(0.25)
        my_servo.angle = 180    # left
        time.sleep(0.25)
        my_servo.angle = 90     # middle
        time.sleep(0.25)
        my_servo.angle = 0      # right

This example is similar to the 1 servo example, but instead of accessing thecrickit.servo_1 object directly, we'll make a list called servos that contains 4 servo objects with

servos = (crickit.servo_1, crickit.servo_2, crickit.servo_3, crickit.servo_4)

Then we can access the individual using servo[0].angle = 90 or iterate through them as we do in the loop. You don't have to do it this way, but its very compact and doesn't take a lot of code lines to create all 4 servos at once!

One thing to watch for is that if you use a list like this, servo[0] is the name of the Servo #1 and servo[3] is Servo #4!

Min/Max Pulse control

Originally servos were defined to use 1.0 millisecond to 2.0 millisecond pulses, at 50 Hz to set the 0 and 180 degree locations. However, as more companies started making servos they changed the pulse ranges to 0.5ms to 2.5ms or even bigger ranges. So, not all servos have their full range at thoe 'standard' pulse widths. You can easily tweak your code to change the min and max pulse widths, which will let your servo turn more left and right. But don't set the widths too small/large or you can hit the hard stops of the servo which could damage it, so try tweaking the numbers slowly until you get a sense of what the limits are for your motor.

All you need to do is add a line at the top of your code like this

crickit.servo_1.set_pulse_width_range(min_pulse=500, max_pulse=2500)

The above is for Crickit Servo #1, you'll need to duplicate and adjust for all other servos, but that way you can customize the range uniquely per servo!

Here we've change the minimum pulse from the default ~750 microseconds to 500, and the default maximum pulse from 2250 microseconds to 2500. Again, each servo differs. Some experimentation may be required!

import time
from adafruit_crickit import crickit

print("1 Servo demo with custom pulse widths!")

crickit.servo_1.set_pulse_width_range(min_pulse=500, max_pulse=2500)

while True:
    print("Moving servo #1")
    crickit.servo_1.angle = 0      # right
    time.sleep(1)
    crickit.servo_1.angle = 180    # left
    time.sleep(1)

Continuous Rotation Servos

If you're using continuous servos, you can use the angle assignments and just remember that 0 is rotating one way, 90 is 'stopped' and 180 and rotating the other way. Or, better yet, you can use the crickit.continuous_servo_1 object instead of the plain servo_1

Again, you get up to 4 servos. You can mix 'plain' and 'continuous' servos

import time
from adafruit_crickit import crickit

print("1 Continuous Servo demo!")

while True:
    crickit.continuous_servo_1.throttle = 1.0 # Forwards
    time.sleep(2)
    crickit.continuous_servo_1.throttle = 0.5 # Forwards halfspeed
    time.sleep(2)
    crickit.continuous_servo_1.throttle = 0   # Stop
    time.sleep(2)
    crickit.continuous_servo_1.throttle = -0.5 # Backwards halfspeed
    time.sleep(2)
    crickit.continuous_servo_1.throttle = -1 # Forwards
    time.sleep(2)
    crickit.continuous_servo_1.throttle = 0   # Stop
    time.sleep(2)

If your continuous servo doesn't stop once the loop is finished you may need to tune the min_pulse and max_pulse timings so that the center makes the servo stop. Or check if the servo has a center-adjustment screw you can tweak.

Disconnecting Servos or Custom Pulses

If you want to 'disconnect' the Servo by sending it 0-length pulses, you can do that by 'reaching in' and adjusting the underlying PWM duty cycle with:

crickit.servo_1._pwm_out.duty_cycle = 0

or

crickit.servo_1._pwm_out.fraction = 0

Likewise you can set the duty cycle to a custom value with

crickit.servo_1._pwm_out.duty_cycle = number

where number is between 0 (off) and 65535 (fully on). For example, setting it to 32767 will be 50% duty cycle, at the 50 Hz update rate

Or you can use fractions like crickit.servo_1._pwm_out.fraction = 0.5

import time
from adafruit_crickit import crickit

print("1 Servo release demo!")

while True:
    print("Moving servo #1")
    crickit.servo_1.angle = 0      # right
    time.sleep(10)
    print("Released")
    crickit.servo_1._pwm_out.duty_cycle = 0
    time.sleep(10)
    # and repeat!

The Crickit with Circuit Playground Express is shown at left.


All the red wires connect to the Drives 5V terminal and the other wire connected to individual Drive terminals.

Using Drives with the Feather-based Crickit is shown at left.


Note: For CircuitPython, you need to use a CircuitPython-compatible Feather board.

Crickit HAT for Raspberry Pi can also drive four devices via the Drive ports.

Test Drive

Lets start by controlling a drive output. You'll need to plug something into the 5V and DRIVE1 terminal blocks. I'm just using a simple LED with resistor but anything that can be powered by 5V will work.

  • Note that the drive outputs cannot have 5V output so you must connect the positive pin of whatever you're driving to 5V. Don't try connecting the positive pin to the drive, and the negative pin to GND, it wont work!
  • Drive outputs are PWM-able!

This example will show turning the drive output fully on and off once a second:

import time
from adafruit_crickit import crickit

print("1 Drive demo!")

crickit.drive_1.frequency = 1000

while True:
    crickit.drive_1.fraction = 1.0  # all the way on
    time.sleep(0.5)
    crickit.drive_1.fraction = 0.0  # all the way off
    time.sleep(0.5)
    crickit.drive_1.fraction = 0.5  # half on/off
    time.sleep(0.5)
    # and repeat!

We start by importing the libraries that we need to have time delays ( import time ) and then the main crickit python library that will make it super easy to talk to the motors and sensors on crickit (from adafruit_crickit import crickit)

The crickit object represents the drive outputs available for control. The drives are available on the sub-objects named drive_1, drive_2, drive_3, drive_4

Note that for the Feather Crickit, these are feather_drive_1, feather_drive_2, feather_drive_3, and feather_drive_4.

Set PWM Frequency

Drive outputs are all PWM outputs too, so not only can they turn fully on and off, but you can also set it half-way on. In general, the default frequency for PWM outputs on seesaw is 1000 Hz, so set the frequency to 1 KHz with crickit.drive_1.frequency = 1000. Even if you aren't planning to use the PWM output, please set the frequency!

Note that all the Drive outputs share the same timer so if you set the frequency for one, it will be the same for all of them.

Control Drive Output

Now that we have a drive pwm object, we can simply assign the PWM duty cycle with the fraction property!

  • crickit.drive_1.fraction = 0.0 turns the output completely off (no drive to ground, no current draw).
  • crickit.drive_1.fraction = 1.0 turns the output completely on (fully drive to ground)
  • And, not surprisingly crickit.drive_1.fraction = 0.5 sets it to 1/2 on and 1/2 off at the PWM frequency set above.

More Drivers!

OK that was fun but you want MORE drives right? You can control up to four!

import time
from adafruit_crickit import crickit

print("4 Drive demo!")

drives = (crickit.drive_1, crickit.drive_2, crickit.drive_3, crickit.drive_4)

for drive in drives:
    drive.frequency = 1000

while True:
    for drive in drives:
        print("Drive #", drives.index(drive)+1)
        drive.fraction = 1.0  # all the way on
        time.sleep(0.25)
        drive.fraction = 0.0  # all the way off
        time.sleep(0.25)
        # and repeat!

This example is similar to the 1 drive example, but instead of accessing the crickit.drive_1 object directly, we'll make a list called drives that contains 4 drive objects with

drives = (crickit.drive_1, crickit.drive_2, crickit.drive_3, crickit.drive_4)

Then we can access the individual using drives[0].fraction = 0.5 or iterate through them as we do in the loop. You don't have to do it this way, but its very compact and doesn't take a lot of code lines to create all 4 drives at once!

Connections from DC motors to the Circuit Playground Express Crickit is shown at left. There are two Motor drivers, labeled 1 and 2.


The center GND terminal is not used for most DC Motor applications.

The Feather Crickit connections for the Motor terminals is shown at left.

Motors are just as easy to use with the Crickit HAT for Raspberry Pi as other versions of Crickit.

You can drive two separate DC motors, so lets go ahead and get right to it!

DC motors are controlled by 4 PWM output pins, the 4 PWM pins let you control speed and direction. And we'll use our adafruit_motor library to help us manage the throttle (speed) and direction for us, making it very easy to control motors

Note that each DC motor is a little different, so just because you have two at the same throttle does not mean they'll rotate at the exact same speed! Some tweaking may be required

The two wires of the DC motor can be plugged in either way into each Crickit Motor port. If the motor spins the opposite way from what you want to call 'forward', just flip the wires!
import time
from adafruit_crickit import crickit

print("Dual motor demo!")

# make two variables for the motors to make code shorter to type
motor_1 = crickit.dc_motor_1
motor_2 = crickit.dc_motor_2

while True:
    motor_1.throttle = 1  # full speed forward
    motor_2.throttle = -1 # full speed backward
    time.sleep(1)

    motor_1.throttle = 0.5  # half speed forward
    motor_2.throttle = -0.5 # half speed backward
    time.sleep(1)

    motor_1.throttle = 0  # stopped
    motor_2.throttle = 0  # also stopped
    time.sleep(1)

    motor_1.throttle = -0.5  # half speed backward
    motor_2.throttle = 0.5   # half speed forward
    time.sleep(1)

    motor_1.throttle = -1  # full speed backward
    motor_2.throttle = 1   # full speed forward
    time.sleep(1)

    motor_1.throttle = 0  # stopped
    motor_2.throttle = 0  # also stopped
    time.sleep(0.5)
    
    # and repeat!

Import Libraries

We start by importing the libraries that we need to have time delays ( import time ) and then the main crickit python library that will make it super easy to talk to the motors and sensors on crickit (from adafruit_crickit import crickit)

The crickit object represents the motors and servos available for control. The motors are available on the sub-objects named dc_motor_1 and dc_motor_2

Each of these are adafruit_motor.motor type objects for the curious

To make our code easier to read, we'll make new names for each motor:

# make two variables for the motors to make code shorter to type
motor_1 = crickit.dc_motor_1
motor_2 = crickit.dc_motor_2

Control Motor

Now that we have our motor objects, we can simply assign the throttle, this will set the direction and speed. For example, to set the speed to full forward, use motor_1.throttle = 1 and to set to full speed backward use motor_1.throttle = -1. For speeds in between, use a fraction, such as 0.5 (half speed) or 0.25 (quarter speed). Setting the throttle = 0 will stop the motor.

Connecting Crickit with Circuit Playground Express with stepper motors is shown at left. 

The Crickit with Feather uses identical connections with other Crickit boards to stepper motors.


Note the Fritzing part for the blue stepper has changed wire order but the color connections shown are identical.

Likewise you can drive two stepper motors with the Crickit HAT for Raspberry Pi. One on the Motor ports, one on the Drive ports. 


The coding for each port is a bit different but the functionality is the same.


The Drive stepper must be Unipolar - bipolar steppers are not supported on the Drive port, only on the single Motor port.

Even though we don't make it really obvious, you can drive stepper motors from the Crickit.

Stepper motors rotate all the way around but only one 'step' at a time. Usually there's a few hundred steps per turn, making them great for precision motion. The trade off is they're very slow compared to servos or steppers. Also, unlike servos they don't know 'where' they are in the rotation, they can only step forward and backwards.

There's two kinds of stepper motors: bipolar (4-wire) and unipolar (5 or 6-wire). We can control both kinds but with some restrictions!

  • The voltage we use to power the motor is 5V only, so 5V power steppers are best, but sometimes you can drive 12V steppers at a slower/weaker rate
  • You can drive one bi-polar stepper motor via the Motor port
  • You can drive two uni-polar stepper motors, one via the Motor port and one via the Drive port
  • That means you have have two uni-polar steppers or one uni and one bi-polar. But you cannot drive two bi-polar steppers.

Bi-Polar or Uni-Polar Motor Port

The Crickit Motor port can run a unipolar (5-wire and 6-wire) or bipolar (4-wire) stepper. It cannot run steppers with any other # of wires!

The code is the same for unipolar or bipolar motors, the wiring is just slightly different.

Unlike DC motors, the wire order does matter. Connect one coil to the Motor pair #1. Connect the other coil to the Motor pair #2

  • If you have a bipolar motor, connect one motor coil to #1 and the other coil to #2 and do not connect to the center GND block.
  • If you are using a unipolar motor with 5 wires, connect the common wire to the center GND port.
  • If you are using a unipolar motor with 6 wires, you can connect the two 'center coil wires' together to the center GND port

If you are using our "12V" bi-polar stepper, wire in this order: red, yellow, (skip GND center), green, gray

If you are using our 5V uni-polar stepper, wire in this order: orange, pink, red (ground), yellow, blue.

Here is the CircuitPython code for stepping various ways. You can try tweaking the INTERSTEP_DELAY to slow down the motor.

CircuitPython supports 4 different waveform stepping techniques. More on each is detailed at Wikipedia.

  • SINGLE stepping (one coil on at a time) - fast, lowest power usage, weak strength
  • DOUBLE stepping (two coils on at a time) - fast, highest power, high strength
  • INTERLEAVE stepping (alternates between one and two coils on) - slow (half the speed of single or double!), medium power, medium strength
  • MICROSTEPPING - while this is supported its so slow with Crickit we're going to just 'skip' this one!

Unless you have power limiting requirements, DOUBLE is great for most projects. INTERLEAVE gives you smoother motion but is slower. SINGLE is simplest but weakest turning strength.

import time
from adafruit_crickit import crickit
from adafruit_motor import stepper

print("Bi-Polar or Uni-Polar Stepper motor demo!")

# make stepper motor a variable to make code shorter to type!
stepper_motor = crickit.stepper_motor
# increase to slow down, decrease to speed up!
INTERSTEP_DELAY = 0.01

while True:
    print("Single step")
    for i in range(200):
        stepper_motor.onestep(direction=stepper.FORWARD)
        time.sleep(INTERSTEP_DELAY)
    for i in range(200):
        stepper_motor.onestep(direction=stepper.BACKWARD)
        time.sleep(INTERSTEP_DELAY)

    print("Double step")
    for i in range(200):
        stepper_motor.onestep(direction=stepper.FORWARD, style=stepper.DOUBLE)
        time.sleep(INTERSTEP_DELAY)
    for i in range(200):
        stepper_motor.onestep(direction=stepper.BACKWARD, style=stepper.DOUBLE)
        time.sleep(INTERSTEP_DELAY)
    print("Interleave step")
    for i in range(200):
        stepper_motor.onestep(direction=stepper.FORWARD, style=stepper.INTERLEAVE)
        time.sleep(INTERSTEP_DELAY)
    for i in range(200):
        stepper_motor.onestep(direction=stepper.BACKWARD, style=stepper.INTERLEAVE)
        time.sleep(INTERSTEP_DELAY)

CircuitPython stepper motor control is pretty simple - you can access the motor port for stepper control via the crickit.stepper_motor object (it's an adafruit_motor.stepper type object).

With that object, you can call onestep() to step once, with the direction and stepping style included. The default direction is FORWARD and the default style is SINGLE.

Note that 'forward' and 'backward' are, like DC motors, dependent on your wiring and coil order so you can flip around the coil wiring if you want to change what direction 'forward' and 'backward' means.

Putting time.sleep()'s between steps will let you slow down the stepper motor, however most steppers are geared so you may not want any delays.

Uni-Polar Only Drive Port

The Drive port can also control steppers although it can only do uni-polar! Don't try connecting a 4-wire bi-polar stepper, it won't work at all.

If you are using our 5V uni-polar stepper, wire in this order: red (5V), orange, yellow, pink, blue. That should line up with the wires on the plug

And here's the CircuitPython code. Note that the only difference is we're using the crickit.drive_stepper_motor object now!

import time
from adafruit_crickit import crickit
from adafruit_motor import stepper

print("Uni-Polar Stepper motor demo!")

# make stepper motor a variable to make code shorter to type!
stepper_motor = crickit.drive_stepper_motor  # Use the drive port

# increase to slow down, decrease to speed up!
INTERSTEP_DELAY = 0.02
while True:
    print("Single step")
    for i in range(200):
        stepper_motor.onestep(direction=stepper.FORWARD)
        time.sleep(INTERSTEP_DELAY)
    for i in range(200):
        stepper_motor.onestep(direction=stepper.BACKWARD)
        time.sleep(INTERSTEP_DELAY)

    print("Double step")
    for i in range(200):
        stepper_motor.onestep(direction=stepper.FORWARD, style=stepper.DOUBLE)
        time.sleep(INTERSTEP_DELAY)
    for i in range(200):
        stepper_motor.onestep(direction=stepper.BACKWARD, style=stepper.DOUBLE)
        time.sleep(INTERSTEP_DELAY)
    print("Interleave step")
    for i in range(200):
        stepper_motor.onestep(direction=stepper.FORWARD, style=stepper.INTERLEAVE)
        time.sleep(INTERSTEP_DELAY)
    for i in range(200):
        stepper_motor.onestep(direction=stepper.BACKWARD, style=stepper.INTERLEAVE)
        time.sleep(INTERSTEP_DELAY)

Connecting various sensors, switches, and indicators is easy with Crickit.

The Crickit with Circuit Playground Express is shown at the left.

Note that external pull up (or pull down) resistors are needed on the Crickit Signals block as Seesaw does not have the capability to set internal pull up or pull down resistors like on direct microcontrollers.

Connections to a Crickit with Feather board are identical.

Note that if you plan to use CircuitPython, the Feather board you choose should be one that is supported by CircuitPython (there are a few Feathers that cannot be programmed with CircuitPython).

The Signals block on the Crickit HAT for Raspberry Pi gives you 8 bidirectional general purpose input/output (GPIO) (analog/digital) ports.

Since the Crickit HAT takes pins away from the Raspberry pi to control everything, the Signals block helps to provide some pins back and they all can accept analog input too (unlike RasPi pins).

You may want to add buttons, LEDs, switches or simple sensors to your robot project. With Crickit, you get 8 x 'general purpose in/out' (GPIO) pins called signals. Each signal can be a digital input (button/switch), digital output (LED, for example), or analog input.

This lets you add a ton of external components easily, and its all handled by seesaw. Perfect when you have a Feather without analog inputs (like the ESP8266) or just need a ton of extra pins.

The signal pins are on a 3x8 female header, so you can poke wires directly in!

Here's an example wiring that goes with the code below.

We have two switch buttons, connected to signals #1 and #2, the other side of the buttons connect to ground

There's also two LEDs, connected to the signals #3 and #4 and the negative wires connected to ground. (All the 3.3V and Ground pins are connected together so you don't have to use the ones right next to the signal pin!)

import time
from adafruit_crickit import crickit

# For signal control, we'll chat directly with seesaw, use 'ss' to shorted typing!
ss = crickit.seesaw

# Two buttons are pullups, connect to ground to activate
BUTTON_1 = crickit.SIGNAL1  # button #1 connected to signal port 1 & ground
BUTTON_2 = crickit.SIGNAL2  # button #2 connected to signal port 2 & ground

# Two LEDs are outputs, on by default
LED_1 = crickit.SIGNAL3    # LED #1 connected to signal port 3 & ground
LED_2 = crickit.SIGNAL4    # LED #2 connected to signal port 4 & ground

ss.pin_mode(LED_1, ss.OUTPUT)
ss.pin_mode(LED_2, ss.OUTPUT)
ss.pin_mode(BUTTON_1, ss.INPUT_PULLUP)
ss.pin_mode(BUTTON_2, ss.INPUT_PULLUP)
ss.digital_write(LED_1, True)
ss.digital_write(LED_2, True)

while True:
    if not ss.digital_read(BUTTON_1):
        print("Button 1 pressed")
        ss.digital_write(LED_1, True)
    else:
        ss.digital_write(LED_1, False)

    if not ss.digital_read(BUTTON_2):
        print("Button 2 pressed")
        ss.digital_write(LED_2, True)
    else:
        ss.digital_write(LED_2, False)

Each of the 8 signal pin numbers is available under the crickit object as SIGNAL1 through SIGNAL8. Note these are not DigitalInOut or Pin objects! We need to use the crickit.seesaw object to set the mode, direction, and readings

To simplify our code we shorted the crickit.seesaw object to just ss

# For signal control, we'll chat directly with seesaw, use 'ss' to shorted typing!
ss = crickit.seesaw

Digital Pin Modes

You can set the mode of each signal pin with ss.pin_mode(signal, mode) where signal is the crickit.SIGNAL# from above and mode can be ss.OUTPUT, ss.INPUT or ss.INPUT_PULLUP.

ss.pin_mode(BUTTON_1, ss.INPUT_PULLUP)
ss.pin_mode(BUTTON_2, ss.INPUT_PullUP)
...
ss.pin_mode(LED_1, ss.OUTPUT)
ss.pin_mode(LED_2, ss.OUTPUT)

Digital Read

Then, you can read the values True or False with ss.digital_read(signal)

Don't forget you have to set it to be an INPUT first! And if you don't have an external pull up resistor, you'll need to set it in the code.

ss.digital_read(BUTTON_1)

Digital Write

Or, you can set the signal you want to a high value with ss.digital_write(signal, True), or set to low value with ss.digital_write(signal, False). Don't forget you have to set it to be an OUTPUT first!

# LED On
ss.digital_write(LED_2, True)
# LED Off
ss.digital_write(LED_2, False)

Analog Reads

You can also read analog values like from a potentiometer or sensor.


Let's do a demonstration where the center tap of a potentiometer is hooked up to Signal #3 - don't forget to also connect one side of the potentiometer to 3.3V and the other side to ground.

And here is the example code. You can see we read the signal with ss.analog_read(signal) which returns a value from 0 to 1023.

import time
from adafruit_crickit import crickit

# For signal control, we'll chat directly with seesaw, use 'ss' to shorted typing!
ss = crickit.seesaw
# potentiometer connected to signal #3
pot = crickit.SIGNAL3

while True:
    print((ss.analog_read(pot),))
    time.sleep(0.25)

By printing the value in a python tuple (ss.analog_read(pot),) we can use the Mu plotter to see the values immediately!

There's four capacitive touch pads you can use to detect human touch. They have big pads you can use to attach alligator/croc clips

Whether you use a Circuit Playground Crickit or Feather Crickit, the touch pads are available.

The four capacitive touch pads on the Crickit HAT for Raspberry pi are conveniently on the edge and vave nice holes for clipping alligator clips onto.

You can read the value of the captouch pads from crickit.touch_#.value This will return True (if touched) or False (if not). This is the simplest/easiest way to detect touch, but it has a catch!

We determine if the touch is active by seeing the difference between the current 'raw' reading value and the first value. That means you do need to read the crickit touch pads without touching them first.

Try loading this code and touching the four pads while looking at the REPL

import time
from adafruit_crickit import crickit

# Capacitive touch tests

while True:
    if crickit.touch_1.value:
        print("Touched Cap Touch Pad 1")
    if crickit.touch_2.value:
        print("Touched Cap Touch Pad 2")
    if crickit.touch_3.value:
        print("Touched Cap Touch Pad 3")
    if crickit.touch_4.value:
        print("Touched Cap Touch Pad 4")

If you want to get more specific, you can read the 'raw_value' value which is a number between 0 and 1023. Because there's always some capacitance its reading you'll see a starting value of about 250.

You can then test against a threshold, or use it to measure how hard someone is pressing against something (a fingertip vs a palm will give different readings)

import time
from adafruit_crickit import crickit

# Capacitive touch graphing test
touches = (crickit.touch_1, crickit.touch_2, crickit.touch_3, crickit.touch_4)

# Open up the serial Plotter in Mu to see the values graphed!

while True:
    touch_raw_values = (crickit.touch_1.raw_value, crickit.touch_2.raw_value,
                        crickit.touch_3.raw_value, crickit.touch_4.raw_value)
    print(touch_raw_values)
    time.sleep(0.1)

You can connect any type of NeoPixels to the NeoPixel port on the Crickit for Circuit Playground Express. Be sure you connect the Power and Ground connections appropriately.


The center arrow terminal on Crickit NeoPixel block is connected to Din on the first NeoPixel or the beginning of a strip of NeoPixels.

Likewise the Crickit Feather WIng has the same NeoPixel block.


The board is just rotated a bit from the above picture, same location).

The Crickit HAT for Raspberry Pi has the NeoPixel block along the edge for easy wiring.

Using NeoPixels in your Crickit project is easy and fun, providing a dedicated port on the Crickit to directly wire NeoPixels easily.

The sample code for using NeoPixels on the Crickit vary slightly depending on which version of Crickit you have. Look for the appropriate section on this page for your combination of Crickit and microcontroller.

NeoPixels with Circuit Playground Express + Crickit

If you are looking to use the NeoPixels on the Circuit Playground Express board itself, Adafruit has several tutorials that program them with CircuitPython. See Make It Glow with Crickit for details.

The NeoPixel terminal block is controlled by the Circuit Playground Express pad A1. The pad A1 definition is obtained by import board. Then the NeoPixel routine is from import neopixel.

Various animations are provided by defined functions wheelcolor_chase and rainbow_cycle. Various solid colors are then defined, you are free to use whichever colors you wish.

You can define a new color variable as a Python tuple with three values for red, green, blue, for example WHITE = (255, 255, 255).

# SPDX-FileCopyrightText: 2018 Kattni Rembor for Adafruit Industries
#
# SPDX-License-Identifier: MIT

# Drive NeoPixels on the NeoPixels Block on Crickit for
#  Circuit Playground Express
import time
from rainbowio import colorwheel
import neopixel
import board

num_pixels = 30  # Number of pixels driven from Crickit NeoPixel terminal

# The following line sets up a NeoPixel strip on Crickit CPX pin A1
pixels = neopixel.NeoPixel(board.A1, num_pixels, brightness=0.3,
                           auto_write=False)


def color_chase(color, wait):
    for i in range(num_pixels):
        pixels[i] = color
        time.sleep(wait)
        pixels.show()
    time.sleep(0.5)


def rainbow_cycle(wait):
    for j in range(255):
        for i in range(num_pixels):
            rc_index = (i * 256 // num_pixels) + j
            pixels[i] = colorwheel(rc_index & 255)
        pixels.show()
        time.sleep(wait)

RED = (255, 0, 0)
YELLOW = (255, 150, 0)
GREEN = (0, 255, 0)
CYAN = (0, 255, 255)
BLUE = (0, 0, 255)
PURPLE = (180, 0, 255)

while True:
    print("fill")
    pixels.fill(RED)
    pixels.show()
    # Increase or decrease to change the speed of the solid color change.
    time.sleep(1)
    pixels.fill(GREEN)
    pixels.show()
    time.sleep(1)
    pixels.fill(BLUE)
    pixels.show()
    time.sleep(1)

    print("chase")
    color_chase(RED, 0.1)  # Increase the number to slow down the color chase
    color_chase(YELLOW, 0.1)
    color_chase(GREEN, 0.1)
    color_chase(CYAN, 0.1)
    color_chase(BLUE, 0.1)
    color_chase(PURPLE, 0.1)

    print("rainbow")
    rainbow_cycle(0)  # Increase the number to slow down the rainbow

NeoPixels and the Crickit FeatherWing or Crickit Hat

The NeoPixel block signal wire is connected to the Crickit Seesaw control chip pin #20. The following code sets up an external 30 NeoPixel strip connected to the Crickit FeatherWing or HAT

On Raspberry Pi, you'll also need to add the library: from your command line run the following command:

sudo pip3 install rpi_ws281x adafruit-circuitpython-neopixel

# SPDX-FileCopyrightText: 2018 Kattni Rembor for Adafruit Industries
#
# SPDX-License-Identifier: MIT

# Drive NeoPixels on the NeoPixels Block on Crickit FeatherWing
import time
from rainbowio import colorwheel
from adafruit_crickit import crickit
from adafruit_seesaw.neopixel import NeoPixel

num_pixels = 30  # Number of pixels driven from Crickit NeoPixel terminal

# The following line sets up a NeoPixel strip on Seesaw pin 20 for Feather
pixels = NeoPixel(crickit.seesaw, 20, num_pixels)

def color_chase(color, wait):
    for i in range(num_pixels):
        pixels[i] = color
        time.sleep(wait)
        pixels.show()
    time.sleep(0.5)

def rainbow_cycle(wait):
    for j in range(255):
        for i in range(num_pixels):
            rc_index = (i * 256 // num_pixels) + j
            pixels[i] = colorwheel(rc_index & 255)
        pixels.show()
        time.sleep(wait)

RED = (255, 0, 0)
YELLOW = (255, 150, 0)
GREEN = (0, 255, 0)
CYAN = (0, 255, 255)
BLUE = (0, 0, 255)
PURPLE = (180, 0, 255)

while True:
    print("fill")
    pixels.fill(RED)
    pixels.show()
    # Increase or decrease to change the speed of the solid color change.
    time.sleep(1)
    pixels.fill(GREEN)
    pixels.show()
    time.sleep(1)
    pixels.fill(BLUE)
    pixels.show()
    time.sleep(1)

    print("chase")
    color_chase(RED, 0.1)  # Increase the number to slow down the color chase
    color_chase(YELLOW, 0.1)
    color_chase(GREEN, 0.1)
    color_chase(CYAN, 0.1)
    color_chase(BLUE, 0.1)
    color_chase(PURPLE, 0.1)

    print("rainbow")
    rainbow_cycle(0)  # Increase the number to slow down the rainbow

Crickit for micro:bit

Currently the micro:bit is not supported in CircuitPython. The micro:bit is programmable in MicroPython but there is no Crickit drive support for MicroPython at present.

For More Information

See the tutorial Make It Glow with Crickit.

DC Gearbox Motors

These DC motors have a gear box already built in, and wires attached, so they're super easy to use:

DC Gearbox Motor - TT Motor with two long wires and yellow body
Perhaps you've been assembling a new robot friend, adding a computer for a brain and other fun personality touches. Now the time has come to let it leave the nest and fly on...
$2.95
In Stock

We also have a wide range of matching wheels:

Orange and Clear TT Motor Wheel for DC Gearbox Motor
Usually when one needs an orange wheel it's a garnish for a cocktail, like a tasty Sidecar. And speaking of cars, this wheel is for driving, not...
$1.50
In Stock
Thin White Wheel for TT DC Gearbox Motors
We're keepin' it wheel with this one! Plastic gear-box motors (also known as 'TT' motors) are an easy and low cost way to get your projects moving. But...
Out of Stock
Skinny Wheel for TT DC Gearbox Motors
Plastic gear-box motors (also known as 'TT' motors) are an easy and low cost way to get your projects moving. But we've noticed that there are not a lot of nice TT motor...
$2.50
In Stock

Other accessories are available, check the Adafruit shop for "TT Motor" items for the wide range of add-ons available.

Servo-style DC motor

If you need a motor that is very compact (but not very powerful) these DC-in-servo-body motors can do the job:

DC Motor in Micro Servo Body and 0.1" power cable
This tiny DC Motor in Micro Servo Body is an interesting motor - it's the same size and shape as our micro servo but it isn't a servo. It's...
$3.50
In Stock

Which can be used with this wheel:

Wheel for Micro Continuous Rotation FS90R Servo
We're keepin' it wheel with this one!Need a great drive solution for your little robotic friends? This black plastic Micro Continuos...
$2.50
In Stock

Non-Geared DC Motor

Non-geared DC motors are very weak but very fast: great for fans:

DC Toy Hobby Motor
These are standard '130 size' DC hobby motors. They come with a wider operating range than most toy motors: from 4.5 to 9VDC instead of 1.5-4.5V. This range makes them perfect...
$1.95
In Stock

This chassis is cute, red and has two DC motors so its super easy to drive from the Crickit's dual DC motor port. You may need to use some wires to extend the DC motor connections (they're a tad short)

Round two-wheeled robot turning around a few times and then driving off.
Unleash your inner Mad Max and make your vehicle dreams a reality with the Mini Red Round Robot Chassis...
$19.95
In Stock

This chassis is nearly identical, but has 3 layers, so you can FIT MORE STUFF!

Angled shot of three-layer round robot in black metal with Feather plus motor featherwing connected to motors.
Does this guy look familiar? Of course it does! It's our Black, 3-Layer Round Robot Chassis Kit from
$24.95
In Stock

This chassis is not as nice as the above, but if you fancy it, it comes with two servo-style DC motors and can use the DC motor control on the Crickit as well

Two-wheeled robot turning around a few times and then driving off.
Unleash your inner Mad Max and make your vehicle dreams a reality with the Mini Robot Rover...
$24.95
In Stock

You're in luck, you can use just about any kind of servo!

Note that many of the photos below don't show the additional motor horns, but every servo comes with plastic clip-on parts!

Servo Extensions

People often ask us what they can do if the wire to their Servo is to short for their project. Not a problem! These cables act as extension cords - now you've got plenty of room.

Three pin Servo Extension Cable - 30cm / 12" long.
Stretch out your servo connections with this flexible servo extension cord. It has a 3 pin shrouded "male" connection to plug your servo into and then, 30cm later, a 3 pin...
$1.95
In Stock
Three pin Servo Extension Cable - 50cm / 19.5" long.
Stretch out your servo connections with this flexible servo extension cord. It has a 3 pin shrouded "male" connection to plug your servo into and then, 50cm later, a 3 pin...
$2.50
In Stock

Popular plastic-gear servos

The most popular/common servos have plastic gears, they're plenty strong and not too expensive!

These can go back and forth, rotating about 180 degrees

They come in 'standard' size:

Standard hobby servo with three pin cable
This high-torque standard servo can rotate approximately 180 degrees (90 in each direction). You can use any servo code, hardware, or library to control these servos. Good for...
Out of Stock

And 'micro' size, not as strong but much more compact

Micro servo with three pin cable
Tiny little servo can rotate approximately 180 degrees (90 in each direction) and works just like the standard kinds you're used to but smaller. You can use any servo...
$5.95
In Stock

Continuous Rotation Servos

These servos look a lot like the above but they rotate all the way around. Unlike standard servos you can't control the location of the horn, just the speed and direction it which it turns. Good as an alternative to DC motors for wheeled bots. For that reason, they tend to get purchased with matching wheels!

Continuous Rotation Servo with three pin cable
This servo rotates fully forward or backward instead of moving to a position. You can use any servo code, hardware, or library to control these servos. Good for making simple moving...
$11.95
In Stock
Continuous Rotation Servo Wheel
Plastic wheel with a cutout specially designed to allow attachment to our larger continuous rotation servo. Makes it easy to get your...
$2.95
In Stock
Continuous Rotation Micro Servo spinning around
Need to make a tiny robot? This little micro servo rotates 360 degrees fully forward or backward, instead of moving to a single position. You can use any servo code, hardware,...
$7.50
In Stock
Wheel for Micro Continuous Rotation FS90R Servo
We're keepin' it wheel with this one!Need a great drive solution for your little robotic friends? This black plastic Micro Continuos...
$2.50
In Stock

High Torque Servos

If you need more power, metal-gear servos can give you better torque, but at additional cost (since the gears have to be machined)

These are not continuous rotation

Standard Size - High Torque - Metal Gear Servo  with three pin cable
This high-torque standard servo now comes in a metal-gear flavor, for extra-high torque (10 kg*cm!) and reliability! It can rotate at least 120 degrees (60 in each direction) with a...
$19.95
In Stock
High Powered, High Torque Metal Gear Micro Servo
Add even more power to your robot with this metal-geared servo. The tiny little servo can rotate approximately 180 degrees (~90 in each direction), and works just like the...
$11.95
In Stock
High Torque Metal Gear Micro Servo  with three pin cable
Add more power to your robot with this metal-geared MG90D servo. The tiny little servo can rotate approximately 90 degrees (45 in each direction) and works just like the standard...
$9.95
In Stock

The Class-D amplifier on the Crickit is pretty powerful, so you can make quite a bit of noise!

4Ω Speakers

You'll get a lot louder audio from 4Ω speakers.

We recommend this speaker, you'll  have to either poke wires into the connector, or cut it off and strip the wires to connect to the terminal block, but its nice and durable

Enclosed Speaker with JST cable
Listen up! This 2.8" x 1.2" speaker is a great addition to any audio project where you need 4 ohm impedance and 3W or less of power. We particularly like...
$3.95
In Stock

This speaker is less expensive but you'll need to solder wires to the back

Speaker - 3" Diameter - 4 Ohm 3 Watt
Listen up! This 3" diameter speaker cone is the perfect addition to any audio project where you need an 4 ohm impedance and 3W or less of power. We particularly like this cone as...
$1.95
In Stock

8Ω Speakers

8 ohm speakers won't be as loud, but that's OK!

This speaker is inexpensive, but you'll need to solder wires to the back

Speaker - 3" Diameter - 8 Ohm 1 Watt
Listen up! This 3" diameter speaker cone is the perfect addition to any audio project where you need an 8 ohm impedance and 1W or less of power. We particularly like this cone as...
$1.95
In Stock

The speakers below work just fine, but because the audio amp is pretty strong so you have to make sure not to damage the speakers by turning up the potentiometer on the Crickit to make the audio really loud.

If you're getting buzzy sounds from them, turn that little trimmer potentiometer down.

Mini Metal Speaker with Wires
Listen up! This tiny 1" diameter speaker cone is the perfect addition to any small audio project where you need an 8 Ω impedance and will be using 0.5W or less of power. We...
$1.95
In Stock
Thin Plastic Speaker with Wires
Listen up! This 1.5" diameter speaker cone is the perfect addition to any audio project where you need an 8Ω impedance and are using 0.25W of power. The speakers are rated...
$1.75
In Stock

Wall or Bone Transducers

You can also use surface transducers if you like; attach/bolt/clamp the transducer to a surface:

Medium Surface Transducer with Wires
Turn any surface/wall/table etc into a speaker with a surface transducer. This type of speaker does not have a moving cone like most speakers you've seen. Instead, a small metal...
Out of Stock
Small Bone Conductor Transducer with Wires
Drown out the voices in your head with a bone conduction transducer! This incredible speaker does not have a moving cone like most speakers you've seen, instead, a small metal rod...
$8.95
In Stock

Solenoids

Since the Crickit can only drive 5V power, you'll need to stick to this small 5V solenoid

Mini Push-Pull Solenoid wired to Trinket, activating back and forth
Solenoids are basically electromagnets: they are made of a coil of copper wire with an armature (a slug of metal) in the middle. When the coil is energized, the slug is pulled into the...
$4.95
In Stock

Vibration Motors

You'll need to extend these wires but they'll work great at 5V and buzz very strongly

Vibrating Mini Motor Disc with two wires
*BZZZZZZZZZZ* Feel that? That's your little buzzing motor, and for any haptic feedback project you'll want to pick up a few of them. These vibe motors are tiny discs,...
$1.95
In Stock

The capacitive touch pads on the Crickit have large holes so its easy to connect alligator/croc clips. That's how we recommend you attach to them. The "small" size clips work best:

Bundle of Small Alligator Clip Test Leads
Connect this to that without soldering using these handy mini alligator clip test leads. 15" cables with alligator clip on each end, color coded. You get 12 pieces in 6 colors....
$3.95
In Stock
Group of Small Alligator Clip to Male Jumper Wires
When working with unusual non-header-friendly surfaces, these handy cables will be your best friends! No longer will you have long, cumbersome strands of alligator clips. These...
$3.95
In Stock

You can also use copper foil tape. Note that if you get foil with conductive adhesive, you can tape the foil right onto the Crickit pads. Otherwise you'll need to use alligator clips to grab onto the copper.

Large roll of quarter-inch wide copper tape.
Copper tape can be an interesting addition to your toolbox. The tape itself is made of thin pure copper so its extremely flexible and can take on nearly any shape. You can easily...
$5.95
In Stock
Large roll of inch-wide copper tape.
Copper tape can be an interesting addition to your toolbox. The tape itself is made of thin pure copper so its extremely flexible and can take on nearly any shape. You can easily...
$19.95
In Stock

You can use other conductive materials like paints! Either drip the paint into the pad itself and let it harden, or use alligator clips to connect from one pad to a paper with conductive paint on it.

Bare Conductive Paint Pen
Bare Conductive Paint is a multipurpose electrically conductive material perfect for all of your DIY projects! Bare Paint is water based, nontoxic and dries at room temperature.
$12.50
In Stock
Hand drawing black ink on paper with brush
Bare Conductive Paint is a multipurpose electrically conductive material perfect for all of your DIY projects! Bare Paint is water based, nontoxic and dries at room temperature.
$34.95
In Stock

Remember: If you absolutely need more capacitive touch pins, Signal #1, #2, #3, #4 are four more capacitive touch inputs.

Speeding up many requests from Raspberry Pi to CRICKIT

If your project is making a large number of requests from your Raspberry Pi to CRICKIT, the speed of the I2C connection between boards may be an issue. Fortunately this can be changed.

For the best performance, you'll want to consider tweaking the I2C core to run at 1MHz. By default it may be 100KHz or 400KHz

To do this edit the config with sudo nano /boot/config.txt

and add to the end of the file

dtparam=i2c_baudrate=1000000

Brown Outs?

The power supply on the Crickit will let you draw 4 Amps at once, which is a lot. But perhaps you are turning on all the motors at once, causing the power supply to flicker? An extra large capacitor on the 5V and GND pads may help smooth out that power draw!

Use a large electrolytic capacitor, rated for 10V or higher. Even though the power supply is 5V, you may think you can use a 6.3V capacitor, but you want at least 2x the voltage rating if possible so stick to 10V!

4700uF 10v through hole  Electrolytic Capacitor
This Big Freaking Capacitor is just the trick when you have a lot of current sloshing around your project. They'll help smooth out voltage spikes by providing a little buffering....
$1.95
In Stock

Connect the capacitor using the NeoPixel terminal blocks. The 5V and GND lines are shared across the board so even if its a DC motor or servo causing the issues, this will help! It's just the most convenient place to attach a large capacitor because the two terminal blocks are nicely spaced.

Connect the capacitor using the NeoPixel terminal blocks. The 5V and GND lines are shared across the board so even if its a DC motor or servo causing the issues, this will help!


Connect the Positive (longer leg) to 5V and the Negative (shorter leg) to GND

Why did you misspell "Cricket"?

We wanted a unique name, inspired by the original Cricket robotics platform from MIT (which then became the PicoCricket), but not with the exact same name!

My code gives the following error in the REPL/Serial window:

The code from adafruit_crickit import crickit always throws

Traceback (most recent call last):
File "code.py", line 1, in
File "adafruit_crickit.py", line 66, in
MemoryError: memory allocation failed, allocating 152 bytes

CircuitPython will pull in libraries from /lib on the device before looking for any "baked in" ("Frozen" libraries) in the main CircuitPython code. If you are using, for example, the Circuit Playground Express + Crickit build of CircuitPython and you also have the adafruit_crickit and/or adafruit_seesaw libraries in /lib, CircuitPython will load the /lib version and still have the frozen version in memory. Your program will quickly run out of memory on the Circuit Playground Express.

The fix is fairly easy. Only put the libraries you need in the /lib folder of your CIRCUITPY drive. For Crickit, use the special Crickit builds of CircuitPython and be sure that the libraries adafruit_crickit and adafruit_seesaw are not in your /lib folder. You still have that functionality, but they are already loaded due to the special build.

Your Crickit is well tested but there's things that can trip you up! Here's a few common issues we see

My Crickit Is Doing Something Wrong

We do have bugs once in a while, so please always try updating to the latest Crickit seesaw firmware - then see if the bug persists

My Crickit Motors Aren't Moving!

My Crickit Keeps Resetting, It Works For a Bit... Then Fails!

Check the power supply. There's a few ways to know that power is good:

  1. Check the "Happy Face" green LED below the power switch, it should stay lit!
  2. Check the "Warning Symbol" red LED below the power switch, it should be off

If you have updated the Crickit seesaw firmware (see above) we have added NeoPixel feedback, the LED will be green when power is good and blink red when power is bad!

HELP! My Crickit isn't working in MakeCode, and in Python I see a message "No I2C Device at Address: 49"

A super common issue we see is people using the Crickit with Circuit Playground Express (CPX) and the bolts/screws have come loose! Those bolts aren't just mechanical, they pass signals back and forth between the CPX and the Crickit!

If you're having issue, first thing to check is that those screws are tightly attached!

Another common issue we see is not having good power to the Crickit. Check that you have fresh batteries or a good 5V power supply. Also check the Crickit is on! There's an on/off switch next to the power jack

Python: No Pullups found on SDL and SCL

This most often indicated the Crickit is not powered.

If you're running Crickit on battery power, you need fresh batteries.

If you use the wall power brick to provide power, ensure it is plugged in and the power switch is on.

If batteries aren't an issue, try clicking reset on the Crickit board to kick it back into running

micro:bit Crickit does not work

Be sure the micro:bit LED matrix faces towards the Crickit Seesaw chip and USB firmware update plug and the micro:bit reset button faces the Crickit black power jack. If you plug the micro:bit in backwards, it won't control things properly. Unplug the micro:bit, make sure the 5x5 grid of LEDs faces the Crickit printing that says "micro:bit LED grid faces this way" and you should be set.

This guide was first published on Dec 14, 2018. It was last updated on Nov 26, 2018.