It's easy to use the MAX9744 amplifier with Python and CircuitPython, and the Adafruit CircuitPython MAX9744 module. This module allows you to easily write Python code that controls the volume of the amplifier over its I2C connection.
You can use this sensor with any CircuitPython microcontroller board or with a computer that has GPIO and Python thanks to Adafruit_Blinka, our CircuitPython-for-Python compatibility library.
CircuitPython Microcontroller Wiring
First wire up a MAX9744 to your board exactly as shown on the previous pages for Arduino using an I2C connection. In addition just like the basic test page mentions be sure to also wire up a power supply, speakers, and audio input to the amplifier.
Here's an example of wiring a Feather M0 to the sensor with I2C:

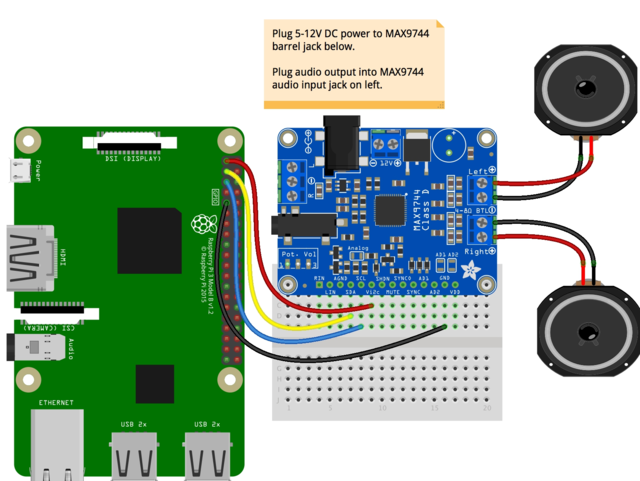
Python Computer Wiring
Since there's dozens of Linux computers/boards you can use we will show wiring for Raspberry Pi. For other platforms, please visit the guide for CircuitPython on Linux to see whether your platform is supported.
In addition to wiring the sensor to your computer, just like the basic test page mentions, be sure to also wire up a power supply, speakers, and audio input to the amplifier.
Here's the Raspberry Pi wired with I2C:
CircuitPython Installation of MAX9744 Library
Next you'll need to install the Adafruit CircuitPython MAX9744 library on your CircuitPython board.
First make sure you are running the latest version of Adafruit CircuitPython for your board.
Next you'll need to install the necessary libraries to use the hardware--carefully follow the steps to find and install these libraries from Adafruit's CircuitPython library bundle. Our introduction guide has a great page on how to install the library bundle for both express and non-express boards.
Remember for non-express boards like the, you'll need to manually install the necessary libraries from the bundle:
- adafruit_max9744.mpy
Before continuing make sure your board's lib folder or root filesystem has the adafruit_max9744.mpy file copied over.
Next connect to the board's serial REPL so you are at the CircuitPython >>> prompt.
Python Installation of MAX9744 Library
You'll need to install the Adafruit_Blinka library that provides the CircuitPython support in Python. This may also require enabling I2C on your platform and verifying you are running Python 3. Since each platform is a little different, and Linux changes often, please visit the CircuitPython on Linux guide to get your computer ready!
Once that's done, from your command line run the following command:
sudo pip3 install adafruit-circuitpython-max9744
If your default Python is version 3 you may need to run 'pip' instead. Just make sure you aren't trying to use CircuitPython on Python 2.x, it isn't supported!
CircuitPython & Python Usage
To demonstrate the usage of the amplifier we'll initialize it and control the volume from the board's Python REPL. Run the following code to import the necessary modules and initialize the I2C connection with the amplifier:
import board
import busio
import adafruit_max9744
i2c = busio.I2C(board.SCL, board.SDA)
amp = adafruit_max9744.MAX9744(i2c)
Make sure some audio is playing through the amplifier, then you can control the volume using a few commands.
The first option is to set the volume property to an explicit value. This can be any number from 0 to 63 where 0 is off/muted and 63 is maximum intensity (be careful, this amplifier can produce 20 watts of output which might damage small speakers!)
For example to set a moderate half-way to max volume:
amp.volume = 31
Or to mute/turn off the output:
amp.volume = 0
In addition you can call the volume_up and volume_down functions to tell the amp to move up or down a single volume level. This might be handy if your project only has an up/down volume control.
For example to move up 2 levels and then back down 1 level:
amp.volume_up()
amp.volume_up()
amp.volume_down()
Again be careful to not increase the volume to such a high level that it damages your speakers!
That's all there is to using the MAX9744 amplifier with CircuitPython!
Below is a complete example of setting the volume of the amplifier. Save this as code.py on the board and it will set the volume to a moderate/half-way level.
# SPDX-FileCopyrightText: 2018 Tony DiCola for Adafruit Industries
# SPDX-License-Identifier: MIT

# Simple demo of the MAX9744 20W class D amplifier I2C control.
# This show how to set the volume of the amplifier.
import board
import busio

import adafruit_max9744


# Initialize I2C bus.
i2c = busio.I2C(board.SCL, board.SDA)

# Initialize amplifier.
amp = adafruit_max9744.MAX9744(i2c)
# Optionally you can specify a different addres if you override the AD1, AD2
# pins to change the address.
# amp = adafruit_max9744.MAX9744(i2c, address=0x49)

# Setting the volume is as easy as writing to the volume property (note
# you cannot read the property so keep track of volume in your own code if
# you need it).
amp.volume = 31  # Volume is a value from 0 to 63 where 0 is muted/off and
# 63 is maximum volume.

# In addition you can call a function to instruct the amp to move up or down
# a single volume level.  This is handy if you just have up/down buttons in
# your project for volume:
amp.volume_up()  # Increase volume by one level.

amp.volume_down()  # Decrease volume by one level.


