With the circuit fully assembled, you're ready for some code.
First, if you haven't programmed your Gemma before, you'll need to get the IDE up and running. Check out the introductory guide, particularly the sections on drivers and IDE setup:
or
Once you've got the IDE configured, make sure you've got the Adafruit NeoPixel library installed. There's a full guide here:
You should be able to install this using the LIbrary Manager in the IDE - just do Sketch -> Include Library -> Manage Libraries...

Select "All" in the Type dropdown, and search for "neopixel", then click the row and you should get an "Install" button.
Again, if you're having trouble here, refer to the full NeoPixel guide.
Next, copy and paste the following code in a new sketch:
// SPDX-FileCopyrightText: 2017 Phillip Burgess for Adafruit Industries
//
// SPDX-License-Identifier: MIT
#include <Adafruit_NeoPixel.h>
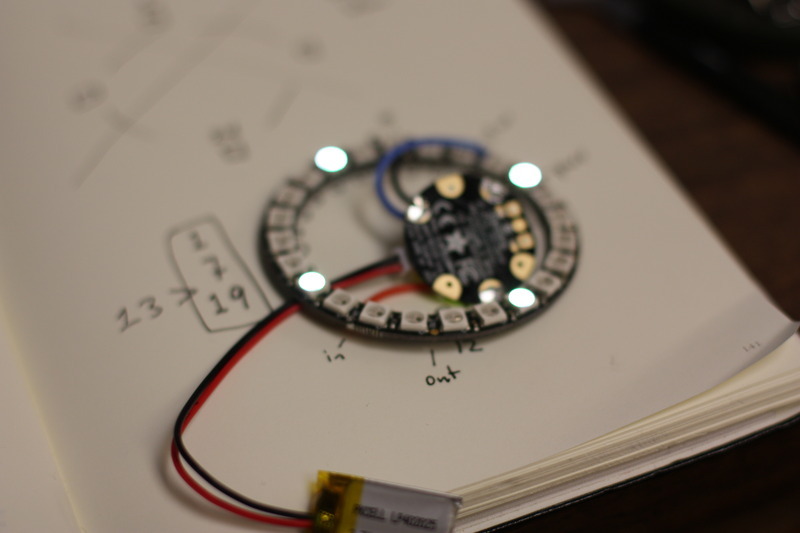
#define NUM_LEDS 24 // 24 LED NeoPixel ring
#define NEOPIXEL_PIN 0 // Pin D0 on Gemma
#define VIBRATION_PIN 1 // Pin D1 on Gemma
#define ANALOG_RANDOMNESS_PIN A1 // Not connected to anything
#define DEFAULT_FRAME_LEN 60
#define MAX_FRAME_LEN 255
#define MIN_FRAME_LEN 5
#define COOLDOWN_AT 2000
#define DIM_AT 2500
#define BRIGHTNESS_HIGH 128
#define BRIGHTNESS_LOW 32
Adafruit_NeoPixel pixels = Adafruit_NeoPixel(NUM_LEDS, NEOPIXEL_PIN);
uint32_t color = pixels.Color(0, 120, 30);
uint8_t offset = 0;
uint8_t frame_len = DEFAULT_FRAME_LEN;
uint32_t last_vibration = 0;
uint32_t last_frame = 0;
void setup() {
// Random number generator is seeded from an unused 'floating'
// analog input - this helps ensure the random color choices
// aren't always the same order.
randomSeed(analogRead(ANALOG_RANDOMNESS_PIN));
// Enable pullup on vibration switch pin. When the switch
// is activated, it's pulled to ground (LOW).
pinMode(VIBRATION_PIN, INPUT_PULLUP);
pixels.begin();
}
void loop() {
uint32_t t;
// Compare millis() against lastFrame time to keep frame-to-frame
// animation timing consistent. Use this idle time to check the
// vibration switch for activity.
while(((t = millis()) - last_frame) <= frame_len) {
if(!digitalRead(VIBRATION_PIN)) { // Vibration sensor activated?
color = pixels.Color( // Pick a random RGB color
random(256), // red
random(256), // green
random(256) // blue
);
frame_len = DEFAULT_FRAME_LEN; // Reset frame timing to default
last_vibration = t; // Save last vibration time
}
}
// Stretch out frames if nothing has happened in a couple of seconds:
if((t - last_vibration) > COOLDOWN_AT) {
if(++frame_len > MAX_FRAME_LEN) frame_len = MIN_FRAME_LEN;
}
// If we haven't registered a vibration in DIM_AT ms, go dim:
if((t - last_vibration) > DIM_AT) {
pixels.setBrightness(BRIGHTNESS_LOW);
} else {
pixels.setBrightness(BRIGHTNESS_HIGH);
}
// Erase previous pixels and light new ones:
pixels.clear();
for(int i=0; i<NUM_LEDS; i += 6) {
pixels.setPixelColor((offset + i) % NUM_LEDS, color);
}
pixels.show();
// Increase pixel offset until it hits 6, then roll back to 0:
if(++offset == 6) offset = 0;
last_frame = t;
}
From the Tools→Board menu, select the device you are using:
- Adafruit Gemma M0
- Adafruit Gemma 8 MHz
- Connect the USB cable between the computer and your device. The original Gemma (8 MHz) need the reset button pressed on the board, then click the upload button (right arrow icon) in the Arduino IDE. You do not need to press the reset on the newer Gemma M0 or Trinket M0.
If all went well, the NeoPixel ring will start a rotating pattern with 4 LEDs lit at once, and tapping the vibration sensor will change the colors.
Once the sketch is running, it's probably a good idea to connect a charged LiPo to the Gemma and disconnect the USB cable to make sure the whole thing runs on battery power.


