
How to make a hand
We started by tracing our hand on paper using a pencil to get the actual size. Instead of scanning the drawing, we simply took a photo with our phone. We can import the photo into a drawing app like Photoshop or Illustrator to trace the hand. We'll use vector paths to create the outline - this will allow us to import it into CAD software to create an 3D extrude.
Scaling Paths
Once we had our hand traced out with vector paths, we needed to scale them to closely match the dimensions of our actual hand.
When scaling paths in Illustrator or Photoshop, avoid using millimeters as the units of measurements. This causes unexpected scaling issues - ie. parts set to 10mm x 10mm won't actually be 10 x 10, instead it gets 28.35 x 28.35mm.
Set up Illustrator to use pixles. 1 pixel = 1mm inside most CAD programs.
For more information on scaling issues, check out our Layer by Layer tutorial on YouTube.
Tracing your hand
Make sure your hand can actually fit on your 3D printers bed!
You'll want to lay your hand flat with your thumb resting aligned with your index finger. Don't spread your fingers out too much, otherwise your hand might not fit on your print bed.
Draw conductive traces
Measure the distance between the two soldering pads on the Sequin LEDs - we'll use this value to draw our conductive pads.
Draw the traces using single vector lines using the pen tool in Photoshop or Illustrator. Next, draw out the ground and power traces for each finger.

Stroke width
In Photoshop or Illustrator, you can apply a stroke thickness to single vector paths. We suggest making the traces at least 5px thick to ensure good conductivity along the trace.

Outline Stroke
Once you have your traces drawn out with single vector paths and in the spot you'd like, we need to create "outlines" of the single paths so they're extrudable. We can lock-in the stroke thickness by outline the strokes. In Illustratrator, that option is under:
Object > Path > Outline Stroke
Now we can use the "save as" option to save the paths out as as .SVG files - One for just the traces, and a second for just the hand outline. Now we can import them into our CAD program.

Extrude paths
Import the SVG files into your preferred CAD software. Extrude the hand outline and traces. The main hand body can be 1.5 mm thick while the traces are 1mm thick.
To avoid shorting the traces, you can insulate them by moving .25 mm off the ground, that way are sandwiched in-between the Ninjaflex printed hand.
Coin Cell Battery Holder
To power this project, we're using a coin cell battery. You can measure the diameter of the coin cell you plan to use. The holder can be a simple cylinder with a cavity for fitting the coin cell. You should run a print test of just the battery holder to ensure it has good tolerances. For getting a snap fit, try offseting the inner diameter of the holder by ~0.2mm.

Strap Tabs
To attach the Ninjaflex hand to your meaty one, we can add tabs to each finger for straps. These little tabs on the side of each finger has little slots. We can use them to attach the straps or rubber bands. The straps themselves can also be 3D printed in Ninjaflex.

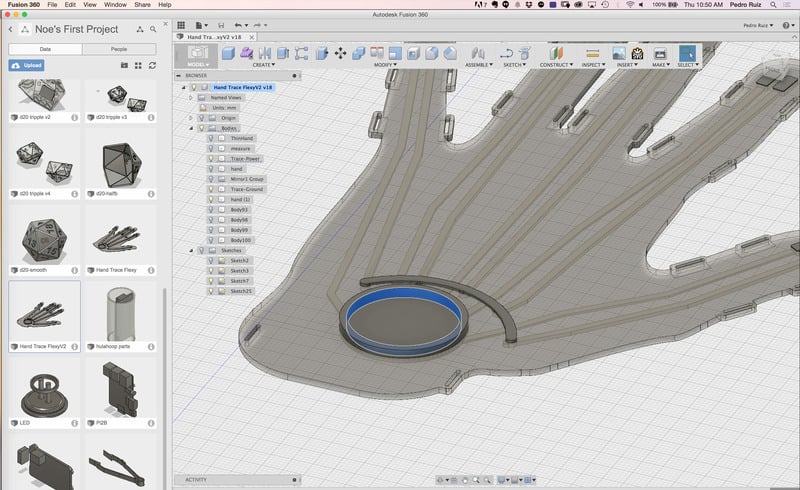
Connecting Traces
To connect the LED's in parallel, we'll need to bridge a set of traces together. In this project, we briged all the traces on the right using a curved trace, highlighted above. This curved trace actually sits above the left set of traces. Ninjaflex material will be layered on top, insulating it from the other traces.

Traces in Z
Since the left and right (power and ground) traces are in the same z-height, we used a series of cylinders with a height of .4mm to bridge the right(ground) traces to the top of the curved traces. No need to worry about overhangs because Ninjaflex material will be inbetween!

Subtract traces from hand
To make a proper tool path for dual printing, we'll have to subtract the traces away from the hand solid. This will allow one of the extruders to print the hand, while the other extruder can print the traces.


