One of the first things that you will want to do is to get your Raspberry Pi connected up to the Internet.
In this lesson, you will learn how to:
-
Connect using an Ethernet cable
-
Connect using WiFi
-
Find out the IP address of your Raspberry Pi

One of the first things that you will want to do is to get your Raspberry Pi connected up to the Internet.
In this lesson, you will learn how to:
Connect using an Ethernet cable
Connect using WiFi
Find out the IP address of your Raspberry Pi
The quickest way to get your Raspberry Pi connected is to use an Ethernet patch cable and just plug it into the back of your home network router.

As soon as you plug your Pi in, you should see the network LEDs start to flicker.

For most home networks, you should also be able to connect to the Internet without any further configuration. For this to work, your router should be configured for DHCP (Dynamic Host Configuration Protocol). This service runs on your home network router, dishing out IP addresses to any device that connects to it either through WiFi or by cable.
If DHCP is not turned on, on your home network router, then connect to its management console using a different computer that is already connected.
You should be able to find a setting somewhere that turns it on.

Beginning in 2016 Raspberry Pi v3 Model B starting shipping with built-in WiFi. Today the A+, B, B+ and Zero W all include built-in WiFi. Earlier versions will require an external adapter to connect over WiFi.
Look for a WiFi adapter that supports the RTL8192cu chipset the latest Raspbian distributions both have support for this built-in. We have found its much faster than the Ralink chipsets
If you already have a WiFi adapter, just give it a go, even a lot of the very low cost budget adapters will work without any trouble.

WiFi does however use quite a lot of power, so check the power rating of your power supply. Some WiFi adapters require an external power supply to work well. We suggest the 5V 2A power adapter in our shop if this is the case. All of the WiFi adapters we have in the Adafruit shop will work just fine this way.
If you have a WiFi adapter plugged taking up a port and drawing power you may also need a powered USB hub.
raspi-config is the Raspberry Pi configuration tool that makes network configuration, remote access (eg. ssh / vnc), location settings and boot options a snap. This tool can be run from the command line and provides a simple interface that is easy to navigate with arrow keys. We highly recommend using this method over the GUI or manual command line file editing due to the flexibility of being able to run it remotely or in a console.
When you first boot your newly configured Pi it will either drop you into a console or into a graphical environment. In either case we will run the following command. The GUI boot up will require us to launch a terminal.

sudo raspi-config


We could just reboot and see if the WiFi automatically comes up. The following wpa_cli command will bring up the WiFi interface on-line without requiring a reboot.
If you have a modern Raspberry Pi and are using an external adapter it is likely that your WiFi device will be named wlan1.
sudo wpa_cli -i wlan0 reconfigure

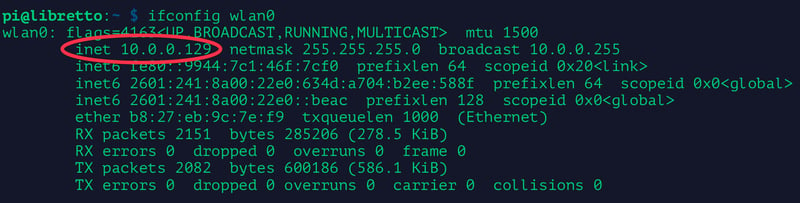
If everything worked properly we will see the IP address of our device after the "inet " argument. We are now on-line. If this does not work try repeating the steps above in raspi-config and entering the WiFi access point name (SSID) and password again.
ifconfig wlan0
To configure Wifi you will need to edit the file /etc/wpa_supplicant/wpa_supplicant.conf. There are two ways to do this as described below. Use whichever is most convenient for your setup and situation.
With either approach, you'll want the contents of the file to be what is shown below. Replace YOURSSID and YOURPASSWORD with whatever is used for your network setup.
ctrl_interface=DIR=/var/run/wpa_supplicant GROUP=netdev
update_config=1
country=US

network={
    ssid="YOURSSID"
    psk="YOURPASSWORD"
    scan_ssid=1
}
This approach will allow you to configure Wifi by creating and editing the file directly on the SD card in another PC. The /boot partition is FAT formatted which is readable by most PC's. So you can simply insert the SD card in a USB reader and a boot folder should show up.
If you create a wpa_supplicant.conf file in /boot, it will be copied to the main partition's /etc/wpa_supplicant location at boot time,replacing whatever is there. It will then be deleted from /boot, so you won't see it there if you go looking.
So just use whatever text editor (not word processor) you want on your PC to create the file in /boot, like this:

Save the file and safely remove the SD card from your PC. Put it in the Raspberry Pi and power it up. If all goes well, it should copy the file over and connect to your Wifi.
This is the more direct approach - you edit the file directly on the Raspberry Pi. This approach works good if you are already connected to the Raspberry Pi via a console cable or monitor.
Since this file requires elevated privileges to access, you'll need to open it with sudo.

Then add the contents. Don't forget to actually change YOURSSID and YOURPASSWORD.

Press CTRL-X and then Y to save and and exit. Then run the following command to have the file read and try to connect to your Wifi.
sudo wpa_cli -i wlan0 reconfigure

If you have X running, open the Chromium web browser (globe icon) and navigate to the URL of your favourite electronics supplier.
ping adafruit.com

If you find your external WiFi adapter kernel module 'drops out' from time to time, you can fix it fairly easily with a command line fix (thanks perseus286!)
Create and edit a new file in /etc/modprobe.d/8192cu.conf
sudo nano /etc/modprobe.d/8192cu.conf
and paste the following in
# Disable power saving
options 8192cu rtw_power_mgnt=0 rtw_enusbss=1 rtw_ips_mode=1
Then reboot with sudo reboot
This guide was first published on Dec 10, 2012. It was last updated on Mar 08, 2024.


